



Microsoft Viva was launched on February 4, 2021, and has been constantly evolving ever since. In this article, I discuss configuration of the first 4 Viva apps (Connections, Insights, Learning, and Topics) from a Microsoft 365 admin’s perspective. Since that time, Microsoft has launched more: Engage and Sales, which I’ll cover below. The newest Viva family members – Viva Glint, Viva Pulse and Viva Amplify – will have to wait for their turn.
Microsoft Viva explained… once again
Viva is a set of modules (apps, add-ins) available in Microsoft 365 that you can install and use within different Microsoft apps such as Outlook, Teams, or SharePoint. The general purpose of Viva is to improve employee experience, strengthen employee engagement, and boost productivity in the age of hybrid work culture. Refer to the bullet points below to learn what the 3 new Viva modules can do:
- Viva Engage – a Facebook-style feed (a Storyline) browsable through Microsoft Teams where your users can socialize and strengthen relationships by posting announcements, commenting, asking questions, sharing stories, forming communities, etc. Learn more in Microsoft’s documentation
- Viva Sales – initially an Outlook and Teams add-on, Viva Sales became a part of Copilot for Sales. It uses contextual information and AI to automatically generate and suggest best responses to customers and create automated sales meetings summaries. What’s more, Copilot for Sales can automatically update a customer relationship management (CRM) system with the data from these interactions. Learn more in Microsoft’s documentation
Licensing and prices for Microsoft Viva
Just like with the first 4 Viva apps, licensing varies from app to app. To get the most out of Microsoft Viva, you need to pay extra in addition to your Microsoft 365 license. Only non-premium features of Viva Engage are available with no additional payment. For details, refer to the table below:
| Viva app | License required | Cost per user* |
|---|---|---|
| Viva Engage | Microsoft 365 E3, E5, and F3 plans. Learn more + Microsoft Viva Suite license to access all features | Free (premium features available in the Microsoft Viva Suite offering and Microsoft Viva Employee Communications and Communities bundle) |
| Viva Sales (Copilot for Sales) | Microsoft E3/E5 + Dynamics 365 Sales or Salesforce Sales Cloud | $50/user/month |
*Costs were taken from Microsoft’s website at the time of writing. There is no guarantee the cost or requirements will stay the same later on. It’s a good idea to double-check pricing pages before buying Viva licenses.
The prices above apply to the annual subscription. Microsoft Viva Suite, which includes all Viva modules, costs $12.00/user/month. Viva Sales used to require a separate license ($40.00/user/month), but as it became a part of Copilot for Sales, it’s now included in that package at $50/user/month.
To learn more about Viva pricing, visit this website.
How to configure Microsoft Viva
Like in the first article, I’m going to focus on configuring Microsoft Viva apps from a Microsoft 365 administrator perspective. The guides below presume you have already purchased a given Viva offering. To complete all the configurations, the Global Administrator role is required. Still, you can delegate administration in case of each app – read on for details.
Viva Engage
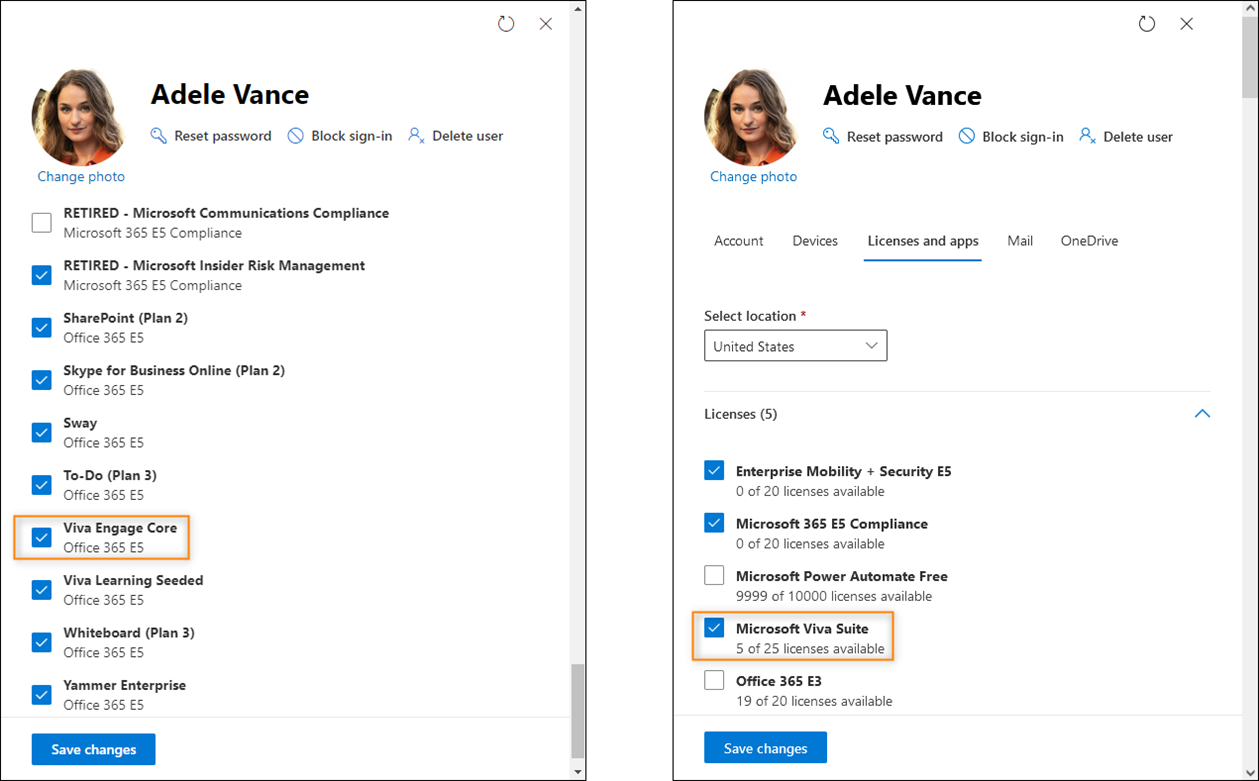
Depending on which Viva Engage features you want to use in your organization, you can choose the Core version which is bundled with your Microsoft 365 Enterprise/Frontline (F3) license or additionally buy the full version (standalone or within the Microsoft Viva Suite offering). To assign a license to a user, sign in to the Microsoft 365 admin center, go to Users > Active users, select a user, and click the Licenses and apps tab. For a Viva Engage Core license, select the checkbox next to Viva Engage Core in the Apps section (the left-hand image below). For a complete Viva Engage experience license, select the checkbox next to Microsoft Viva Suite (or Viva Engage) in the Licenses section (the right-hand image below). Finally, click Save changes.
Staying in the Microsoft 365 admin center, go to Setup in the left-hand navigation menu, click the Microsoft Viva tile, and select Viva Engage – you’ll see the following three options on the list:
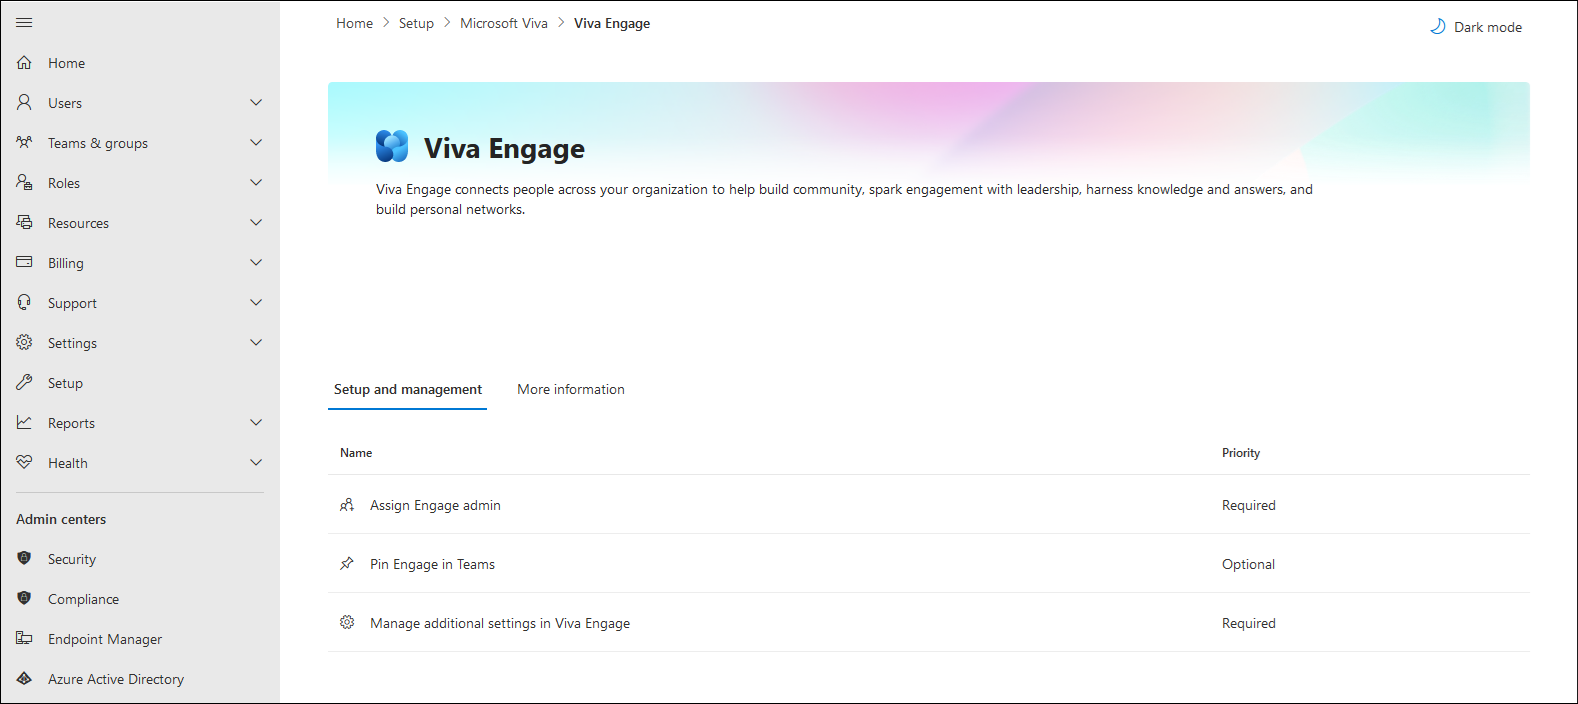
Using the first one, you, as the Global Administrator, can delegate all the Viva Engage-related tasks to somebody else, appointing that person an Engage Administrator. At the same time, you can control Viva Engage permissions in a much more granular way – for details refer to this article.
Clicking the second option, Pin Engage in Teams, you’ll get detailed instructions on how to add the Viva Engage app to your users’ Microsoft Teams.
Skip the third option (Manage additional settings in Viva Engage) for now and open your Microsoft Teams app – here I assume that you have already pinned the Viva Engage app (using the second option above) and you can access it by clicking its icon on the left.
Viva Engage communities
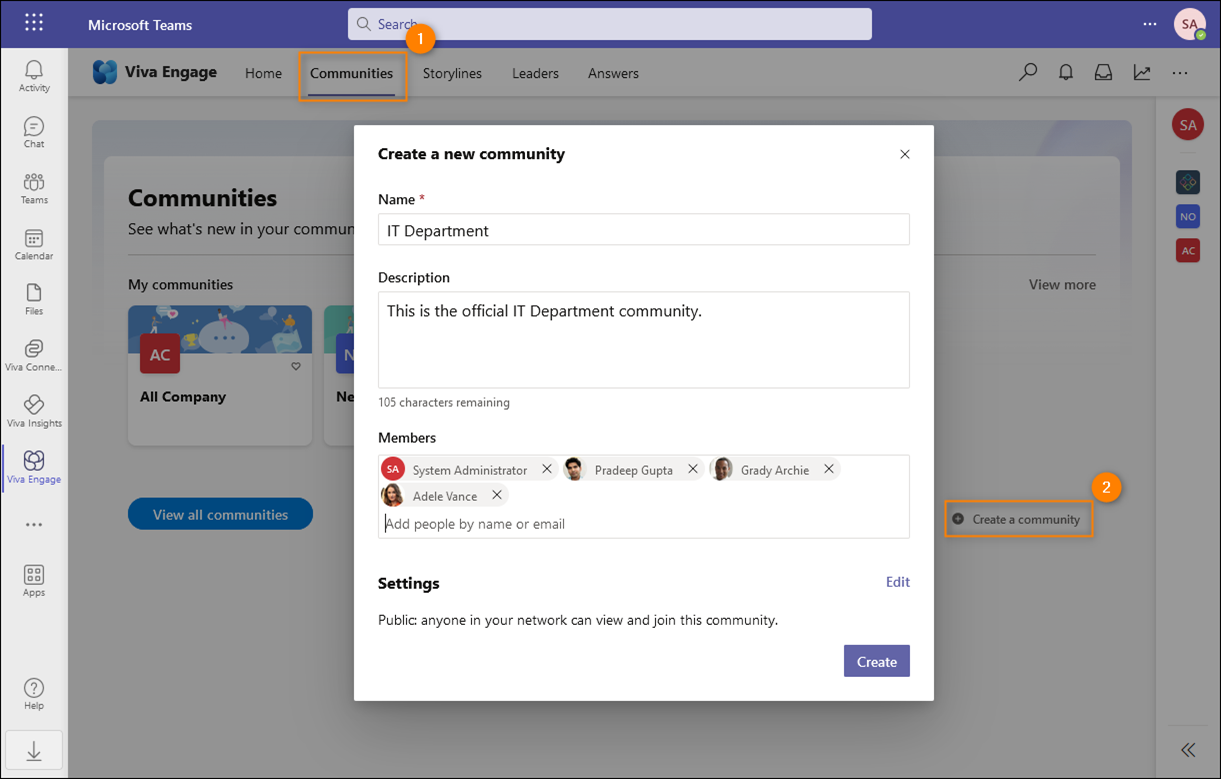
Any interactions in Viva Engage are based on communities. A community is a group of users organized by topic or interest who can interact with one another. You can, for example, create communities corresponding to departments. To do it, click the Communities tab and Create a community. In the pop-up that opens, fill in the necessary information, choose members, decide if your community should be public or private, and finally click Create. The members will receive email notifications about joining the community.
Viva Engage admin center
Next, let’s explore the Viva Engage admin center for more settings and customizations. The admin center is available in Microsoft Teams for admin user(s) only and can be accessed from the Viva Engage app by clicking the ellipsis (three dots) icon in the top right corner of the screen and choosing Admin.
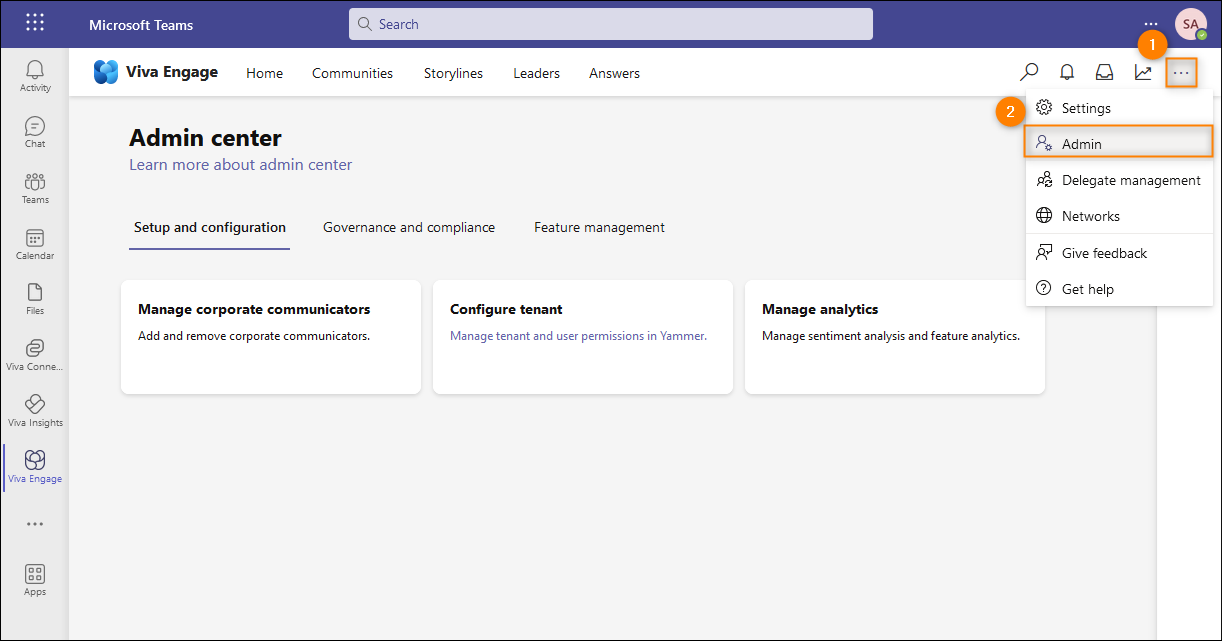
There are three main tabs to organize settings. The number of tiles displayed after clicking each tab depends on your Viva Engage license.
The Setup and configuration tab lets you configure the following settings:
- Manage corporate communicators – here you can add people from your organization who will be able to manage campaigns in Viva Engage. Social campaigns are hashtag-based initiatives with a separate landing page aimed at engaging employees through discussion. Once a campaign is finished, you can get all the analytics regarding user comments, reactions, posts, etc.
- Configure tenant – lets you configure basic settings for your tenant like name and logo, language, etc. To see more configuration options, click a link below those basic settings to go to the Engage (Yammer) admin center where you can manage your Engage social network, network users, as well as apply content and security controls. Most of the settings are self-explanatory. For example, you can prepare and publish a usage policy, remove a user together with their content to execute a GDPR request, or allow users to report conversations.
- Manage analytics – lets you decide which analytical data should be collected for content published in Viva Engage.
Using the Governance and compliance tab, you can export Viva Engage data and remove users.
The Feature management tab’s name speaks for itself. Depending on your license, you can enable and set up features available in Viva Engage:
- Answers – with this feature, people in your organization can easily ask questions, answer them, and search for questions of their interest.
- Leadership identification and audiences and Leadership corner – you can add company leaders, define their audience, and enable a place (a corner) for them to share their thoughts and insights with others.
- Campaigns – here you can manage campaigns, defining their name, hashtag, description, type, and theme color.
- Storyline – here you can enable the basic Viva Engage functionality, which is a Facebook-like newsfeed called storyline, enable stories, configure notifications for storyline posts or opt in for features that are in preview.
- Rewards and recognition – this setting lets you enable and customize badges that are awarded to users in recognition for asking and answering questions (the Answers feature).
Once you’ve set up everything as intended, you can inform your end users about the Viva Engage app’s availability in Teams and encourage them to start publishing on their storylines. Apart from publishing Storyline posts, they will be able to use various features, depending on your configuration (Rewards, Answers, Leadership corner, etc.) and permissions you assigned (e.g. Campaigns).
Viva Sales
Viva Sales is currently part of Microsoft Sales Copilot (announcement). To learn more about Copilot for Sales, refer to its page. Viva Sales is no longer available as a standalone product.
Other ways to enhance your employee experience
While Microsoft Viva can improve your employees’ experience and engage them in many ways, there’s still much room for improvement in terms of making your employees’ lives easier.
Regardless of organization, email communication is an important part of daily duties. So why not simplify it? Discover CodeTwo Email Signatures 365, world’s #1 Microsoft 365 email signature management software that brings the following advantages to you and your employees:
- Easy & centralized administration of email signatures, legal disclaimers, automatic replies, and marketing campaigns that can be delegated to user(s) of your choice.
- Unified & branded appearance of each message sent by your organization (users), from any email client & device.
- Automated signature adding or auto-reply sending per organization, group, team, user, etc. thanks to configurable sending conditions.
- Conditional placeholders to modify signature, disclaimer, or auto reply design on the fly.
- And many more.
If you’re interested in further enhancing your and your employees’ experience, sign up for a free 14-day trial and test all the features of CodeTwo Email Signatures 365 without any limits.
Further reading
Microsoft Viva is already in the cloud.microsoft namespace, see what’s going there next
Recommended articles


CodeTwo sp. z o.o. sp. k. is a controller of your personal data.
See our Privacy Policy to learn more.