


The Exchange Online PowerShell V3 module has been the default and recommended option for connecting to and managing Exchange Online for years now, replacing the Remote PowerShell (RPS) protocol deprecated in 2023.
Learn how to install the V3 module or update to it (if, for example, you find a device that has not been updated for quite some time).
Install Exchange Online PowerShell V3 module
Installing the Exchange Online PowerShell V3 module is the same as installing any previous one. At the time of updating this article, the newest GA version of the Exchange Online PowerShell V3 module is 3.10.1, published on July 24, 2026, so I’ll focus on this version.
Prerequisites
- Minimum Windows PowerShell version: 7.6.0 or later (.NET Framework 10.0 dependent) or 5.1 (.NET Framework 4.7.2 dependent)
- Minimum Windows Version: Windows 8.1, when using Windows PowerShell 5.1.
- Minimum macOS version: macOS 14 Sonoma or later. On older OS versions, you can use previous Exchange Online PowerShell module versions.
- Minimum Linux version: Ubuntu 22.04 LTS
- Execution policy: RemoteSigned or less restrictive.
- Exchange Online administrative role for actually connecting and performing any actions in your organization.
- Local administrator access.
Module installation
Installation process requires you to open your PowerShell console as an administrator and run two cmdlets:
Install-Module -Name ExchangeOnlineManagement

Import-Module ExchangeOnlineManagement
After that, you use Connect-ExchangeOnline and sign in to gain access to your organization’s Exchange Online and perform any actions.
Alternatively, you can install the module manually from PowerShell gallery. That’s also where you can check previous available modules and see what’s changed in release notes.
Update Exchange Online PowerShell module
Currently, the Exchange Online PowerShell module V3 is needed to manage Exchange Online with PowerShell. Remote PowerShell (RPS) is blocked and previous modules will not allow you to connect to Exchange Online.To switch from an earlier version of the module, this official guide from Microsoft recommends you uninstall it and then install the new one. I’m sure there is a valid reason to push admins down this path, but I find it easier to simply update the old module.
So, to update the Exchange Online PowerShell module, simply run your Exchange Online PowerShell console with admin permissions and use the following cmdlet:
Update-Module -Name ExchangeOnlineManagement
Once you agree to everything, the new and shiny V3 module should install in a moment.
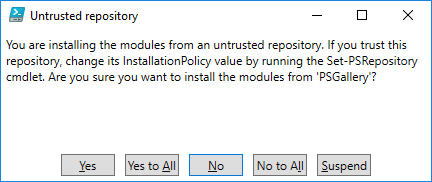
The only side-effect of this method that I’ve seen was a double IntelliSense suggestion for e.g. Connect-ExchangeOnline. The side effect prevailed for about 5 minutes after restarting the Windows PowerShell ISE, so I wouldn’t exactly call it troublesome.
If, for some reason, you’re unable to run an update this way, you can uninstall the old module with:
Uninstall-Module ExchangeOnlineManagement
and install a new one from the PowerShell gallery.
How to connect to Exchange Online with PowerShell
In short, you need to use Connect-ExchangeOnline and stop using New-PSSession for Exchange Online connections. That’s old news, though. I’ve recommended switching to the new method long ago in How to connect to Exchange Online with PowerShell.
The new method supports MFA, is more secure and, most importantly, it works.
About Exchange Online PowerShell V3 module
You might ask how the V3 module is better than the earlier versions. It’s quite simple, and the change can be summed up with one keyword: security.
Before V3 was launched, the Remote PowerShell (RPS) protocol used in New-PSSession or with the -UseRPSSession switch had required Basic authentication in WinRM on the client computer. You don’t want to have anything to do with basic authentication, so the introduction of the V3 module was a quite welcome change.
Another thing is that V3 (like the V2 module) is backed by the REST API, which should improve its security, performance and reliability compared to earlier modules and protocols.
According to this Microsoft’s website, the new, REST API-powered cmdlets have the same names and work just like their legacy equivalents. Theoretically then, there’s no need to update any scripts after you change the way you connect to PowerShell. However, if you come across any problems, or have any concerns, Microsoft provides a dedicated email address to hear them: [email protected].
When to update
The answer is: years ago. Below, I’m summing up the RPS deprecation timeline, which evolved in the meantime, but it doesn’t change the fact that the end has come for RPS and the old module should not lurk anywhere inside your organization.
Here is the initial Microsoft announcement about the RPS deprecation (and later changes to the timeline). Below, you’ll find a summary of what happened when:
- April 1, 2023 – new tenants had RPS blocked by default. It could be re-enabled until June 15, 2023.
- May 2023 – RPS got disabled for tenants which never used it and hadn’t used the diagnostic tool to prolong its life.
- June 15, 2023 – that’s when RPS started getting blocked even if it had been used in your tenant. And if the tenant was created after April 1, 2023, that’s when your opportunity to re-enable RPS ended.
- July 1, 2023 – all new tenants had RPS blocked without a way to re-enable it.
- October 2023 – final end of the line for RPS. It’s when Microsoft started blocking it for every tenant.
Currently, if you want to make any PowerShell operations in Exchange Online, using the V3 module is a must. There was a lot of time to upgrade and multiple announcements that the new module needed to be installed soon.
Do keep in mind that the newer module has been updated numerous times and since July 2026, the newest GA version is 3.10.1. It’s best to keep your modules up to date to benefit from the newest bug fixes and better functionality.
See also
How to connect to Microsoft 365 with Microsoft Graph PowerShell
Recommended articles



CodeTwo sp. z o.o. sp. k. is a controller of your personal data.
See our Privacy Policy to learn more.