
In MS Word and also other text editors, it is common practice to treat the Enter key as a new paragraph and the Shift + Enter keys combination as a new line of text. In Outlook, however, there is no difference between these actions. No matter if the Enter key or Shift+Enter keys are used, always only a new line of text is created. If a user wants to make a new paragraph, he or she needs to double-hit the key. This leads to discrepancies in how the text is presented in mail clients other than Outlook, not to mention the additional work for the writer.
A solution other than using the double Enter key, is to modify the default, Normal style in Outlook. The drawback is that the modified Normal style is applied only to the new message, and not to the reply or forward.
Another approach is to create a custom style from scratch that will work better than Normal and be applied to both – new emails and replies/forwards. Unfortunately, this is not a full solution either as the custom style is not active by default when opening the message editor, and you need to switch to it manually every single time.
A complete solution is to have a custom style, which is automatically enabled by an Outlook macro when composing new emails, replies or forwards. Below you will find step-by-step instructions on how to achieve this.
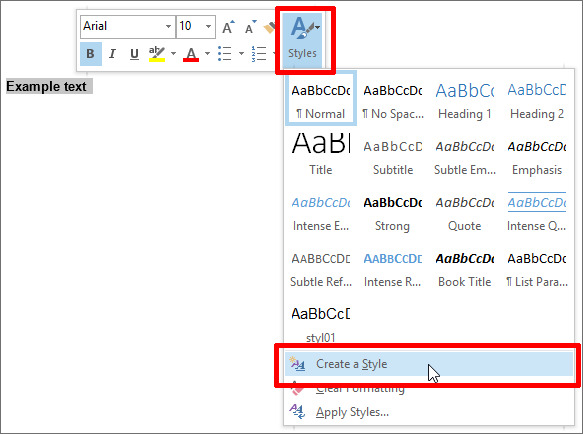
Step 1. Create your custom style. To do it, start off by creating a new email in Outlook and typing a bunch of words. Then highlight these words, which will bring up the hovering menu with the Styles button. Hit the Styles button and then the Create a style button.
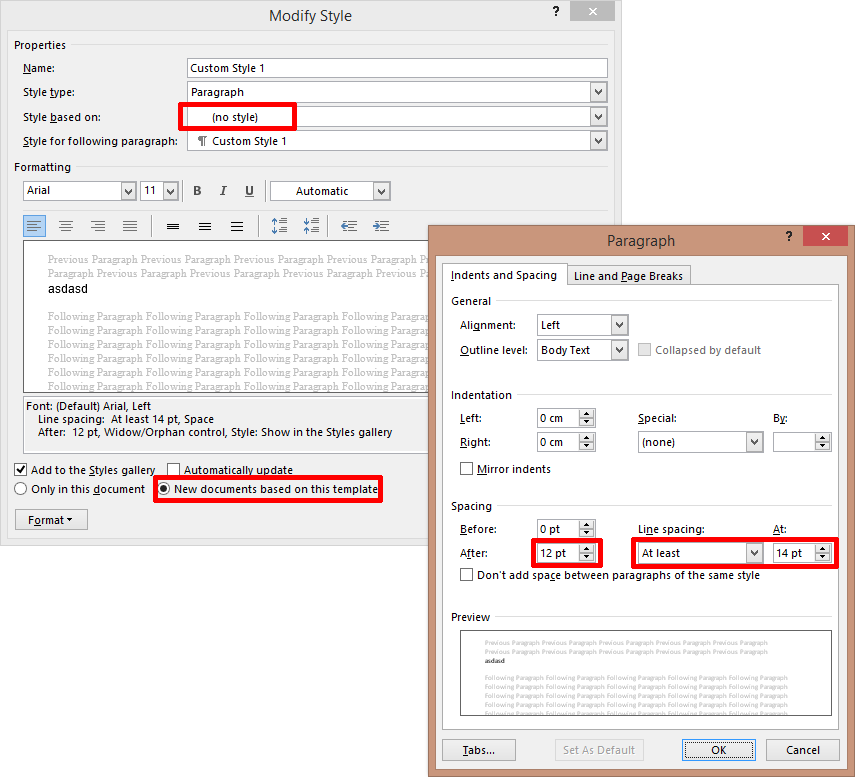
Step 2. In the resulting window type in the name of your style, e.g. Custom Style 1, and then click Modify to define all the aspects and formats used in it. Below you can find a screenshot of all the settings that should be applied. In short they are:
- the Style based on option should be set to (no style)
- In the Formatting section set your font face and size, e.g. Arial, 11
- make sure that the option New documents based on this template is marked
- click Format button at the bottom and open the Paragraph window. In the Spacing section set the After value to 12 pt, the Line spacing to At least and the At: value to 14 pt.
Step 3. Save your settings by clicking the OK buttons all the way out to the new email you created, then send it as a test message to yourself or different email account.
Step 4. Reply to the test message from Outlook, but don’t send it yet. Instead, type any words in the reply, highlight them to bring up the hovering menu with the Styles button. Press the Styles button, find the new style you created in Step 1, right-click it and choose Modify… .
Step 5. In the Modify Style window replicate the settings you introduced a moment ago in Step 2. Don’t forget about checking New documents based on this template and setting the Style based on option to (no style).
Step 6. After making sure that all settings have been replicated correctly, OK your way out of the Modify Style window and send the reply.
Step 7. Repeat Steps 4 and 5, but this time forward the test message from Outlook.
Step 8. Test the new style with different messages, preferably received from other users.
With your style ready, it is time to set it as the default one with a macro. To do so:
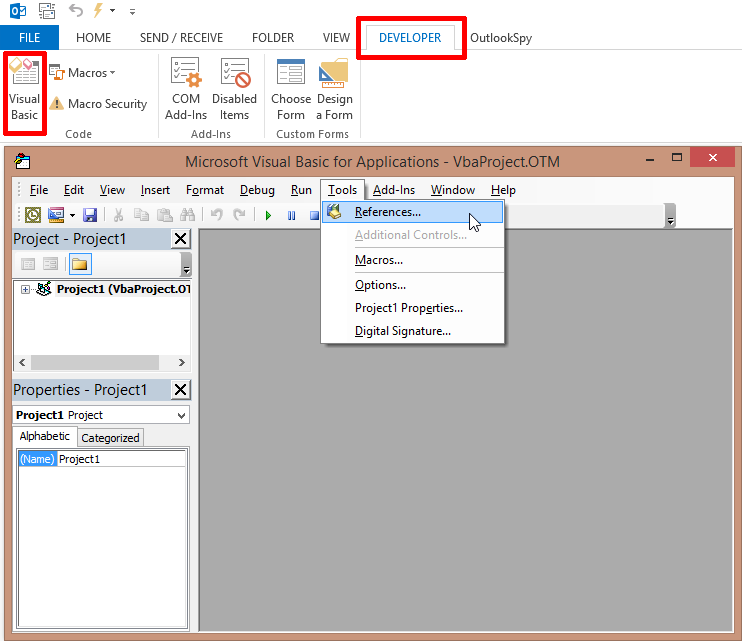
- Show the Developer Tab on the Ribbon in Outlook.
- In the Developer Tab click Macro Security and change it to Enable all macros.
- Click the Visual Basic button. In the next window click the Tools menu on top and select References.

Make sure that the Available References list shows the following positions checked:- Visual Basic For Applications
- Microsoft Outlook 16.0 Object Library
- OLE Automation
- Microsoft Office 16.0 Object Library
- Microsoft Office 16.0 Access Database Engine Object Library (or Microsoft DAO 3.6 Object Library for older versions of MS Office)
- Microsoft Word 16.0 Object Library
NOTE: Some of these libraries show a version that depends on what MS Office suite you have. In MS Office 2019, 2016 and 365 the version is 16, in MS Office 2013 it’s 15.0, in Office 2010 it’s 14.0, and in Office 2007 it’s 12.0. The Microsoft DAO Object Library is the same across all these suits of Office.
- Once you have the above references set click the OK button.
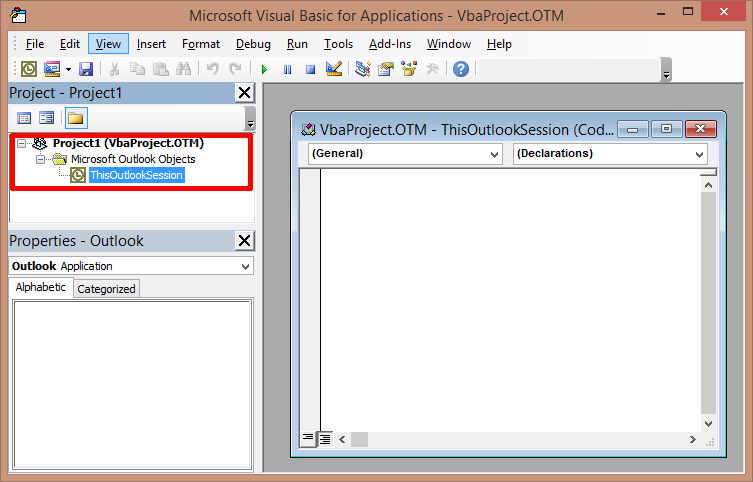
- While still in the Visual Basic, open the project window by expanding the project tree in the left pane and double clicking ThisOutlookSession:

- In the new window that pops up copy and paste the following macro code:
Public WithEvents OutlookInspectors As Outlook.Inspectors
Public WithEvents myOlExp As Outlook.Explorer
Public WithEvents myIns As Outlook.Inspector

'startup Outlook
Private Sub Application_Startup()
    Set OutlookInspectors = Application.Inspectors
    Set myOlExp = Application.ActiveExplorer
End Sub

Private Sub OutlookInspectors_NewInspector(ByVal Inspector As Inspector)
    Set myIns = Inspector
End Sub

Private Sub myOlExp_InlineResponse(ByVal item As Object)

'Change the name of the style to your own
'The name is case sensitive
Dim objStyleName As String
objStyleName = "Custom Style 1"

    Dim objEditor As Word.Document
    Dim objStyle As Word.Style
    'Check if the message is Plain Text. If so - end the macro as Plain Text does not support styles
    'Bodyformat:
    '1 - plain text
    '2 - html
    '3 - rtf
    If ActiveExplorer.ActiveInlineResponse.BodyFormat = 1 Then Exit Sub
    Set objEditor = ActiveExplorer.ActiveInlineResponseWordEditor
    Set objStyle = objEditor.Styles.item(objStyleName)

    'No need to set the same style again - it can break copy-paste option and duplicate text
    'If you have changed style to other than defined in objStyleName program can still duplicate text
    If objEditor.Windows(1).Selection.Style = objStyle Then Exit Sub
    objEditor.Windows(1).Selection.Style = objStyle

    Set objEditor = Nothing
    Set objStyle = Nothing

End Sub

Private Sub myIns_Activate()
'Change the name of the style to your own
'The name is case sensitive
Dim objStyleName As String
objStyleName = "Custom Style 1"

    If myIns.IsWordMail() = False Then Exit Sub
    Dim objEditor As Word.Document
    Dim objStyle As Word.Style
    Dim objItem As Object

    Set objItem = myIns.CurrentItem
    'Check if object is empty
    If objItem Is Nothing Then Exit Sub

    'Check the type of the item np. Meeting request
    Dim iStringPos As Integer
    iStringPos = InStr(objItem.MessageClass, "IPM.Note")
    If iStringPos = 0 Then Exit Sub
    'If the object is flagged as sent, it means this is the uneditable content
    If objItem.Sent = "True" Then Exit Sub

    'Check if the message is Plain Text. If so - end the macro as Plain Text does not support styles
    'Bodyformat:
    '1 - plain text
    '2 - html
    '3 - rtf
    If objItem.BodyFormat = 1 Then Exit Sub
    If myIns.EditorType = olEditorWord Then
       Set objEditor = myIns.WordEditor
       Set objStyle = objEditor.Styles.item(objStyleName)
       If objStyle Is Nothing Then Exit Sub

    'No need to set the same style again - it can break copy-paste option and duplicate text
    'If you have changed style to other than defined in objStyleName program can still duplicate text
    If objEditor.Windows(1).Selection.Style = objStyle Then Exit Sub
    objEditor.Windows(1).Selection.Style = objStyle
    End If

    Set objEditor = Nothing
    Set objStyle = Nothing
    Set objItem = Nothing

End Sub
Make sure to change the style name to your own, as described in the macro’s comments. In this case it should be Custom Style 1.
- Save the project by clicking the blue disk icon visible on the top, or by using the Ctrl+s keyboard shortcut.
- Restart your Outlook.
That’s it – from now on your custom style is the default one when writing a message in Outlook, even if a different formatting was used in the email you are responding to. This way you can make sure that the correspondence look is unified and not altered by other users.

Recommended articles

I was helping a user to follow your instructions but they kept getting an error at the line
Set objStyle = objEditor.Styles.item(objStyleName)
Because the new Style they had defined was not in NormalEmail.dotm. I found, for me, that you have to Close Outlook to update NormalEmail.dotm with the new style.
See the Microsoft Answers thread at
https://answers.microsoft.com/en-us/outlook_com/forum/outlk_win-outtop_classic-outsub_ofh/outlook-the-real-paid-one-responses-have-no/64c297e6-742c-44be-bba6-c1d72c4ea935?messageId=10e637db-b4d0-4a94-b4d9-696bb13b14b3
Great you managed to get it to work. And thanks for including the link to my article in the thread! I’ll try to refresh this post soon and incorporate your solution in it.
Why the reference to “Microsoft Office 16.0 Access Database Engine Object Library (or Microsoft DAO 3.6 Object Library for older versions of MS Office)” ? I don’t see any use of objects from these libraries and the code compiles without them.
If the code compiles without it, feel free to drop this reference. I might have added this just in case.
Hello Adam,
… I am terribly sorry for the error I made in identifying Outlook.
My question should have been: Does your process apply to Outlook 16.0 in MS Home & Business 2021?
Hi Steve,
I haven’t tested it yet but don’t see any reason why it shouldn’t work in this Outlook version. If you test it out, let us know if it worked. Future readers would be happy.
Does your process apply to Outlook 16.0 in MS Office 2016?
Adam:
I did your process but am getting an error. This occurs when replying to an email. the message is in Visual Basic and says:
Compile error:
User-defined type not defined
And has “OK” and “Help” options. I clicked on “OK” and and the window showing all the code I copied in came up, this time with the line “Private Sub myIns_Activate ()” highlighted in yellow.
Also, I composed a new email and the paragraph spacing I set up in the custom style wasn’t used.
I have not tried forwarding – I’m assuming that will also have issues.
Any ideas on fixing this?
Thanks!!
For starters, have you checked if all the references mentioned in this part of the article are checked? Also make sure you changed the style name to the one you created, all the places are highlighted by comments in the code.
I get an “Error in loading DLL” when I select the following:
Microsoft DAO 3.6 Object Library
Any idea on how to overcome this? I am using MS Office 365
It seems that the Microsoft DAO 3.6 Object Library module is obsolete from some time now. For you version of MS Office, you should select Microsoft Office 16.0 Access Database Engine Object Library instead. Thanks for pointing that out – I’ll update the article as well.
Excellent code Mr. Aardvark. Worked like a charm, only had to reposition the Publics as I have some other code runnign as well.
Isn’t it strange that we have to program a default style in this day and age?
Time stamps of the comment section suggest that this is a recurring theme for many Outlook users.
/UHJ
Thank you very much! It is a bit weird, but it’s also great to know that there are tools which let us solve problems like that, even if they require a bit of coding skills.
This is awesome as this was the only way I could finally get Outlook 2013 and 2016 to keep any of my changes. Set as Default for Paragraph Grouping or even a custom Style would never stick. When I would create a new email, it always reverted back.
One concern though:
I noticed on replies, the From, Sent, To, and Subject lines don’t abide by the Style rules. So they are not indented from the left margin, which is unfortunate, because I’m using the Notebook Stationery theme, and this spiral graphic overlaps the left margin by about an 1/2″. This causes part of the email info I mentioned above to be partly covered or obscured.
Any suggestions how to resolve this?
Try changing the style in Outlook > View > View Settings > Other Settings > Column Headings and Rows.
Great article. Thanks for sharing.
Very nice tutorial.
Q: does this also solve the double line spacing taking place when exchanging mails between Gmail and Outlook?
Thanks!
Hello Mike,
Yes, as long as nobody uses double enters in the conversation, the double line spacing problem should be solved across different email clients.
Hey Adam
This code works great but I cant figure out how to use an existing signature with links and images with your code. Any ideas that would help is much appreciated.
Hi JA,
I am not sure what issue you are experiencing. Does the macro change anything in the existing signature? An email signature set up in Outlook’s signature editor should not be affected when you follow the steps from this article. The message’s style and the email signature’s style are two separate things.
Hi Adam,
It is a very great code! I tried on my Outlook 2016 and it is works on new message. But when I reply or forward, the fonts size was changed to 10. The new style was 11 when I create it, but don’t know why it become 10 after. Even I tried to modify it, it will back to 10 after restart Outlook.
Wah
Hi Wah,
Problems with replies and forwards usually happen when step 4 (or 7) of the tutorial is omitted. I’d try following the guide from the very beginning and see if it helps. In the worst case scenario, you can switch to the configured style manually.
I want to change the font of the emails that come TO me (rather than my own). Is that possible?
You could change the font of the incoming emails, but only if you converted all incoming emails to plain-text format using Outlook Trust Center > Email Security and then set the font to your liking in Outlook Options > Mail > Stationery and Fonts. Mind that this solution has some major flaws, e.g. hyperlinks will not work and no images will be visible in emails.
The fix for new emails works great, but I can’t get the macro to work for replies & forwards. I don’t get an error, it just reverts to Times New Roman and none of my paragraph settings are there. I’ve made sure that I put the name in the code. I so want this to work!
Actually, it’s working for Reply but not Forward. I can live with that since I hardly ever forward, but I’d love for it to work.
Hi Jane,
Please double check you completed step 7 of the guide and inserted the name of your style in both places of the macro (The places are marked by comments: ‘Change the name of the style to your own).
Hi Adam – yes, it’s changed in both places.
Since you have updated the script correctly and have ensured that step 7 was completed beforehand, I do not know what might be causing this different behavior in case of forwards. Since you said you do not forward much, I would just switch to your custom style manually on those rare occasions.
Great job. It work beautifully. Thanks!
Can we configure this to change the font of received (incoming)HTML emails?
I’m afraid that it won’t work with incoming messages.
Hi Adam,
I followed the steps as described but whenever I create a new email, reply or forward, it defaults to Normal style.
I even put a break point on VBA (first line of code: If ActiveExplorer.ActiveInlineResponse.BodyFormat = 1 Then Exit Sub) to see if it was going through it but nothing happened.
Any idea.
Thanks,
Al
Hi Al,
What is the Macro setting in your Outlook Trust Center? (https://support.office.com/en-us/article/Enable-or-disable-macros-in-Office-files-12b036fd-d140-4e74-b45e-16fed1a7e5c6)
-Adam
Adam,
Thanks! I followed it to the letter, and got excellent results…
EXCEPT…
I did get the error message:
Runtime error ‘5941’;
The requested member of the collection does not exist
So I checked again, and found that there are two places where I need to change the style name to the one I chose. Once I did that, it works beautifully!
Thanks for this thorough and easy to follow tutorial. It’s great for old folks/tech-idiots like me who think an “object” is something you hold in your hand, “OLE” is slang for “OLD” and have no clue what “macro” means!
I’m grateful!
Robert
This is the code I have, but it gives me the Run-time error. Please help!
Public WithEvents OutlookInspectors As Outlook.Inspectors
Public WithEvents myOlExp As Outlook.Explorer
Public WithEvents myIns As Outlook.Inspector
Private Sub Application_Startup()
Set OutlookInspectors = Application.Inspectors
Set myOlExp = Application.ActiveExplorer
End Sub
Private Sub OutlookInspectors_NewInspector(ByVal Inspector As Inspector)
Set myIns = Inspector
End Sub
Private Sub myOlExp_InlineResponse(ByVal item As Object)
Dim objStyleName As String
objStyleName = “Custom Style 1”
Dim objEditor As Word.Document
Dim objStyle As Word.Style
If ActiveExplorer.ActiveInlineResponse.BodyFormat = 1 Then Exit Sub
Set objEditor = ActiveExplorer.ActiveInlineResponseWordEditor
Set objStyle = objEditor.Styles.item(objStyleName)
If objEditor.Windows(1).Selection.Style = objStyle Then Exit Sub
objEditor.Windows(1).Selection.Style = objStyle
Set objEditor = Nothing
Set objStyle = Nothing
End Sub
Private Sub myIns_Activate()
Dim objStyleName As String
objStyleName = “Custom Style 1”
If myIns.IsWordMail() = False Then Exit Sub
Dim objEditor As Word.Document
Dim objStyle As Word.Style
Dim objItem As Object
Set objItem = myIns.CurrentItem
If objItem Is Nothing Then Exit Sub
Dim iStringPos As Integer
iStringPos = InStr(objItem.MessageClass, “IPM.Note”)
If iStringPos = 0 Then Exit Sub
If objItem.Sent = “True” Then Exit Sub
If objItem.BodyFormat = 1 Then Exit Sub
If myIns.EditorType = olEditorWord Then
Set objEditor = myIns.WordEditor
Set objStyle = objEditor.Styles.item(objStyleName)
If objStyle Is Nothing Then Exit Sub
If objEditor.Windows(1).Selection.Style = objStyle Then Exit Sub
objEditor.Windows(1).Selection.Style = objStyle
End If
Set objEditor = Nothing
Set objStyle = Nothing
Set objItem = Nothing
End Sub
Hi Barbara, Can you provide the exact error code you are getting?
Thanks for this post. It addressed an issue that I’ve been struggling with since installing Office 2016. Unfortunately, when I tried it, there was a compiling error on start up… I suspect a small change in Outlook in the new version, with which this was not compatible. (?) If there is a required update to the code, I’d like to know, because this macro would be really useful to me. Thanks!
Hi Graham,
Can you provide the error code?
Adam
Hello Adam,
How do I take an advertising letter, or document with graphics etc. and make it the email itself. Or, how do I make the document the first thing the person sees? I cannot send attachments. I have tried the cut/paste, and plain format, but I lose the artwork and the unique text design.
Thank you!
Hi Sal,
Try this solution: http://www.msoutlook.info/question/144
Hope it helps,
Adam
Great tutorial artical :) Thanks!
Jerry, that code works when you open or response email. If you want to change all emails for good, you should make a loop For each elements in folder and save it. But that ‘ll change the objects date. You can also use rules with code, to change only new one.
Regards.
Hi Adam,
thanks for this code, it’s almost exactly what I was looking for!
One addition I would like to ask for if possible, is to automatically convert the body format to HTML aswell. If that is doable I’d really appreciate a hint on how to do it.
Thanks and regards!
/Jerry
I followed the steps above but got
Runtime error ‘5941’;
The requested member of the collection does not exist
I changed the string variable to match the name of the style I created. I double checked the style exists (i.e. Outlook saved it after I created it), but no luck. The spelling is correct and I’ve not deleted a ” for example (I’m an ex-developer so checking the name matched exactly was the first thing I checked). Any thoughts? I’m using Outlook 2007
Hi Sean,
First of all make sure that you provided the correct name of the style in both places in the code:
1. objStyleName = “Custom Style 1”
Dim objEditor As Word.Document
2. objStyleName = “Custom Style 1”
If myIns.IsWordMail() = False Then Exit Sub
The name is case sensitive. You can make sure what the correct name is by adding the underlined code (the output will be provided in the Immediate window):
If objItem.BodyFormat = 1 Then Exit Sub
If myIns.EditorType = olEditorWord Then
Set objEditor = myIns.WordEditor
For Each style In objEditor.Styles
Debug.Print style.NameLocal
Next
Please let me know if this helps.
Best regards,
Adam
Hello, Adam! I recently changed to outlook.com email and I am trying to follow your instructions as given above but I do not get the windows that you are showing in the examples. My window .. or menu or whatever it’s called … for changing styles doesn’t look anything like that. It’s just a pop up with a list … no icons… nada! Frustrating! I’ve spent a couple of hours looking for the solution to my problem and your instructions are the first ones that have given me “hope”… which turned out not to work either.
What’s going on? Is it because I am using the free version? The emails look good when I click on “send”…. they arrive double spaced or in some other garbled form. Thanks for whatever information you can give me. – Louise -( I’m praying! :-)
Hi Louise,
Keep in mind that, to apply my solution, you have to use Outlook. This article explains how to configure an outlook.com account in Outlook: http://www.slipstick.com/outlook/config/configuring-outlook-com-in-outlook/.
Hope this helps,
Adam
Excellent tutorial and great use-case! Thank you.