
Exchange Server administrators are often forced to deal with the problem of setting up an auto-responder directly on the server without the need of configuring anything on the client machines. It often happens that a given Active Directory group or selected users are not available to senders at specific hours or days. In that case, an automatic reply informing that a given addressee is not able to respond at the moment is needed. The thing is that configuring a separate out-of-office message on every end-user PC individually is in most cases impossible. Although Exchange Server doesn’t have a robust built-in auto-responder mechanism, there are some features which you could use as auto-replies set on the server side.
Auto-responder on Exchange SE, 2019, 2016, 2013 and 2010
Options available in the Exchange admin center aren’t that straightforward if you need to set up an automatic reply for a mailbox. In Exchange 2010, the option that can serve as an auto-reply is Send rejection message to sender with enhanced status code and in Exchange 2013/2016/2019/Subscription Edition (SE), the action is Reject the message and include explanation (Exchange Admin Center > mail flow > rules). These actions will send a non-delivery reports to the original senders with the explanation text of your choice.
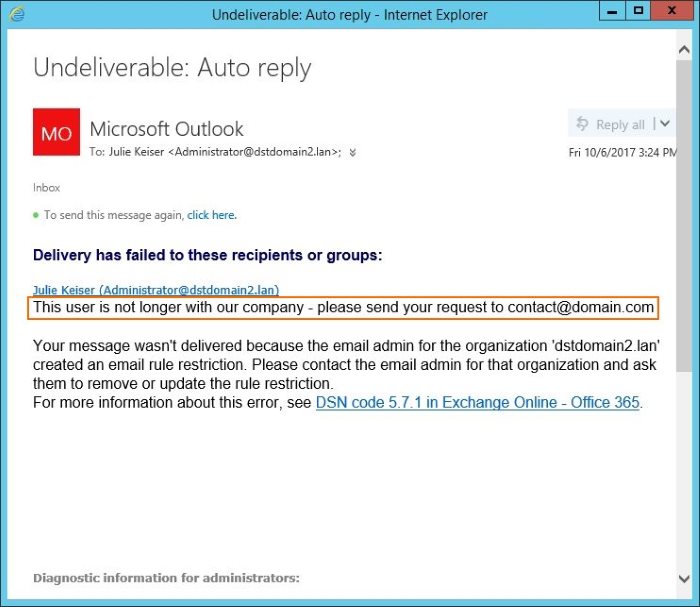
When you set up this action on a recipient’s mailbox, the original message isn’t delivered to the original recipient.
Set up auto reply via PowerShell
Exchange Server 2019, 2016, 2013 and 2010 allow you to set up automatic replies for specific mailboxes by using the following PowerShell cmdlet.
Set-MailboxAutoReplyConfiguration
An auto reply message can be configured for both internal and external emails. The command line would be like this:
Set-MailboxAutoReplyConfiguration -Identity [email protected] -AutoReplyState Enabled -InternalMessage "Here put a message text you want for internal auto replies." -ExternalMessage "Here put a message text you want for external auto replies."
In this case, all messages sent to that mailbox will be successfully delivered.
Exchange Server 2007 ’s native auto responder
If you still use Exchange Server 2007 and haven’t been hacked, you clearly know what you’re doing. Or are incredibly lucky.
Exchange Server 2007 doesn’t have a real built in auto-responder feature. Of course there are some mechanisms which you could adapt for that purpose, but all in all, they weren’t meant to be used as real auto-replies.
Basically, there are two things which you can do in Hub Transport (Exchange Management Console > Organization Configuration > Hub Transport > New Transport Rule) to set up a sort of auto-reply on Exchange Server side:
1. Use the bounce message action as a short auto-reply (New Transport Rule > Actions).
or
2. Redirect/forward messages sent to a given user or Active Directory group to another email address (New Transport Rule > Actions) with an auto-responder configured in Outlook (Out of Office Assistant).
These options will work for you in a way but at the same time, they have some big disadvantages.
The first method has the biggest limitations due to the fact that the bounce message can only be 79 characters long. It means that you won’t be able to construct a decent auto-reply using so little space. What is more, the sender will get this message as a part of a bigger delivery error report which doesn’t look as an out-of-office message at all.

The second option is definitely a way better choice, but still, the auto-reply is sent from a fixed email address (e.g. [email protected]). It means that the sender, who sends a message for instance to John, won’t get the auto-reply directly from him, but from the address where the Out of Office Assistant was configured on. In some cases it is acceptable, but still, it is not the kind of auto-responder we originally wanted.
CodeTwo Email Signatures On-prem’s auto-responder
If you want to configure auto-replies on the server side exactly the way you want it and with almost no limitations, you have to use a third party tool like CodeTwo Email Signatures On-prem, which offers features not available in native mail flow rules.
CodeTwo Email Signatures On prem (previously CodeTwo Exchange Rules Pro) is a powerful email management console that is designed to simplify work of Exchange Server administrators. Above all, it allows you to create server-sided rules that cover such important tasks as email rerouting, forwarding, sensitive content control, attachment compressing, email signatures and disclaimers and many more. But most importantly, the program lets you also create auto-responders on the server side in an easy and intuitive way.
How to create a server-sided automatic reply on Exchange using CodeTwo Email Signatures On-prem
To create an auto-responder rule in CodeTwo Email Signatures On-prem (or CodeTwo Exchange Rules Pro) you have to begin with creating a new rule in the left pane of the program’s main window. Press Add and enter the rule’s name (e.g. “Autoresponder”).

After the rule has been created, you have to specify the conditions on which your auto-reply will be sent. To do this, go to the Conditions tab. CodeTwo Email Signatures On-prem gives you many possibilities in that field.

Once you have chosen the correct conditions, you can proceed to the Actions tab. Our goal is to create an auto-responder rule, so click the Add button in the Actions tab and chose the Auto respond action.

You can now edit the template of the auto-reply which will be sent to senders. Note that CodeTwo Email Signatures On-prem offers advanced template editing options and enables composing the message in HTML or/and plain text, using dynamic Active Directory placeholders, adding attachments and many more. These options guarantee that the sender will receive a professionally looking reply that contains all the necessary information.

And that’s it. After saving the changes, the rule will be active and your auto-reply will be sent to senders accordingly to the settings you have previously chosen. Additionally, you can edit the exceptions of your auto-responder rule or add a timestamp option – it’s up to you.
Loop protection in CodeTwo Email Signatures On-prem
There’s one more thing worth mentioning. Whenever you decide to use auto-responders, there’s always a threat that the person on the other side has also an auto-reply configured on his or her email account. If so, an automatic message sent to that person will initiate an endless loop of auto-replies exchanged between these two accounts.
CodeTwo programmers have foreseen such situation. They have equipped CodeTwo Email Signatures On-prem with a smart loop protector, which limits the number of auto-replies sent in a specific period of time to the value chosen by the administrator.

Consider using this option by applying auto responders, as looped messages can stop users’ inboxes up and affect the email flow on your server.
Suggested reading
Recommended articles


Hey very nice blog!
can i send any info mail auto to all users monthly once?
If you set up autoresponder in CodeTwo Exchange Rules Pro, you can configure the loop protection option to send only one email to a certain email address per 30 days.
Hi
In the Auto respond action in the Sender field I typed the email address manually. In the body, I would like to insert AD attribute {Display name}. It did not works.
When I use {Original recipient} as sender everything is ok.
Why it did not work?
Hi Tomasz,
The auto respond action supports only the original recipient’s AD placeholders. Since you need to have a fixed Sender of the autoresponder message, you should also be able to use fixed contact details in the autoresponder.
It would help a lot if you could specify what exacly you want to achieve in this scenario, I might be missing the point here.
Is it possible for the autoresponse message to be stored in the autoresponding users Sent Items folder? We would like to retain a copy of the autoreply for legal retention reasons.
Hi Lorn,
I’m afraid that with the native auto-responder feature this will not be possible. Still, you can track out of office messages using Exchange message tracking logs. Alternatively, you can use CodeTwo Exchange Rules Pro to set up a single autoresponder rule, BCC the automatic reply to its sender and use an Inbox rule to move the email to Send Items.
Hi,
Whether I can setup or set a rule to send an auto reply from noreply email id.
Example –
I will receive the mails from out side vendors to [email protected], once I received the email, I need to send the acknowledge Thank You mail from [email protected].
Can this be set.
Thanks
Prabhu
Hi Prabhu,
Yes, it can.
In the Auto respond action in the Sender field (Fig. 5), you simply need to type the email address you want to send the auto reply from, i.e. [email protected].
In the Conditions tab (Fig. 2), you can set:
Recipient > matches email address > [email protected]
Then, all users who send emails to [email protected] will get the auto reply message from [email protected].
If you would like to test this solution, download a free trial of CodeTwo Exchange Rules Pro from this website: https://www.codetwo.com/exchange-rules-pro/download?sts=3861.
Of course, in case of any questions just give me a shout!
Best regards,
Adam
Can you set up an autoresponder filter/rule so that it only sends a reply to messages that either had a valid SPF/DKIM or other email validation mechanism, or at least it did not fail such a rule?
That would be important, to not annoy forged senders from spam with unnecessary autoresponder files.
Hi Mike,
If you are already using an SPF/DKIM validator on your server, then Exchange’s Transport Rules will let you pick out validated emails based on headers. The condition you will want to use is ‘when the message header contains text patterns’. An example setting would be – Message header: Authentication-results; Text patterns: spf: pass, dkim: pass.
As I mention in my article, the “autoreply” option offered natively in Exchange is poor. So if you wanted to use CodeTwo Exchange Rules Pro to autorespond to the verified emails, you would have to combine it with Transport Rules, i.e.: use Transport Rules to tag emails based on authentication info in their headers (more on Exchange Transport Rules: https://www.codetwo.com/admins-blog/email-rules-on-exchange-server-explained/?sts=3861), and have CodeTwo Exchange Rules Pro respond only to emails based on the tag (E.g. using the ‘Subject matches/contains’ condition: https://www.codetwo.com/userguide/exchange-rules-pro/subject.htm?sts=3861).
Hope this helps,
Adam
If you looking for a 3 colums Aardvark theme, then check out my gig !