


SharePoint Online audit logs – contents
Before you activate auditing for all kinds of events, mind that audit logs can quickly grow in size. Like with any other kinds of logs, too much data might make it hard to find relevant information when something actually happens. With SharePoint Online audit logs, you don’t have to worry about their size as much as on-premises, but it is worth to verify if you need to register an event whenever a user views a document, or searches for something.
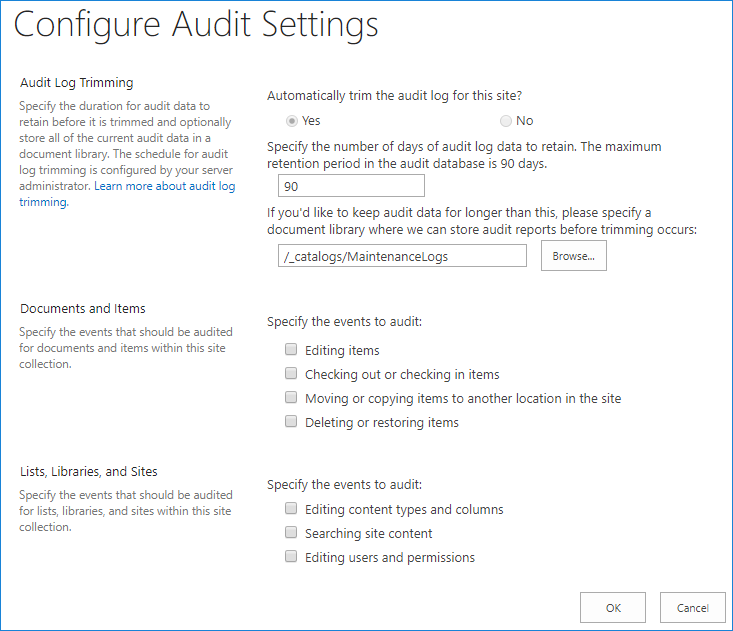
Events related to documents and items available for auditing:
- Editing items,
- Checking out or checking in items
- Moving or copying items to another location in the site
- Deleting or restoring items
Events related to lists, libraries and sites that you can audit:
- Editing content types and columns
- Searching site content
- Editing users and permissions
Before you enable audits for a chosen site collection and browse through registered events, you need to make sure you have enough permissions to do so.
Required permissions
To enable auditing for a particular site collection, you need to be the site collection admin. The quickest way to assign those rights is to use PowerShell. Connect to your SharePoint Online organization using guidelines from How to connect to SharePoint Online using PowerShell and run the following cmdlet:
Set-SpoUser -site <YourSiteURL> -LoginName <YourTargetUPN> -IsSiteCollectionAdmin $true
If you need to perform this task for all site collections, run:
$sites=Get-SPOSite
 foreach ($site in $sites) {Set-SPOUser -LoginName <YourTargetUPN> -Site $site -IsSiteCollectionAdmin $true}
Minimum required permissions for searching audit logs are View-Only Audit Logs & Audit Logs roles. Only Organization Management and Compliance Management role groups in Exchange Online include those by default. For help with assigning minimum required permissions, consult this article.
Enable auditing for a site collection
To change your auditing settings for a site, follow the instructions below:
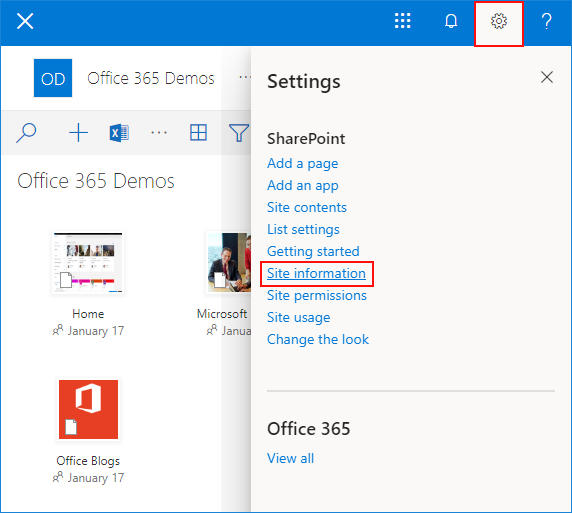
- Go to your site collection, click the Settings button in the top-right area, and then click Site information:

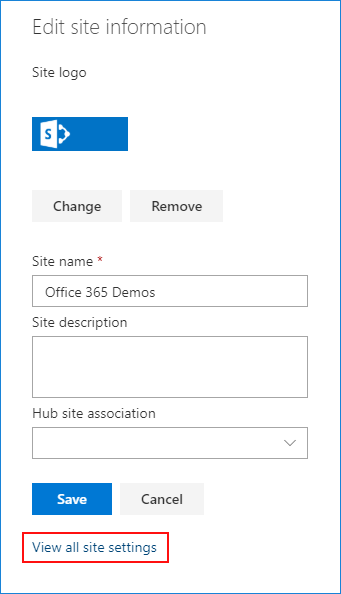
- Next, click View all site settings:

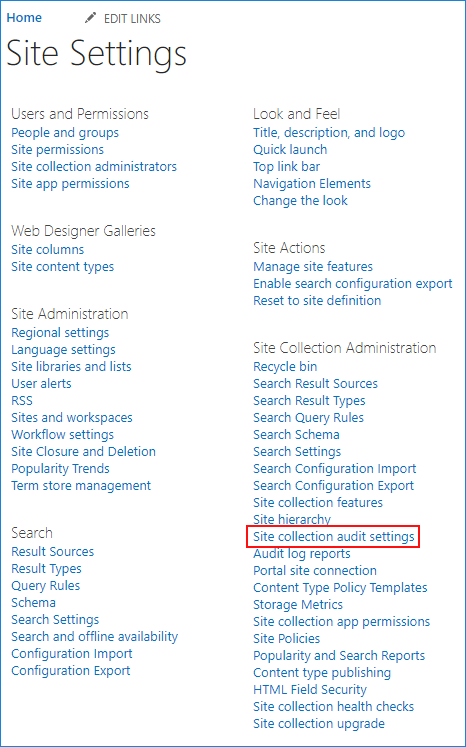
- Now, in the Site Collection Administration section, find Site collection audit settings and click it:

- The Configure Audit Settings page is where you can turn on the auditing. Apart from selecting which events to log, you can also use the Audit Log Trimming settings to specify for how long the audit logs will be kept. In SharePoint Online, trimming is automatically switched on and cannot be disabled. The retention period for audit log data can be set to any value between 0 and 90 days. 0 will cause all audit log files to be deleted at the end of the month. To retain audit logs for a period longer than specified on this page, choose a document library on this SharePoint site to which audit logs will be copied:

If you want to enable SharePoint audit loging with PowerShell, you can find a sample script in the Technet forum.
How to view SharePoint Online audit logs
SharePoint Online does not have a dedicated audit log search. That is why, if you want to find SharePoint-related events, you need to make use of the unified audit log.
Audit log search is accessed from the Microsoft Purview compliance portal. You can also use the following direct link to this feature: https://compliance.microsoft.com/auditlogsearch.
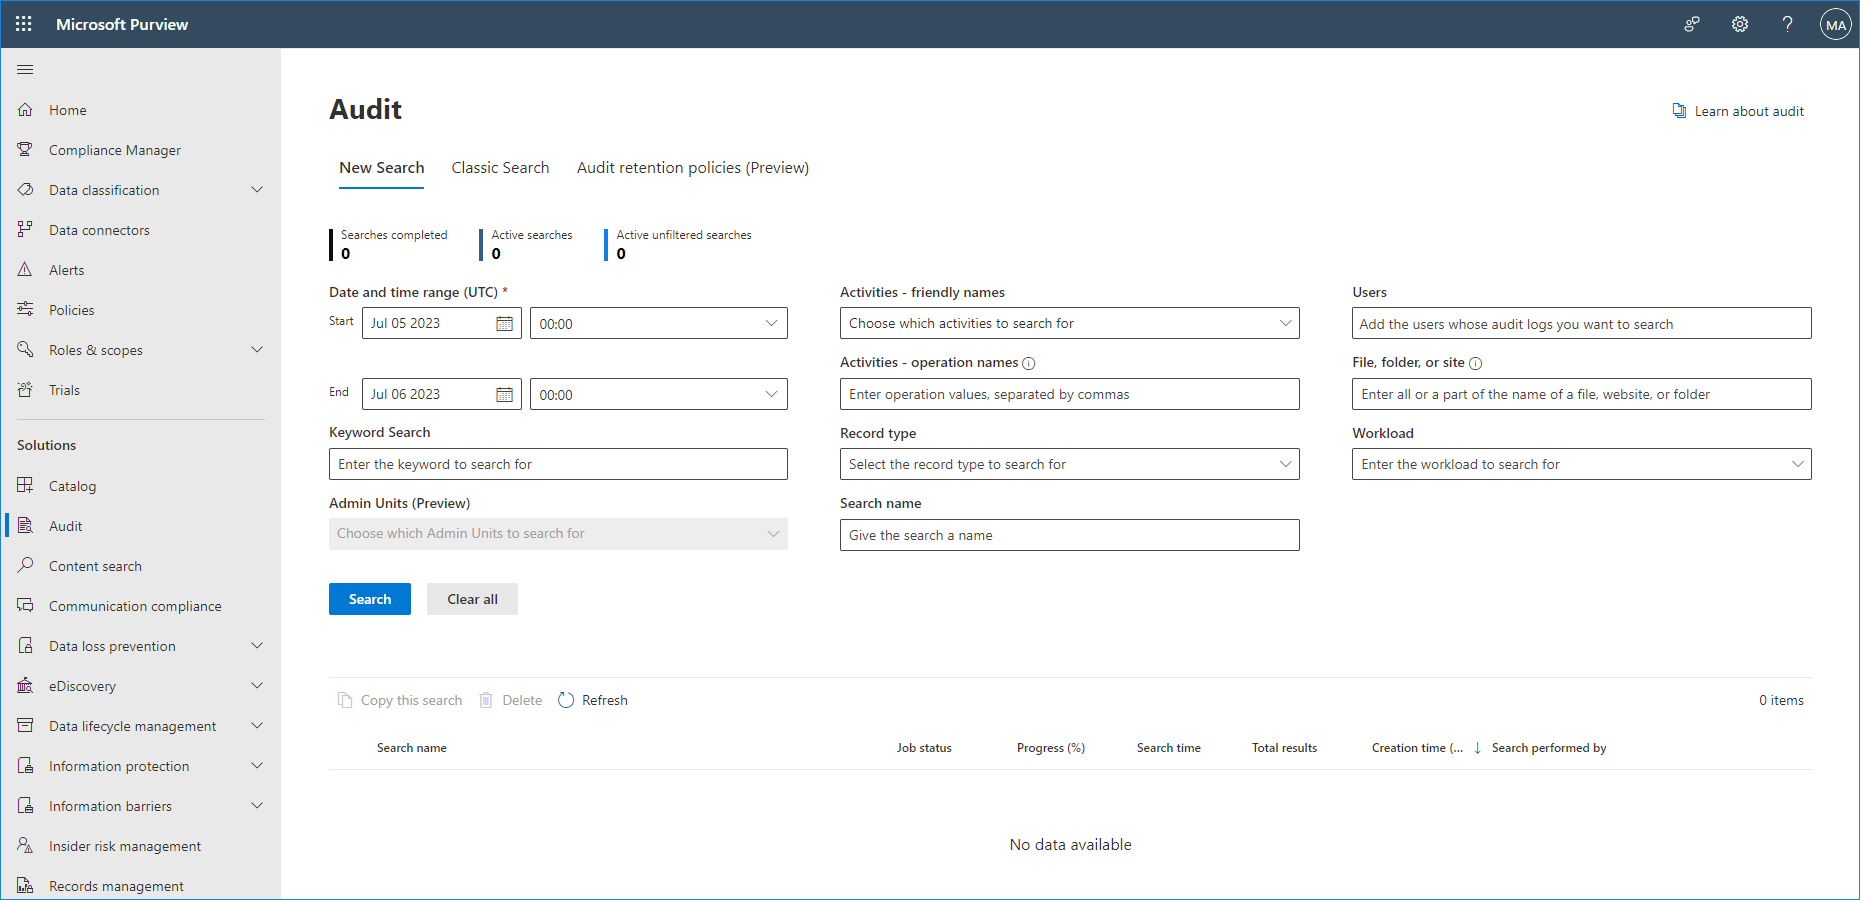
The unified audit logs let you check users’ and admins’ activities in your organization. To limit search for SharePoint events only, you have two main options:
- in the Activities – friendly names drop-down menu, select only SharePoint-related actions, found, for example, under File and page activities and Site administration activities, or
- use the File, folder, or site field where you can enter an exact URL of a specific site, or use a wildcard together with an URL (https://<yourorgname>.sharepoint.com*) to return all SharePoint-related events. Using a site name also works, but the results will not be limited to SharePoint sites only.

How to search for SharePoint events with PowerShell
One quick way to search the unified audit logs without the UI is to use PowerShell and the Search-UnifiedAuditLog cmdlet. Using PowerShell is especially useful if, for example, you need to investigate an incident, or you want to get an automatic daily report of deleted items. To do so
- First, connect to your Office 365 environment using the instructions from this article. When you start a remote PowerShell session, the Search-UnifiedAuditLog cmdlet should become available, provided you have the required permissions, as described above.
- Run the search. The -StartDate and -EndDate attributes are required. You can use -RecordType, for example, to get only file or site operations and -Operations to further limit the results:
Search-UnifiedAuditLog -StartDate (Get-Date).AddHours(-24) -EndDate (Get-Date) -RecordType SharePointFileOperation -Operation “*delete*”
The cmdlet returns the queried results just fine. The problem is that the way it shows data is barely readable. The most interesting data can be found in the AuditData field, which shows as a single string. Fortunately, we can easily filter the data and display it in a more decent fashion. The example below lists all audited events, and shows who did what and when:
$AuditLogResults = (Search-UnifiedAuditLog -StartDate (Get-Date).AddHours(-24) -EndDate (Get-Date) -RecordType SharePointFileOperation);
 $AuditLogResults.AuditData | ConvertFrom-Json | select CreationTime,Operation,UserID,ObjectID;
You can further refine the results with additional pipeline to Where-Object. Thanks to that, you can learn what happened with some spreadsheets, or monitor activity of a particular user:
… | Where UserID -like Admin*
 … | Where ObjectID -like *xlsx
Depending on your needs, your query can return more or less results and display more or less information about each entry. If you need any additional clarification, or have doubts about how to form your query, don’t hesitate to ask in the comment section below.
Other topics that might interest you:

Recommended articles


Looks like they killed it. The “Configure Audit Settings” page now just says:
“We no longer support choosing specific events to edit. Audit Log Reports will still be available as usual but powered by the Unified Audit Pipeline. Please refer to this document for complete list of audited events. Please note that we do not support list items as of now.”
That’s right. I’m planning to update this article soon.
It appears this functionality (site level auditing) has been removed in SPO.
The functionality is still available, but the setting to turn it on has been moved to the Security and Compliance Center: https://compliance.microsoft.com/auditlogsearch