How to create an account that can be used to back up SharePoint data
Problem:
You want to create a new admin account that is used by CodeTwo Backup to back up and restore SharePoint data.
Solution:
Below you can find step-by-step instructions on how to create an admin account that has all the necessary roles and privileges to back up and restore data from:
How to create an admin account to back up and restore SharePoint Online data
- Sign in to the Microsoft 365 admin center using an account with Global Administrator permissions.
- Go to Users > Active users and click Add a user (Fig. 1.).
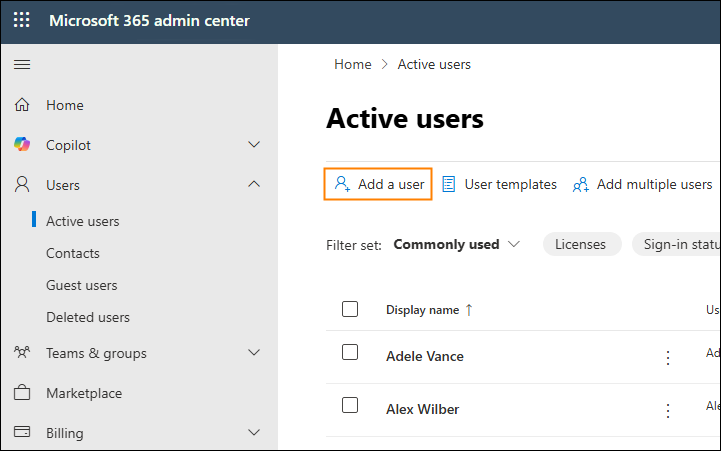
Fig. 1. Adding a new user.
- In the Basics step, fill in all the necessary fields and click Next (Fig. 2.).
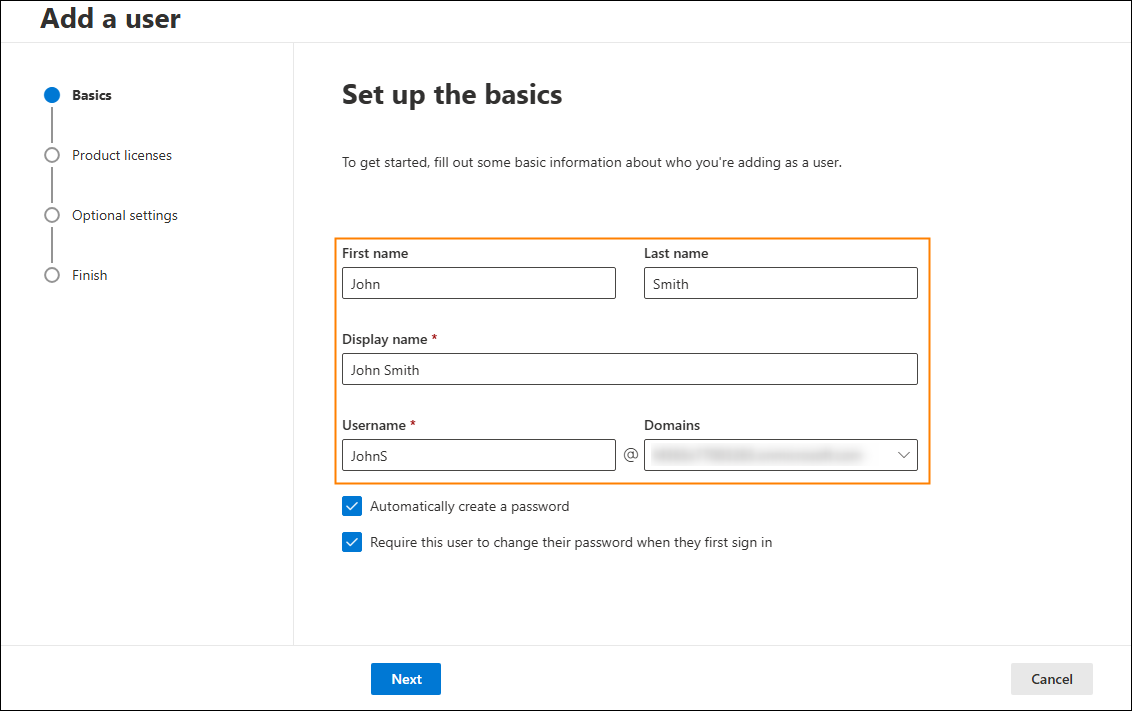
Fig. 2. Adding basic user information.
- In the Product licenses step, assign the user a product license that includes SharePoint Online (e.g., Office 365 E5 or Microsoft 365 E5) and click Next (Fig. 3.).

Fig. 3. Assigning a product license to the new user.
- In the next step, Optional settings, assign the Global Administrator role to the new user (Fig. 4.).
Use less privileged roles
While the Global Administrator role allows a new user to perform all backup and restore tasks for Exchange/SharePoint Online data with CodeTwo Backup, it grants many additional rights that are not necessary.
To follow the principle of least privilege, you can assign the user the following combination of roles to handle all backup/restore tasks without granting the user the Global Administrator role:
- Privileged Role Administrator – this role lets users manage role assignments in Microsoft Entra ID. While it doesn’t allow performing any other privileged actions in itself, it can be used to grant further privileges by creating additional role assignments. Read this Knowledge Base article to learn how to create an account with this role.
- SharePoint Administrator – this role is needed only if you want to perform certain actions (e.g., restore custom web part page layouts or surveys that don't allow for multiple responses) that require the use of legacy authentication. Learn more

Fig. 4. Assigning an admin role to a user.
- Review your settings in the Finish step and click Finish adding to create a new user.
You can now use this account to back up your SharePoint content in CodeTwo Backup.
Tip
If you want an existing role assignment to be temporary (e.g., for the user to complete a one-time SharePoint backup job), follow the steps below:
- Sign in to the Microsoft Entra admin center, go to Users, and select the user for whom you want to set the assignment duration.
- Switch to the Assigned roles tab, find a relevant assignment on the list of active assignments, and click Update in the Action column (Fig. 5.).
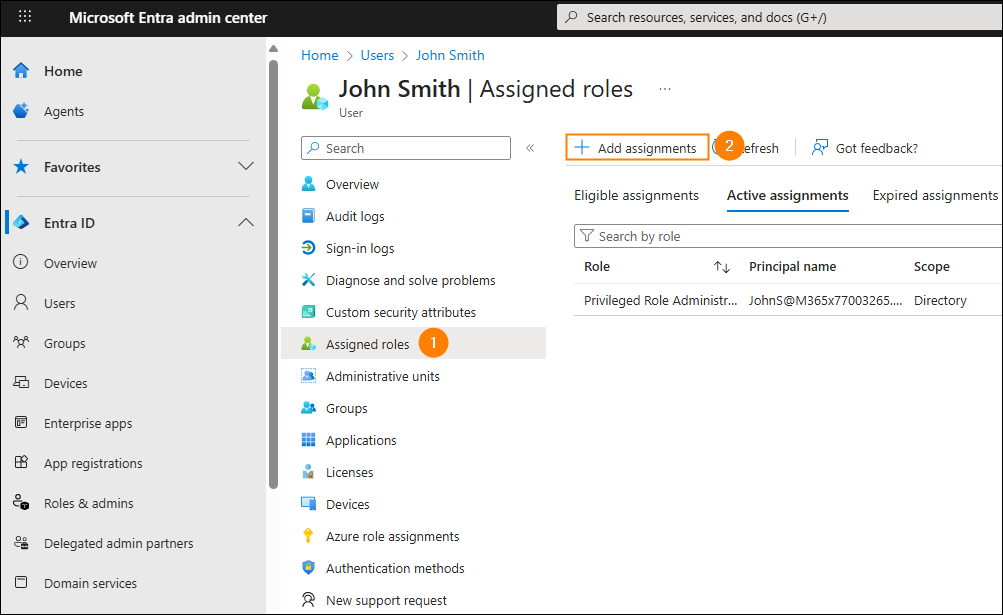
Fig. 5. Updating a role assignment to set the assignment duration.
- On the Membership settings pane that opens, uncheck the Permanently assigned option, specify the assignment end date/time, and enter an appropriate justification (see Fig. 6.).
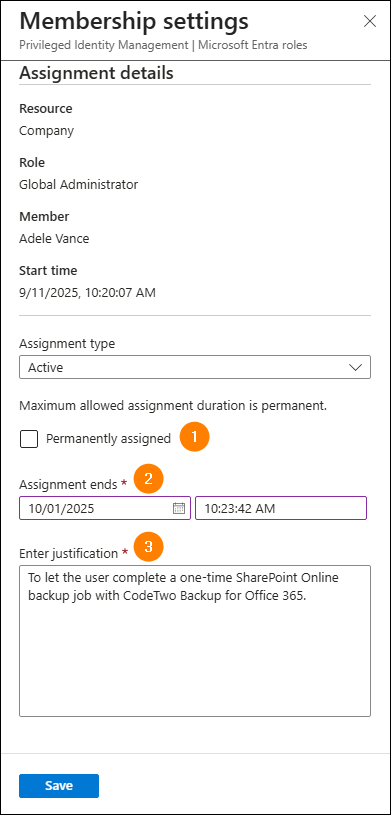
Fig. 6. Setting the role assignment duration.
- Click Save to save your changes.
How to create an admin account to back up and restore SharePoint (on-premises) data
This section includes the following steps:
- Creating a new Active Directory user with administrator rights
- Adding the created admin account to the SharePoint Farm Administrators group
- Granting Full Control permissions to the SharePoint site at the Web Application Policy level
- Adding the admin account to the Remote Management Users group
- Adding the admin account to the SharePoint_Shell_Access role
- Configuring the site collection administrator
In order to perform backup and restore jobs on site collections existing in your on-premises SharePoint environment, the admin account used in CodeTwo Backup needs to be either a primary or secondary site collection administrator. The program sets that admin account as the secondary site collection administrator automatically (to maintain the site collection integrity, the primary site collection administrator will not be changed). However, there can be only one primary and one secondary site collection administrator per site collection in on-premises SharePoint. So, if you intend to create a new admin account to back up or restore your on-premises SharePoint data, keep in mind that the existing secondary site collection administrators will be replaced with that admin account. Learn more below
Creating a new Active Directory user with administrator rights
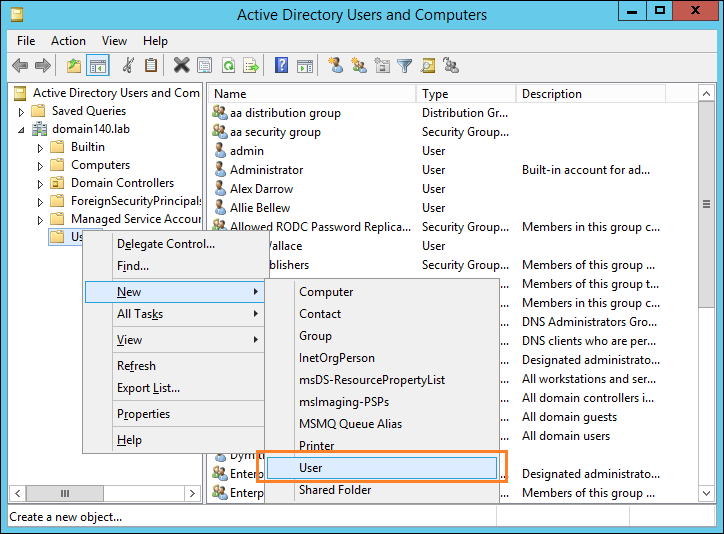
- On your Domain Controller, open Active Directory Users and Computers.
- Right-click the Users object in the left pane and then click New > User (Fig. 7.).

Fig. 7. Creating a new user in Active Directory. - Fill in at least the Full name and User logon name fields (Fig. 8.) and click Next.

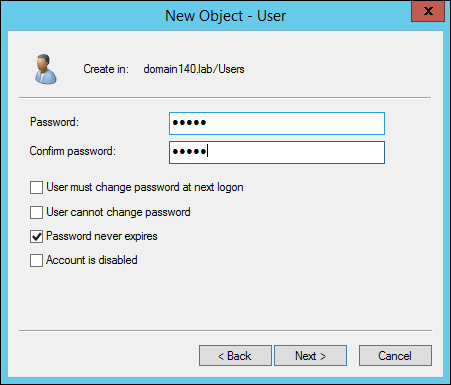
Fig. 8. Filling in the necessary user data. - In the next step, provide the password and configure the remaining options according to your needs (Fig. 9.).

Fig. 9. Configuring the password settings. - Click Next and Finish to create the new user.
- Right-click this user and select Add to a group.
- In the window that opens, type administrators, click Check Names and click OK (Fig. 10.).

Fig. 10. Selecting the Administrators group.

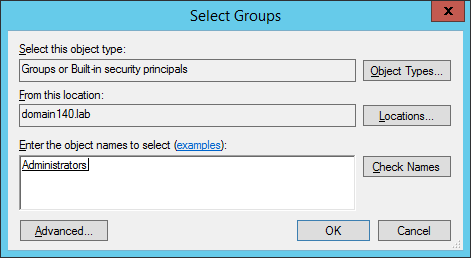
Important
Make sure to select the admin group of the server on which your SharePoint Server is installed. If necessary, specify the domain containing the relevant Active Directory group by clicking the Locations button.
Adding the created admin account to the SharePoint Farm Administrators group
- Open SharePoint Central Administration and go to Security > Manage the farm administrators group (Fig. 11.).
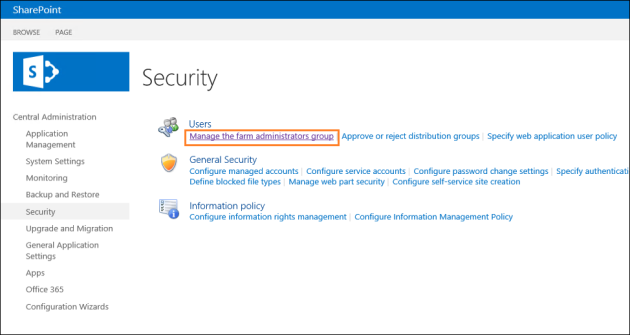
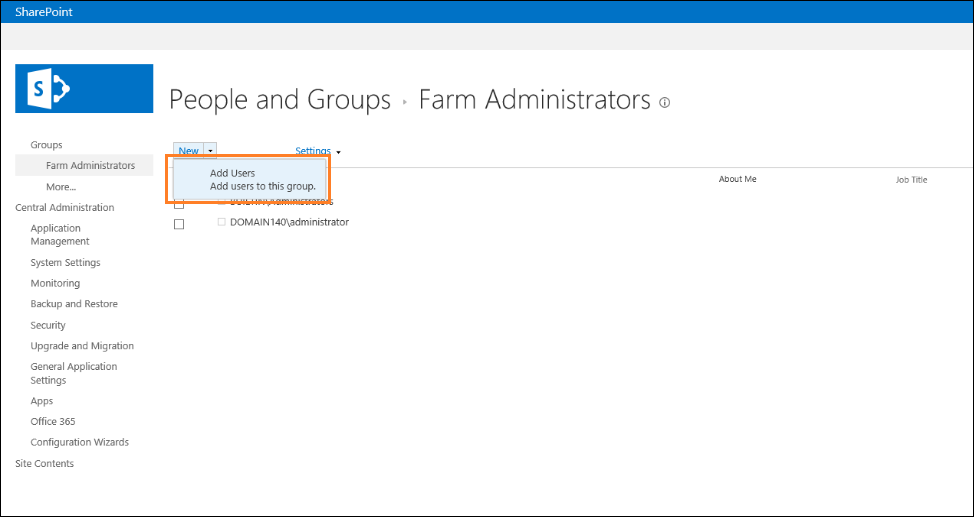
Fig. 11. Accessing the SharePoint Farm Administrators group. - In the Farm Administrators window, click New > Add users to this group (Fig. 12.).

Fig. 12. Adding users to the Farm Administrators group. - Start typing the name of your user and select it once it appears in the drop-down menu below (Fig. 13.).
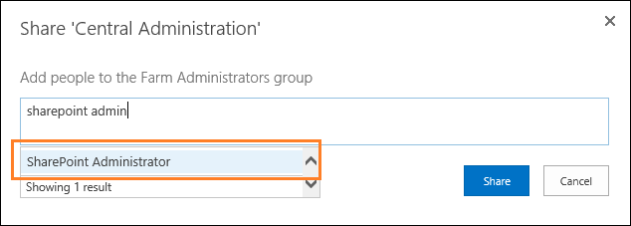
Fig. 13. Selecting the appropriate user account. - Click Share.


Granting Full Control permissions to the SharePoint site at the Web Application Policy level
- In SharePoint Central Administration, go to Application Management > Manage web applications.
- Select SharePoint - 80 on the list and click User Policy on the ribbon (Fig. 14.).
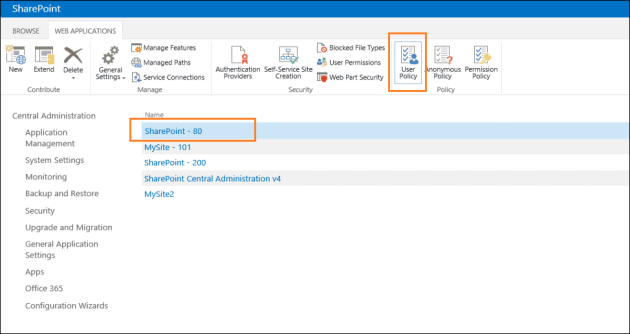
Fig. 14. Accessing the SharePoint User Policy settings. - In the Policy for Web Application window, click Add Users, select (All zones) from the drop-down menu, and click Next.
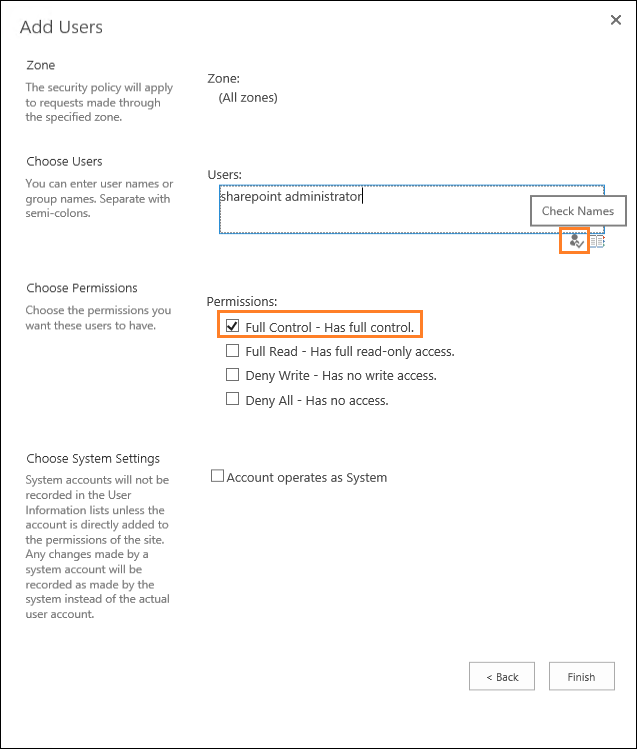
- In the next window, enter the full name or logon of your user in the Users box and click the Check Names button (Fig. 15.).

Fig. 15. Searching for the specific user account. - Under Permissions, select the Full Control checkbox and click Finish.
- Click OK to apply the changes.

Adding the admin account to the Remote Management Users group
- On your SharePoint Server machine, go to Control Panel > Administrative Tools > Computer Management.
- Click Local Users and Groups in the left pane and double-click Groups.
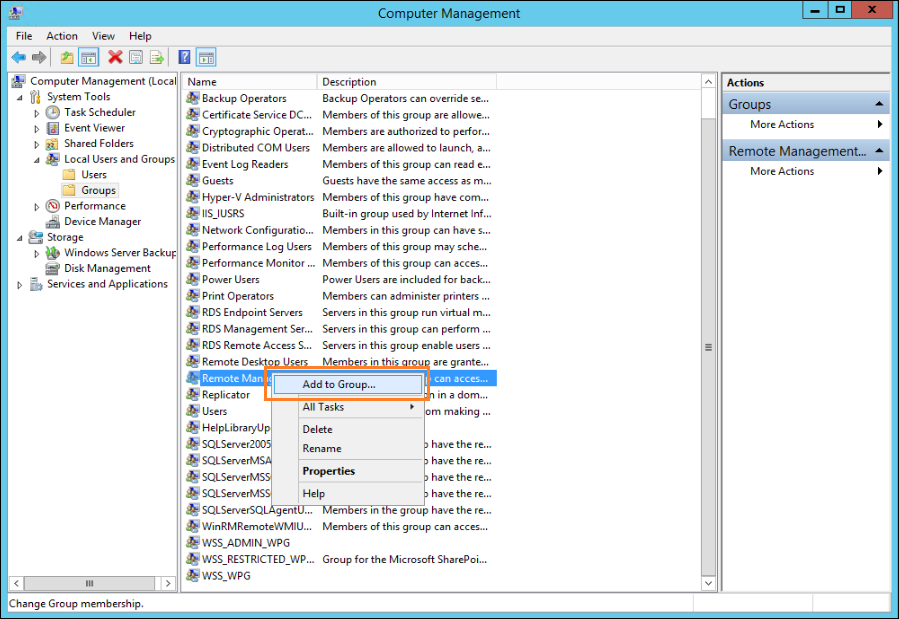
- In the central pane, right-click the Remote Management Users group and select Add to Group (Fig. 16.).

Fig. 16. Adding users to the Remote Management Users group. - In the properties window that opens, click Add, enter the name of your user, click Check Names, and then click OK two times.
Adding the admin account to the SharePoint_Shell_Access role
Important
Before you execute the Add-SPShellAdmin cmdlet, make sure the user account in question has been added to the Administrators group on the server where SharePoint is deployed.
- Open SharePoint Management Shell and add your user to the SharePoint_Shell_Access role by using the following cmdlet:
Add-SPShellAdmin -UserName <domain>\<user_name>
For example:Add-SPShellAdmin -UserName DOMAIN140\sharepoint.admin
For more information on the Add-SPShellAdmin cmdlet, visit this Microsoft page.
You can now use this account to back up your SharePoint content in CodeTwo Backup.
Configuring the site collection administrator (optional)
In order to perform backup and restore tasks on site collections existing in your SharePoint environment, the used admin account needs to be either a primary or secondary site collection administrator for each site collection. If that admin account is neither, the program will automatically set it as the secondary site collection administrator when:
- site collections are listed in the backup job wizard
- site collections are listed in the restore job wizard
- when site collections are being backed up
- when data is being restored to a selected site collection.
Keep in mind that this action will replace the existing secondary site collection administrators (learn more). You can check which users are currently set as secondary site collection administrators or set the secondary site collection administrator for specific site collection manually by following these steps:
- In SharePoint Central Administration, go to Application Management and click Change site collection administrators (Fig. 17.).
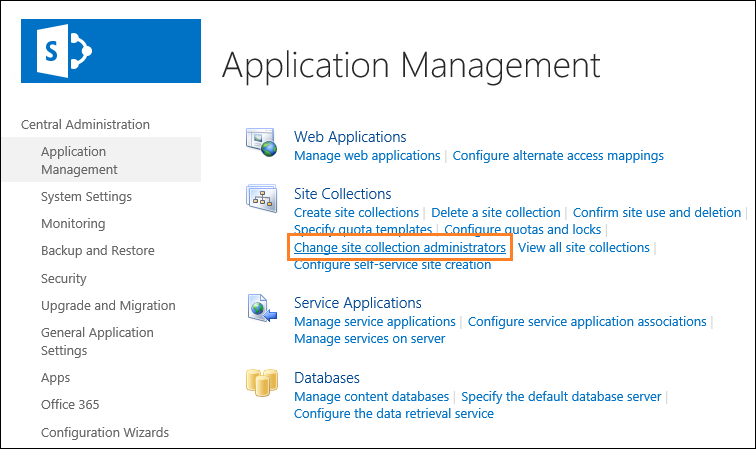
Fig. 17. Accessing management settings for site collection administrators.
- In the Site Collection Administrators window, select the site collection for which you want to set the secondary site collection administrator by clicking the down arrow in the Site Collection section and choosing Change Site Collection (Fig. 18.). In the window that opens, simply click the site URL and then click OK.
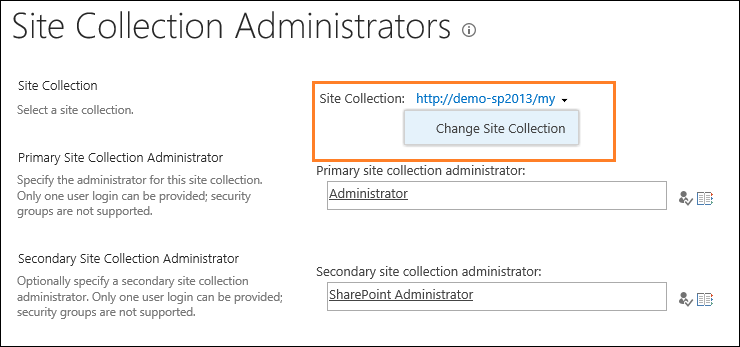
Fig. 18. Changing a site collection.
- In the Secondary site collection administrator section of the window, click the browse (book icon) button (Fig. 19.).
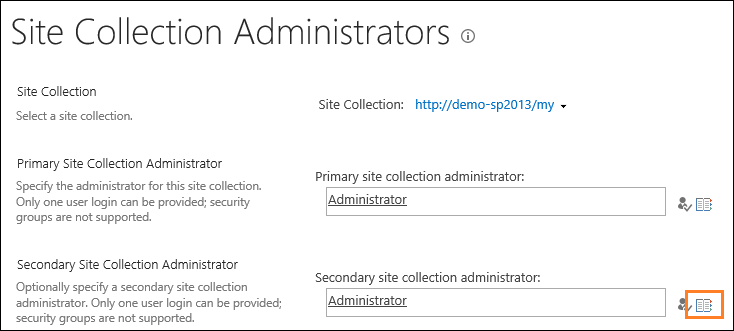
Fig. 19. Changing a secondary site collection administrator.
- In the Select People window that opens, provide the name of your admin account and click the search (magnifying glass icon) button. Once found, select that account and click OK (Fig. 20.).
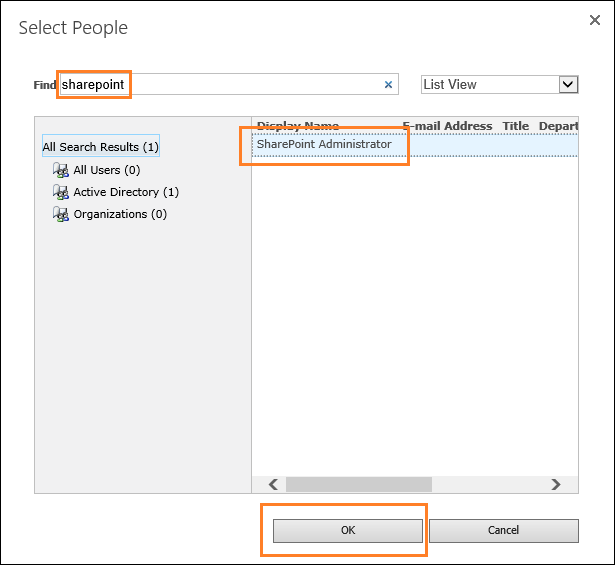
Fig. 20. Browsing for a specific admin account.
- Back in the Site Collection Administrators page, click OK to save new settings. Keep in mind that you need to click OK for each site collection separately in order for the changes to be applied.
- Repeat steps 1-5 until you have set the secondary site collection admin for all site collections.
Tip
To set the secondary site collection administrator to multiple site collections at once, you can use the Set-SPSite cmdlet in SharePoint Management Shell. Learn more here
| Related products: | CodeTwo Backup for Exchange, CodeTwo Backup for Office 365 |
| Categories: | How-To |
| Last modified: | September 19, 2025 |
| Created: | June 11, 2018 |
| ID: | 730 |


