Troubleshooting problems with shared mailboxes
Problem:
You experience problems when setting up a shared mailbox to work with CodeTwo Email Signatures 365.
Solution:
See the following sections to find out what to do if:
- A personal signature is not inserted for shared mailboxes,
- A signature is misplaced in replies or forwarded messages sent using a shared mailbox, or
- A shared mailbox doesn’t show up in Outlook after assigning the Read and manage permission.
A personal signature is not inserted for shared mailboxes
For general information on how to add a personal signature to emails sent from shared mailboxes, see this article.
Personal signatures may not be inserted into messages sent from a shared mailbox due to incorrect configuration of the CodeTwo add-in (applies to Outlook signatures) or because the shared mailbox has been accessed as a secondary account. Follow the steps below to make sure your setup is correct:
- Check the CodeTwo add-in settings (Outlook signatures only)
- Use the Other Email Address option (Outlook signatures only)
- Use the From field instead of the Open another mailbox option (Outlook on the web)
- (Optional) Remove a secondary mailbox from Outlook
Check the CodeTwo add-in settings (Outlook signatures only)
- Sign in to the CodeTwo Admin Panel.
- Select your Microsoft 365 tenant on the Tenants tab, then go to Outlook add-in.
- Make sure the Change CodeTwo Outlook (client-side) signatures to match the email address in the From field setting is disabled, as shown in Fig. 1. If it is not, click the toggle to disable it. Learn more about this setting
This ensures you will always get your own signature, even if you change the address in the From field when composing an email. Note that it can take up to 4 hours for this change to propagate.
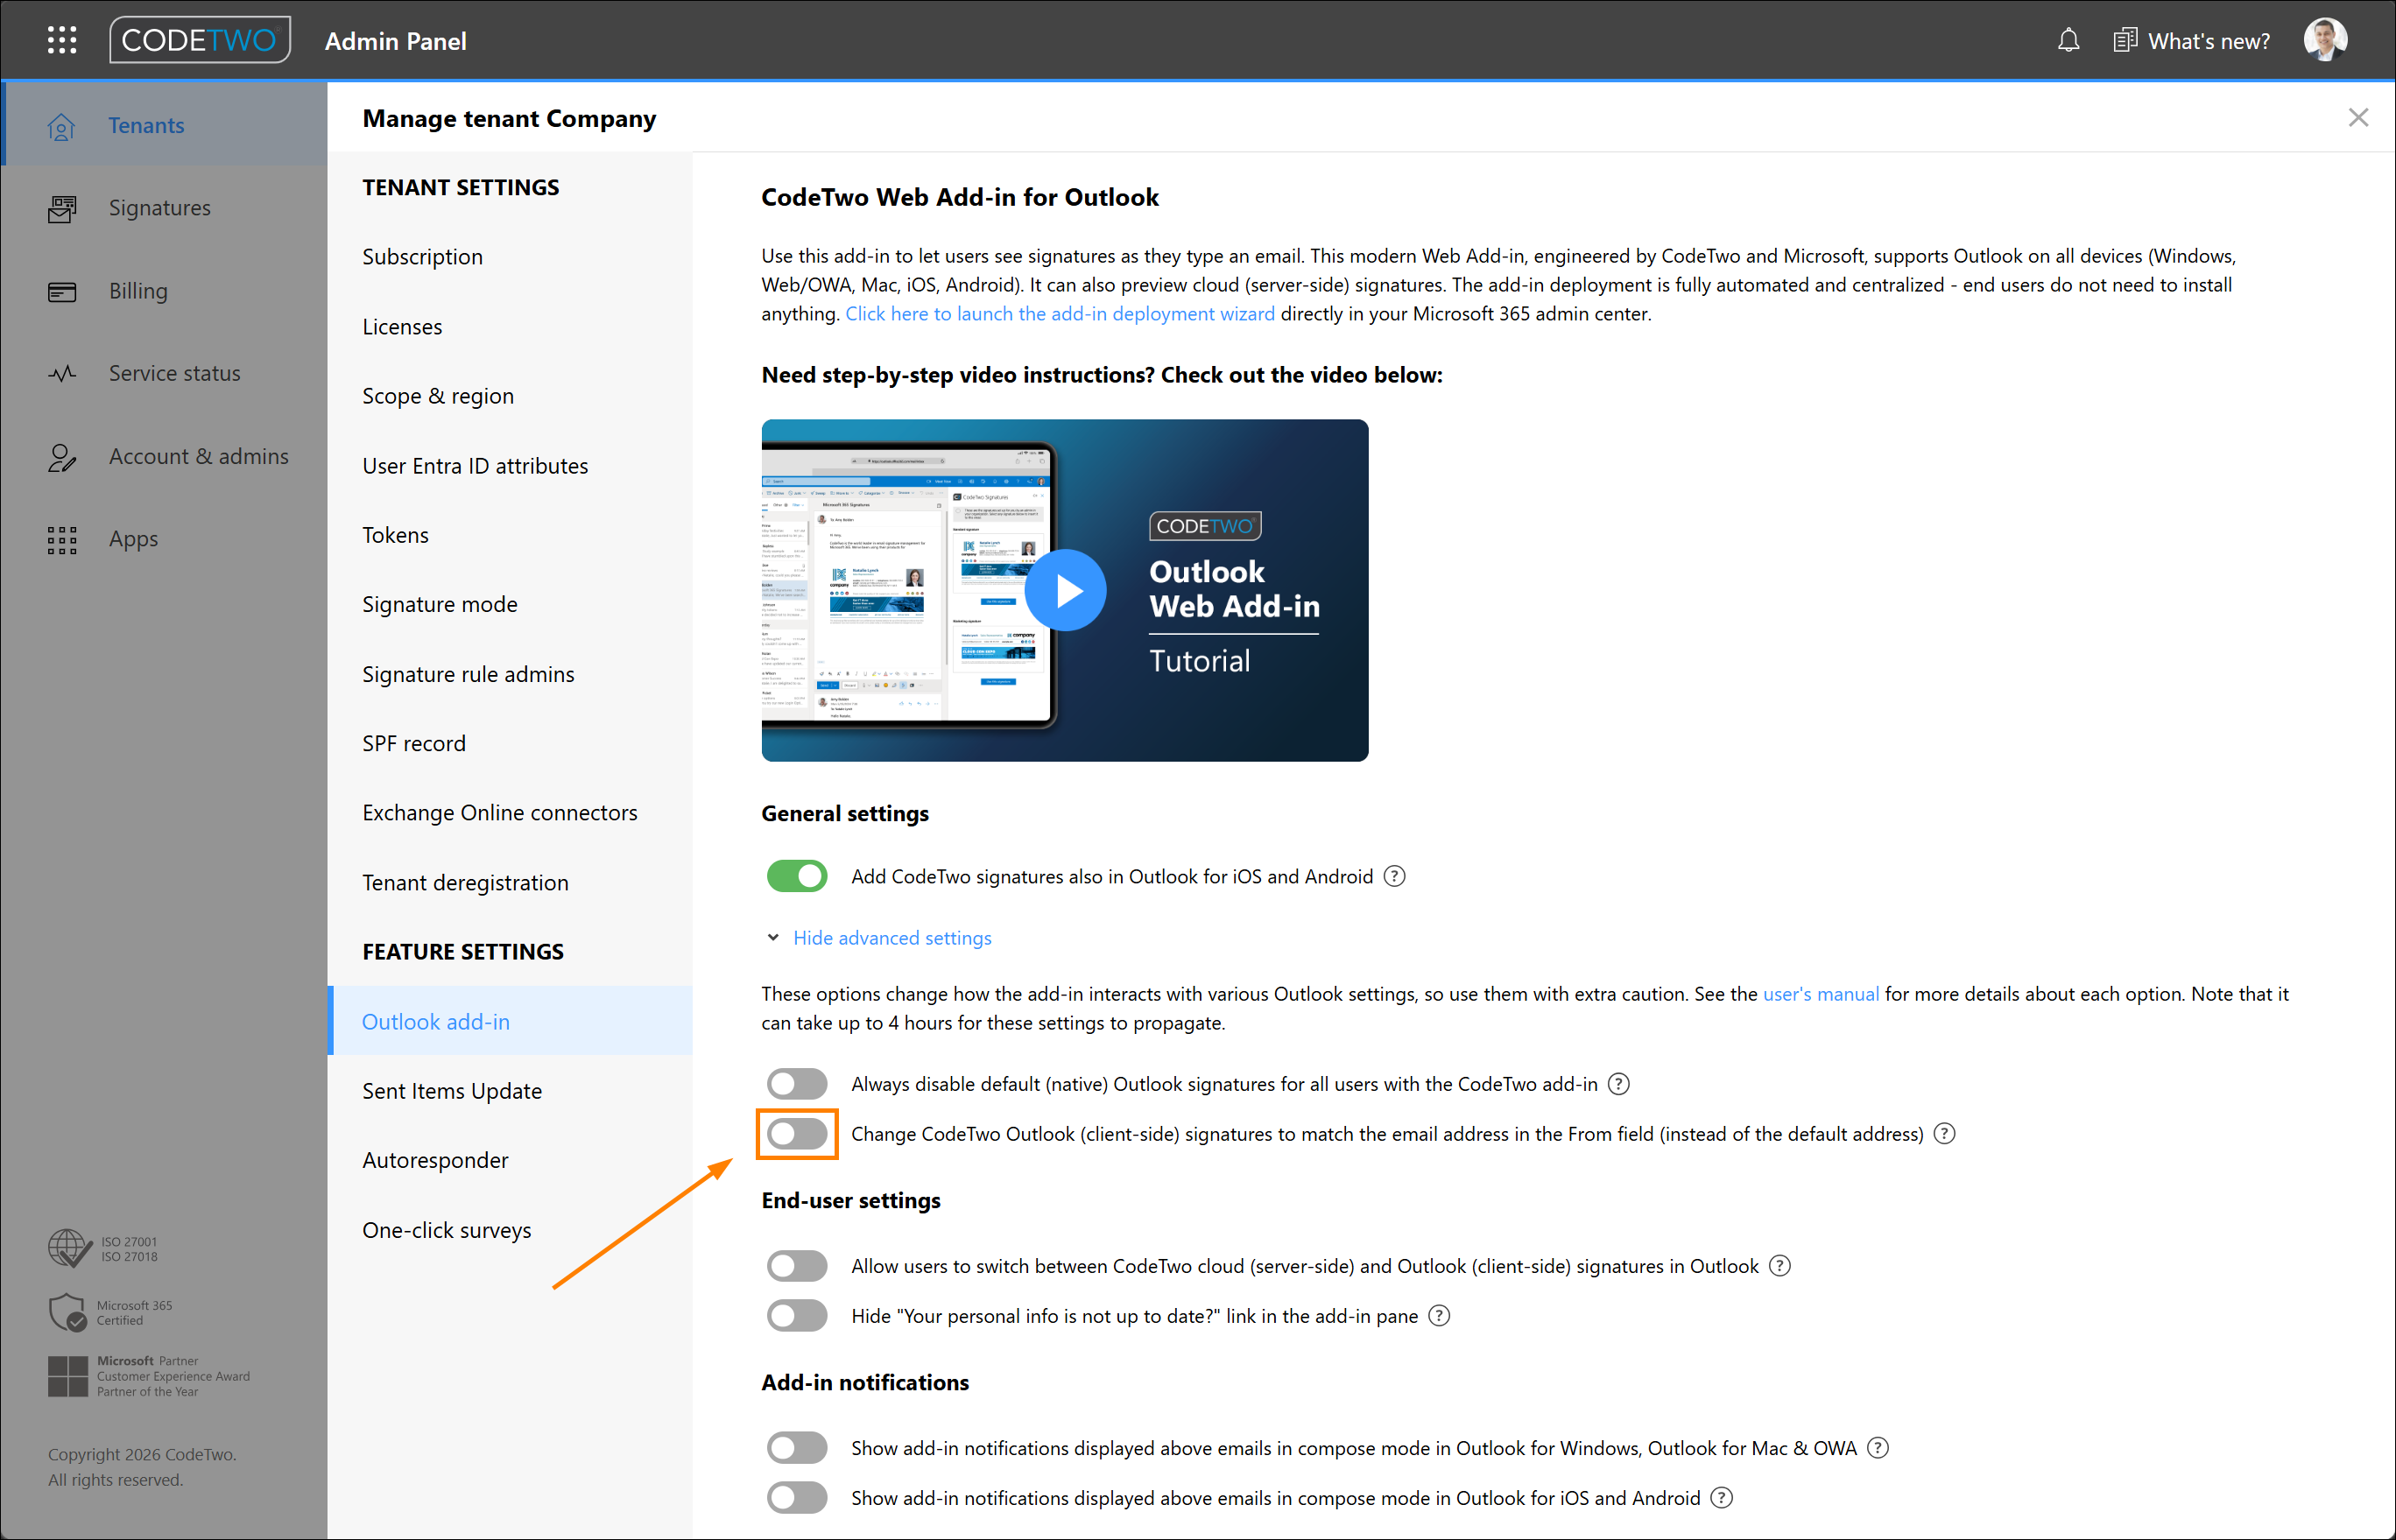
Fig. 1. To keep your personal signatures in emails sent from shared mailboxes, this option must be disabled.
Use the Other Email Address option (Outlook signatures only)
Important
This section only applies to the classic Outlook for Windows and Outlook for Mac.
If a shared mailbox has been added as a secondary account in Outlook and you select it in the From field when composing an email (see Fig. 2.A), or when you access this account’s folders in the mailbox, Outlook makes a full switch to this account. As a result:
- the CodeTwo Outlook Add-in becomes unavailable (unless it's deployed specifically to that shared mailbox), or
- if the add-in is deployed to the shared mailbox, it won't recognize the original user – meaning you cannot send emails on its behalf with your personal signature.
To send an email as or on behalf of another mailbox, always use the Other Email Address option in Outlook (see Fig. 2.B).
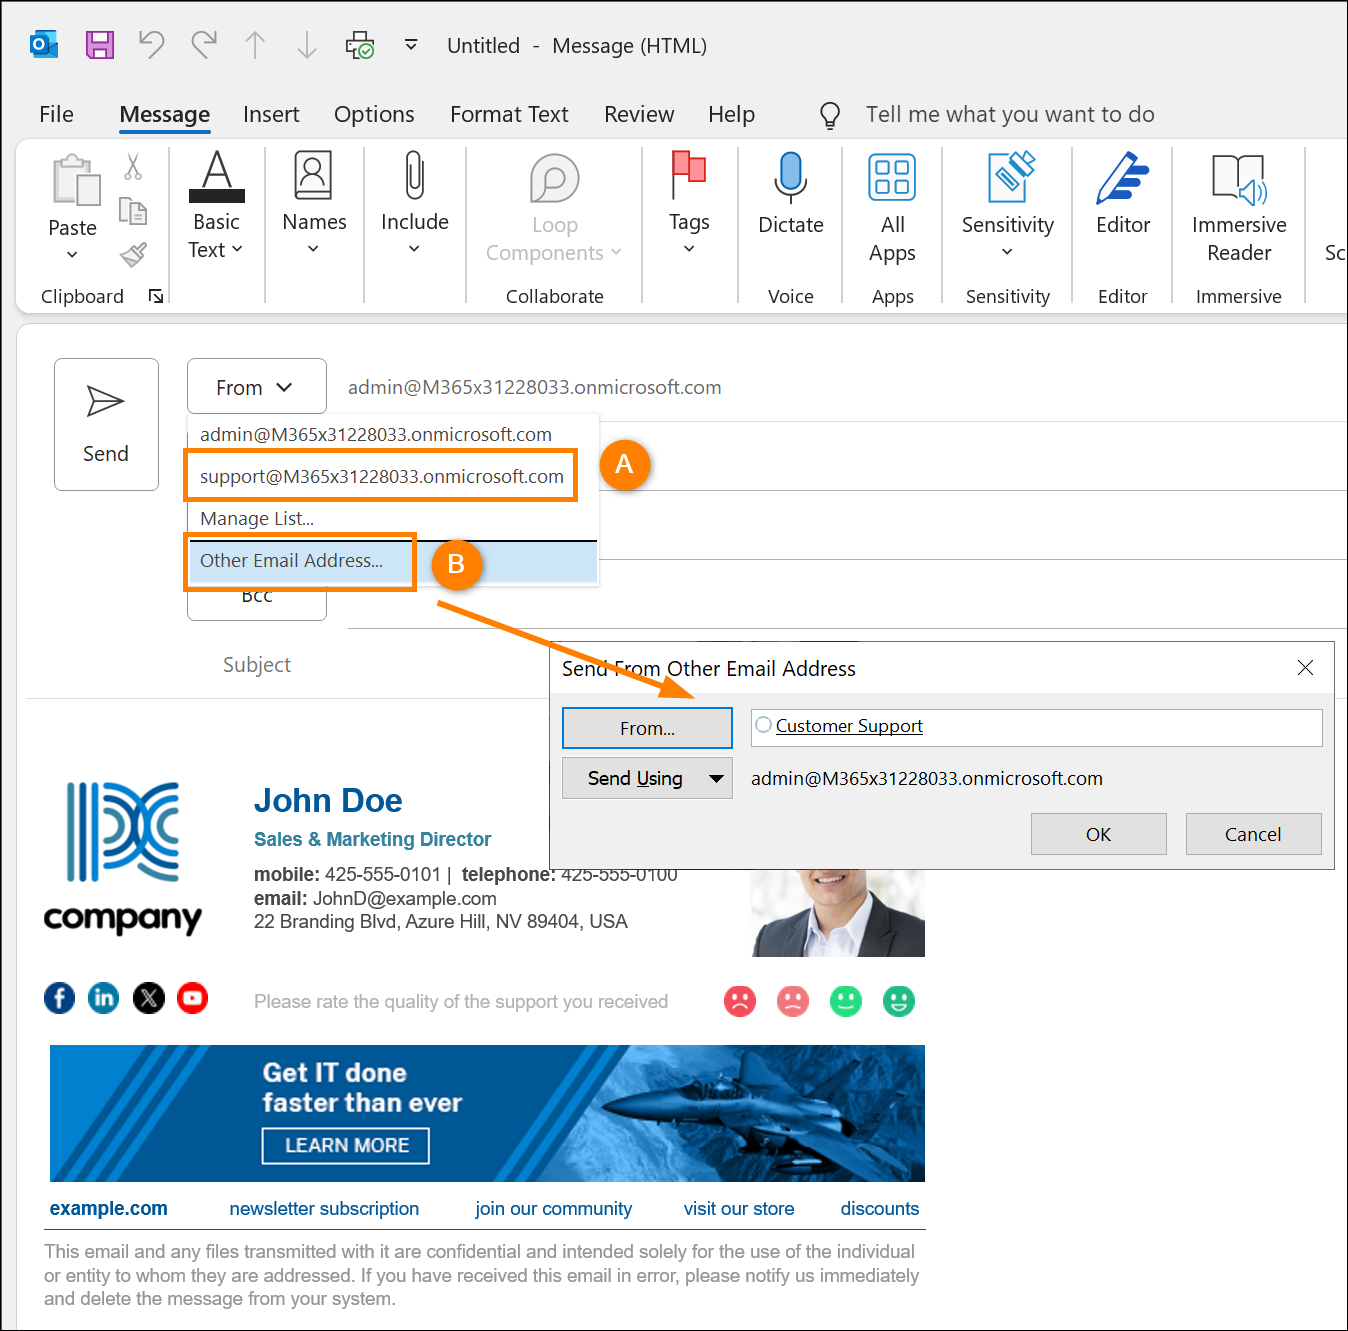
Fig. 2. Sending an email from (A) or as / on behalf of (B) a shared mailbox.
You can also remove the secondary account from Outlook altogether. Read this section to learn how to do it.
Use the From field instead of the Open another mailbox option (Outlook on the web)
If you switch to a shared mailbox by using the Open another mailbox option in Outlook on the web (OWA), your personal signature won’t be inserted for emails sent from that mailbox. To get the personal signature, create an email on your primary account and select the shared mailbox’s address in the From field.
(Optional) Remove a secondary mailbox from Outlook
If you have a shared mailbox added as a secondary (standard) account in Outlook, it’s recommended to remove it. This way, you’ll make sure your personal signature is used in all emails, including those sent from shared mailboxes. Follow the steps below to learn how to remove a secondary account in your Outlook version:
- Classic Outlook for Windows
- New Outlook for Windows and Outlook on the web (OWA)
- Outlook for Mac
- Outlook for Android
- Outlook for iOS
Classic Outlook for Windows
- Go to File > Account Settings > Account Settings.
- On the Email tab, select your secondary account and click Remove (Fig. 3.), then click OK to confirm.
- Restart Outlook.
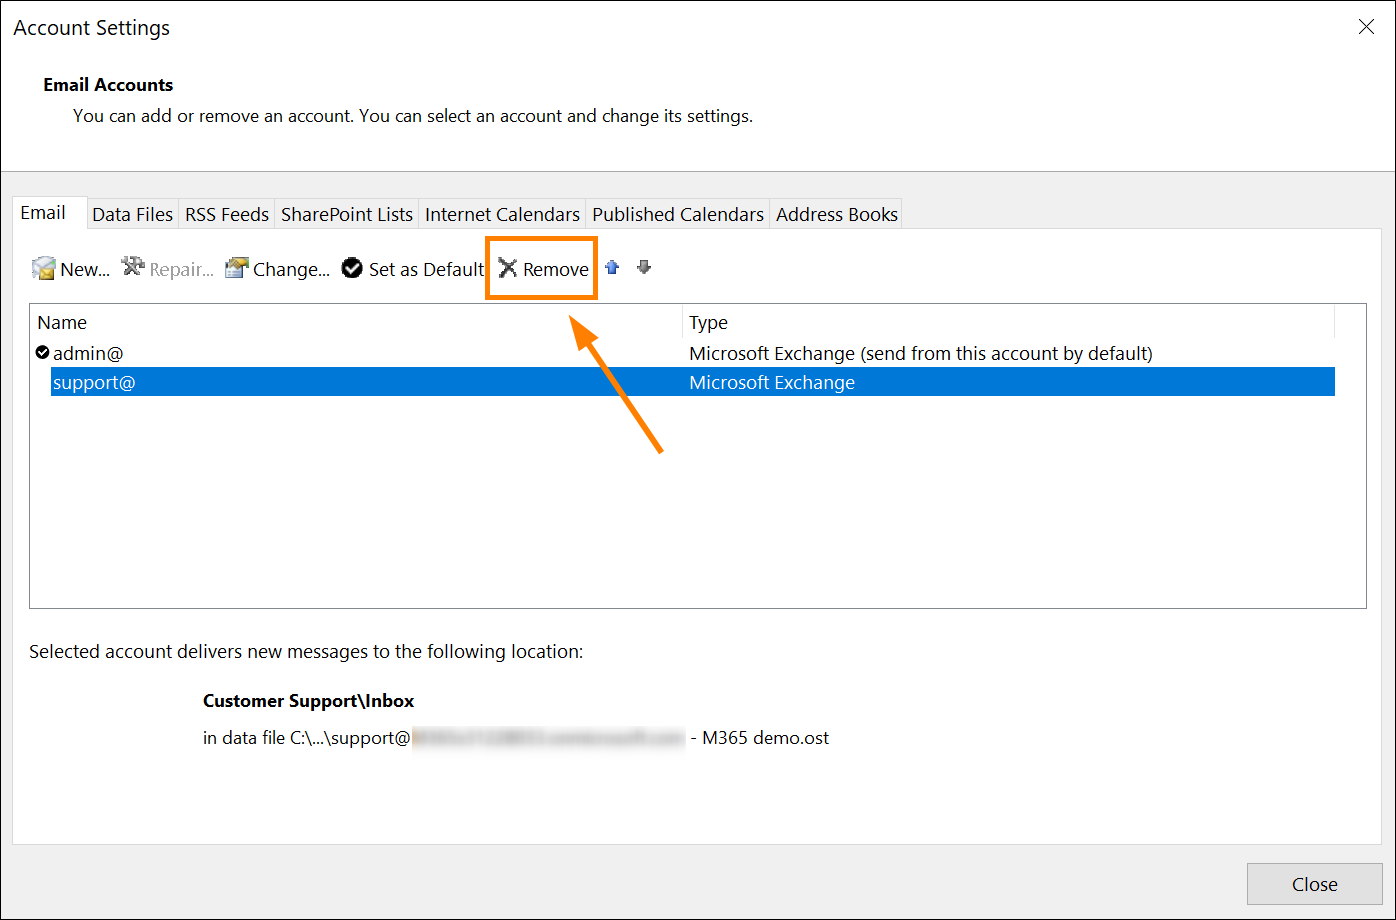
Fig. 3. Removing a secondary email account from the classic Outlook for Windows.
New Outlook for Windows and Outlook on the web (OWA)
- Click Settings (the gear icon) in the upper-right corner.
- Go to Accounts > Your accounts, then click Manage next to the account you want to remove (Fig. 4.).
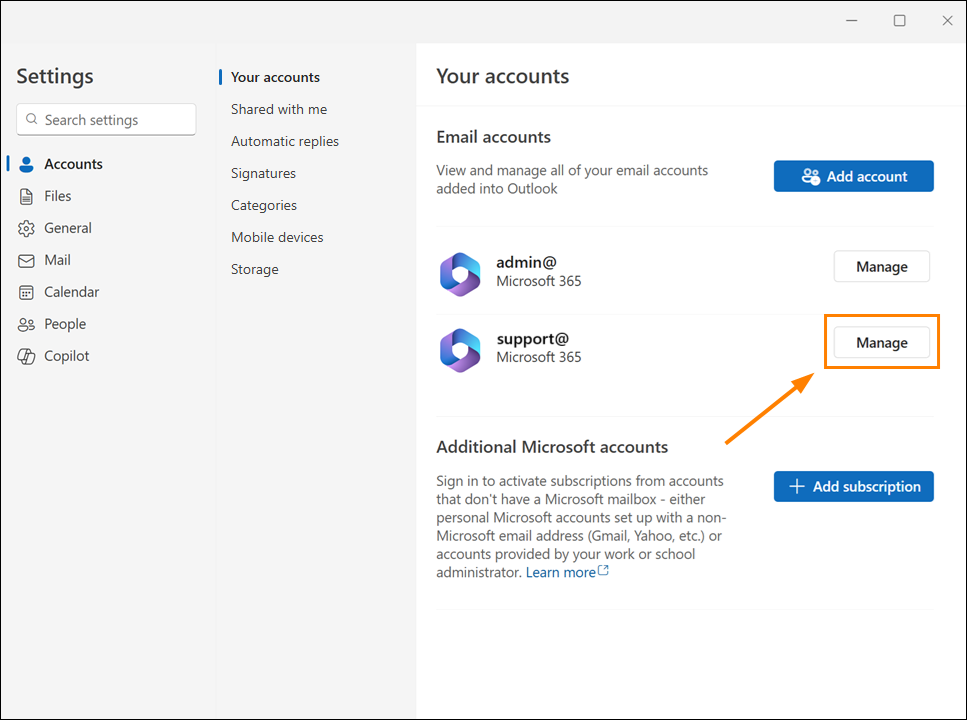
Fig. 4. Accessing the email account settings in the new Outlook for Windows.
- Click Remove (Fig. 5.) and confirm when prompted.
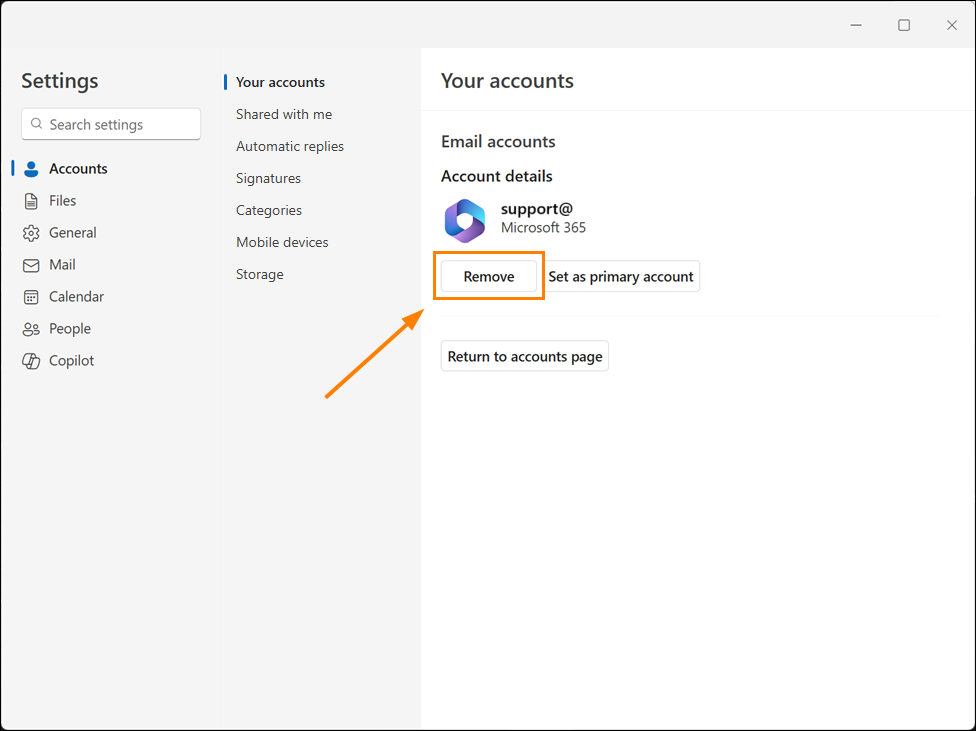
Fig. 5. Removing a secondary email account from the new Outlook for Windows.
Outlook for Mac
- Go to Tools > Accounts in the menu bar.
- Select the account you want to remove (Fig. 6.).

Fig. 6. Accessing the email account settings in Outlook for Mac.
- In the account settings window, click Manage > Remove Account (Fig. 7.) and confirm when prompted.
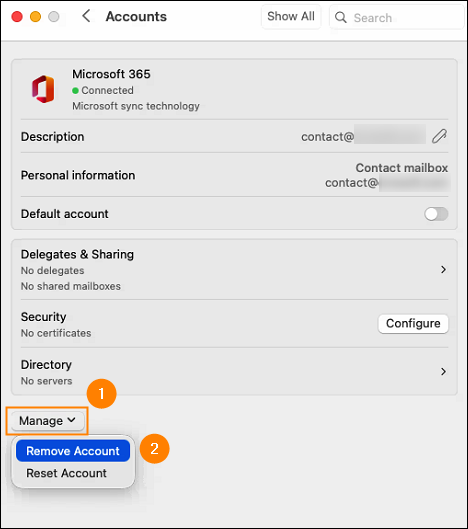
Fig. 7. Removing a secondary email account from Outlook for Mac.
Outlook for Android
- Tap your profile picture.
- In the side menu, tap the Settings (gear) icon.
- Tap Accounts and select the account you want to remove (see Fig. 8.).
- Tap Remove Account and confirm when prompted.

Fig. 8. Removing a secondary email account from Outlook for Android.
Outlook for iOS
- Tap your profile picture.
- In the side menu, tap the Settings (gear) icon.
- Tap Accounts and select the account you want to remove (see Fig. 9.).
- Tap Remove Account and confirm when prompted.
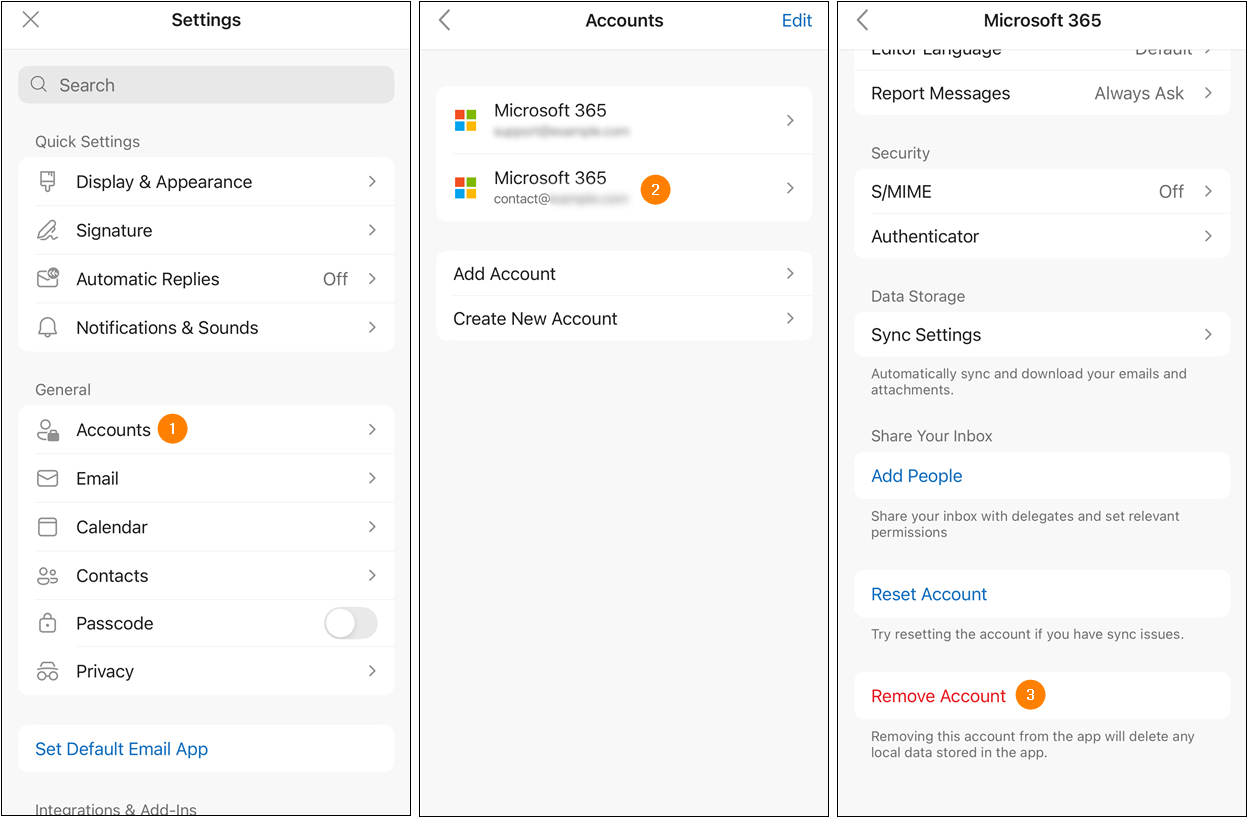
Fig. 9. Removing a secondary email account from Outlook for iOS.
A signature is misplaced in replies or forwarded messages sent using a shared mailbox
If you use a shared mailbox added to a primary user account in the new Outlook for Windows or Outlook on the web (OWA), a signature might be inserted in the current cursor location in a new reply or forwarded message, rather than at the end of this message. This is a known bug of Outlook, not CodeTwo; we have already reported this issue to Microsoft. To add your signature correctly, simply cut it from the wrong place in the message body and paste it where needed.
A shared mailbox doesn’t show up in Outlook after assigning the Read and manage permission
The Read and manage (Full Access) delegate permission assigned in the Exchange admin center allows a user to send emails from a shared mailbox. Unlike the more restrictive Send as permission, it also enables the user to open the shared mailbox in Outlook as its owner.
If the Read and manage (Full Access) permission is assigned correctly but the shared mailbox doesn't appear in Outlook, the mailbox may need to be added manually to the user’s primary account (not as a secondary account).
Important
Note that adding a shared mailbox as a secondary account prevents your personal Outlook signatures from being added to emails sent on behalf of that shared mailbox. To avoid this, make sure to add the mailbox according to the instructions below. If a shared mailbox has already been added as a secondary account and you want to remove it, read this section to learn how to do it.
Follow the steps based on your Outlook version:
- Classic Outlook for Windows
- New Outlook for Windows and Outlook on the web (OWA)
- Outlook for Mac
- Outlook for Android
- Outlook for iOS
Classic Outlook for Windows
- Go to File > Account Settings > Account Settings.
- On the Email tab, select your primary account and click Change (see Fig. 10.).
- Click More Settings, then go to the Advanced tab.
- Click Add, enter the shared mailbox name, and click OK.
- Click OK and exit all dialog boxes.
The shared mailbox will be added under your primary account folders.
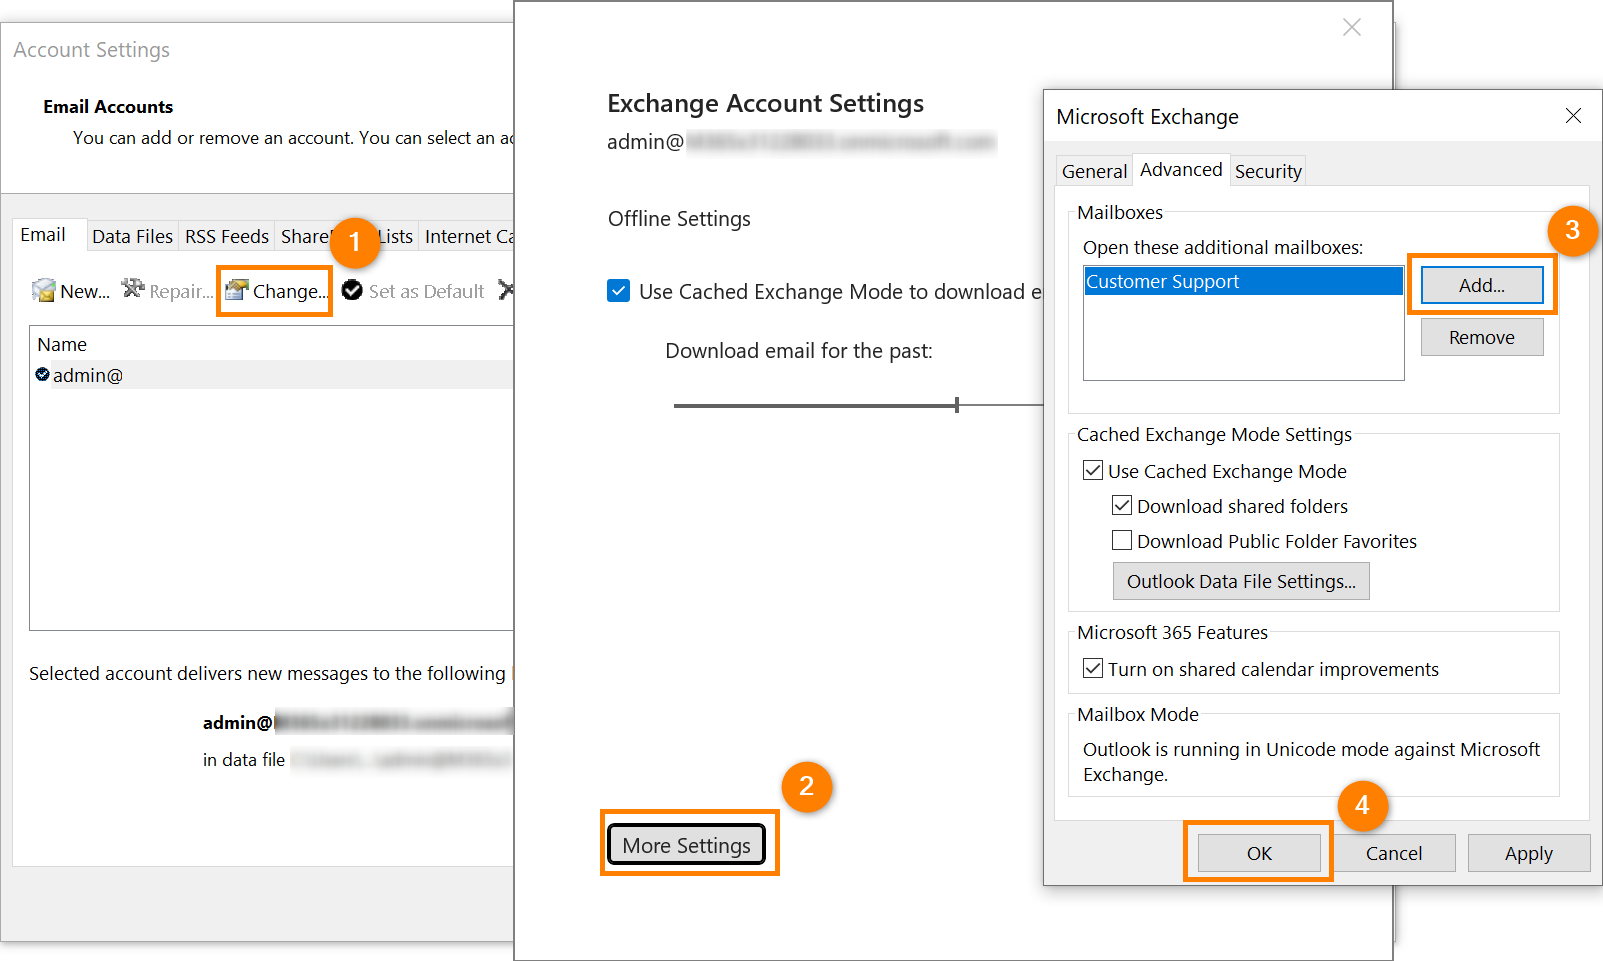
Fig. 10. Adding a shared mailbox to the classic Outlook for Windows.
New Outlook for Windows and Outlook on the web (OWA)
- Click the ellipsis (...) button next to your primary account name (see Fig. 11.).
- Select Add shared folder or mailbox.
- Enter the shared mailbox name and click Continue.
- (New Outlook for Windows only) Restart Outlook.
The shared mailbox will be added under your primary account folders.
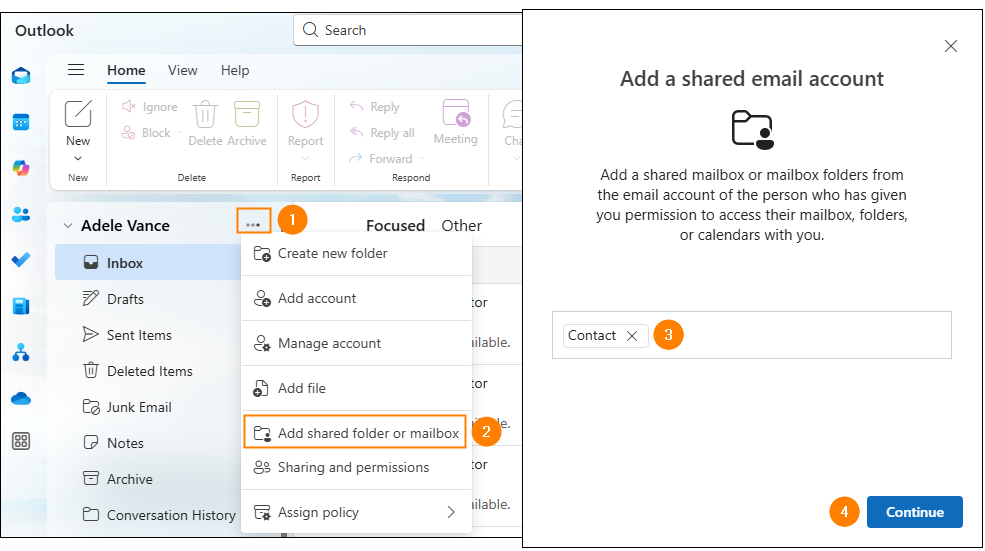
Fig. 11. Adding a shared mailbox to the new Outlook for Windows and OWA.
Outlook for Mac
- Go to Tools > Accounts in the menu bar.
- In the Email Accounts section, select your primary account.
- Click Delegates & Sharing (see Fig. 12.).
- Switch to the Shared With Me tab and click the + button.
- Enter the shared mailbox name and click Add.
The shared mailbox will be added under your primary account folders.
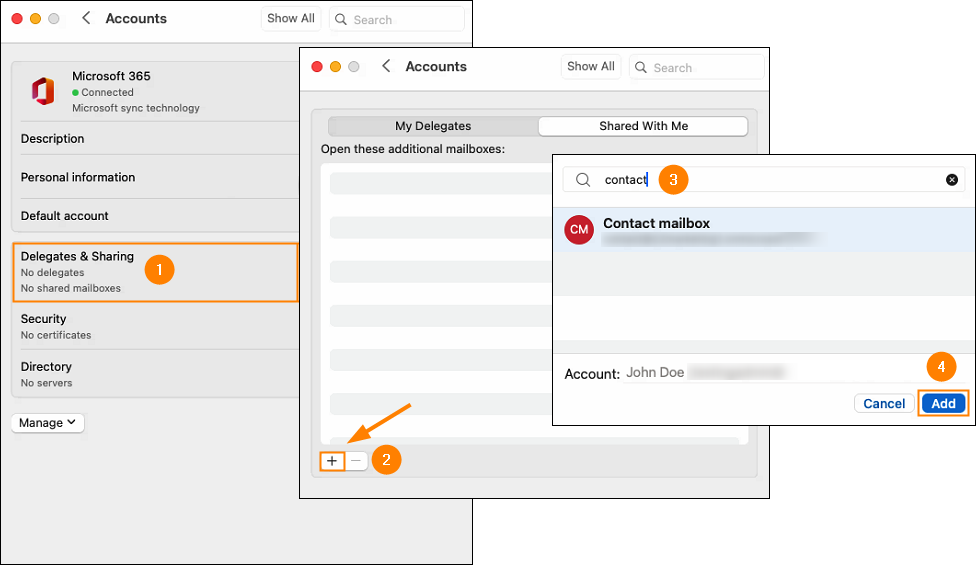
Fig. 12. Adding a shared mailbox to Outlook for Mac.
Outlook for Android
- Tap your profile picture.
- In the side menu, tap the Settings (gear) icon.
- Tap Accounts > Add account > Add a shared mailbox (see Fig. 13.).
- Enter the shared mailbox address and tap Continue.
The shared mailbox will be added to the list of accounts in the side menu.
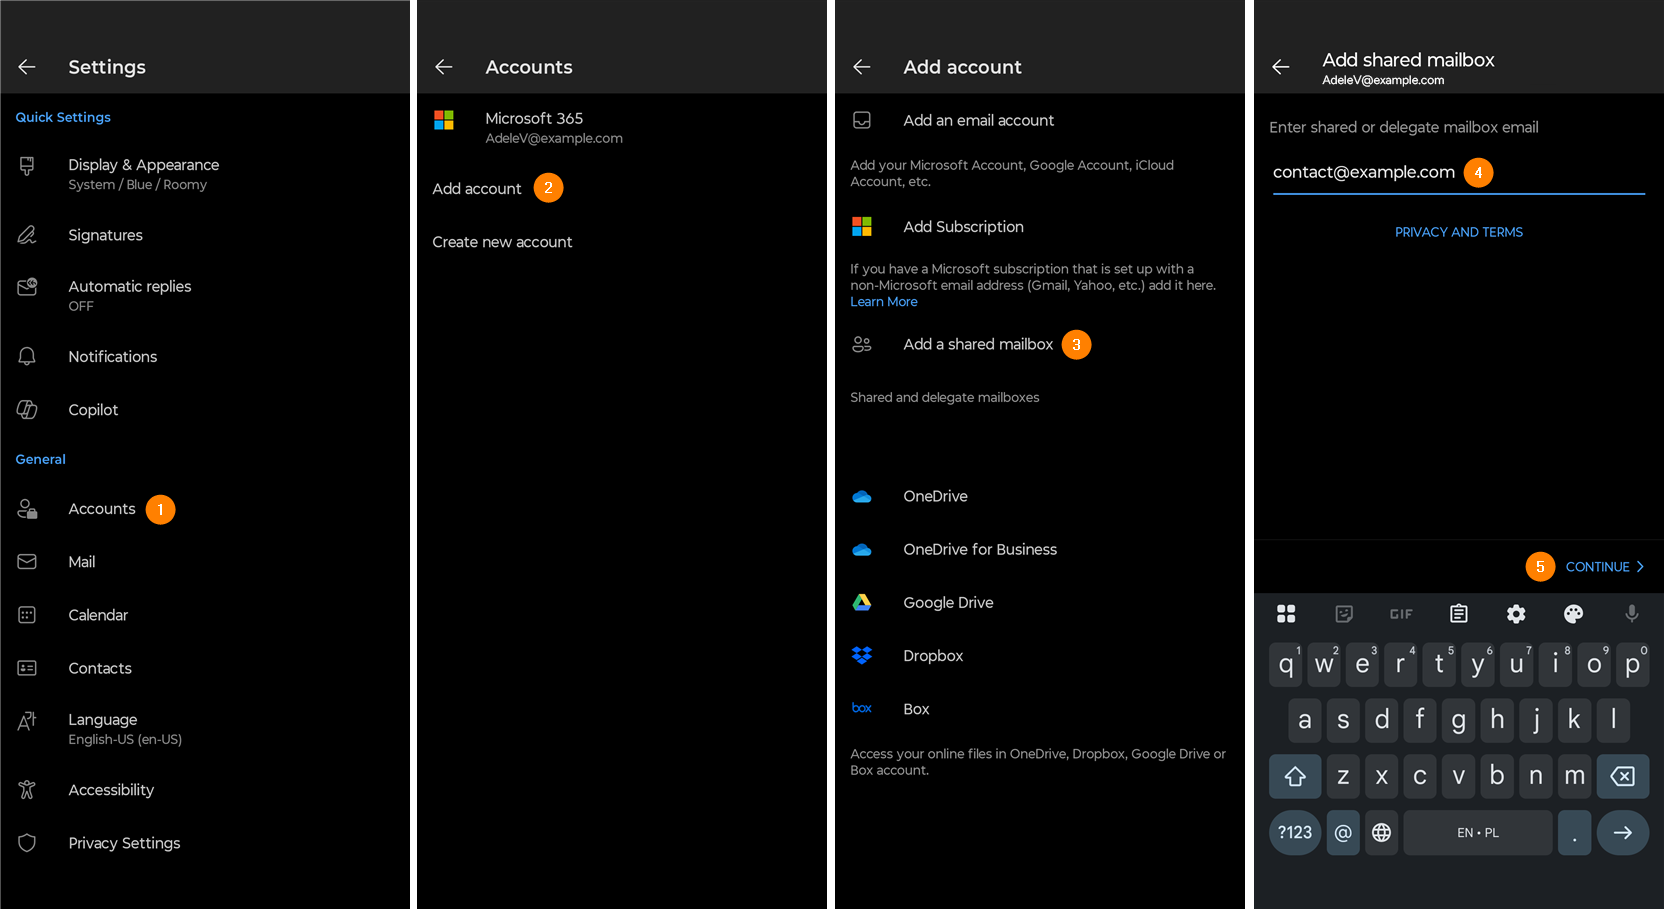
Fig. 13. Adding a shared mailbox to Outlook for Android.
Outlook for iOS
- Tap your profile picture.
- In the side menu, tap the Settings (gear) icon.
- Tap Accounts > Add Account > Shared Mailbox (see Fig. 14.).
- Enter the shared mailbox address and tap Add Shared Mailbox.
The shared mailbox will be added to the list of accounts.

Fig. 14. Adding a shared mailbox to Outlook for iOS.
See also:
| Related products: | CodeTwo Email Signatures for Office 365 |
| Categories: | Troubleshooting |
| Last modified: | May 12, 2026 |
| Created: | February 3, 2026 |
| ID: | 1146 |


