How to configure a Send-Only account in Outlook
Problem:
You want to create a Send-Only email account (from which mail is never downloaded) in Outlook.
Solution:
To exclude an email account from receiving emails in Outlook, you need to add this account as a new POP3 account in Outlook. Then you need to modify this account by setting a fake (non-existent) incoming mail server. Finally, you will have to prevent the Send/Receive error from keep popping up by using the Send/Receive Groups feature in Outlook.
Adding a send-only POP3 account
Follow the steps below to add a Send-Only account in Outlook 2016:
- (Optional) Before you add a new email account, you might want to prevent Outlook from importing this account's emails. To do so, you need to temporarily disable the automatic send/receive capability in Outlook for all of your accounts. Go to the Send / Receive tab, click Send/Receive Groups, and select Disable Scheduled Send/Receive, as shown in Fig. 1.
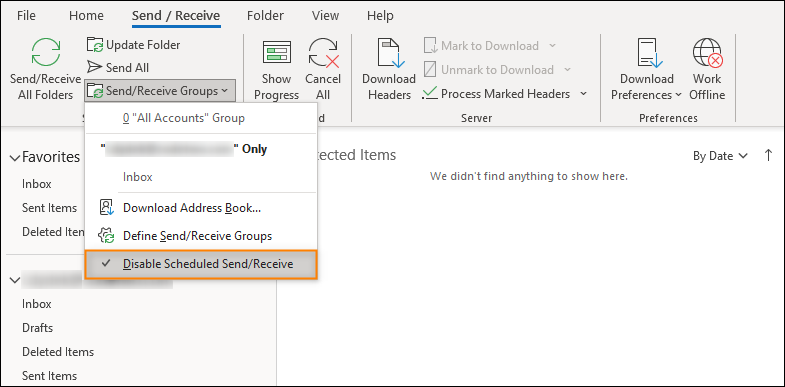
Fig. 1. Disabling the automatic send/receive tasks in Outlook.
- To add a new account in Outlook, go to File > Add Account.
- Type the address of your account. Click on Advanced options and select Let me set up my account manually (Fig. 2.), then click Connect.
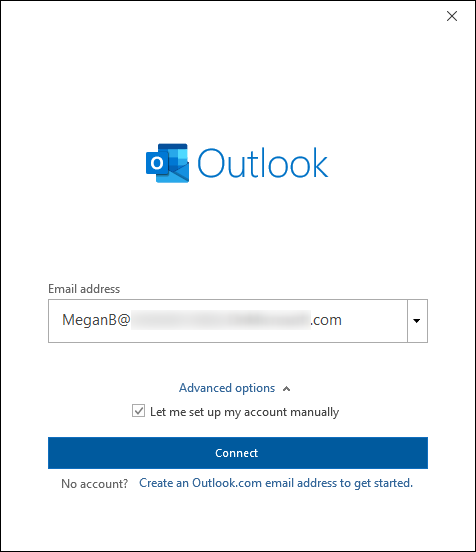
Fig. 2. Adding a new email account to Outlook.
- Choose POP as the account type (Fig. 3.).
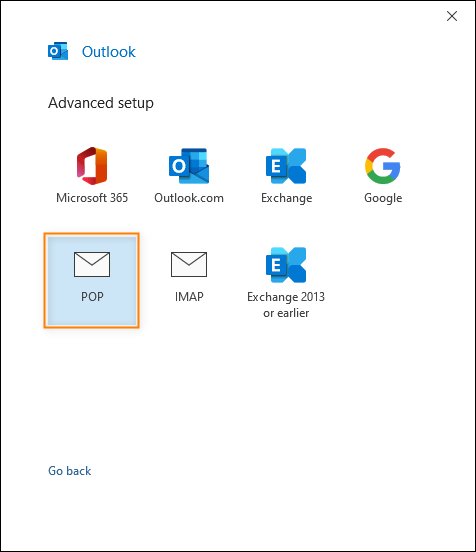
Fig. 3. Choosing the account type.
- Configure incoming and outgoing mail server settings for your account (see an example in Fig. 4.). Make sure to provide valid information. Otherwise, Outlook will refuse to add this account. Click Next to add the account.
Tip
See this Microsoft article to get POP settings for common email providers.
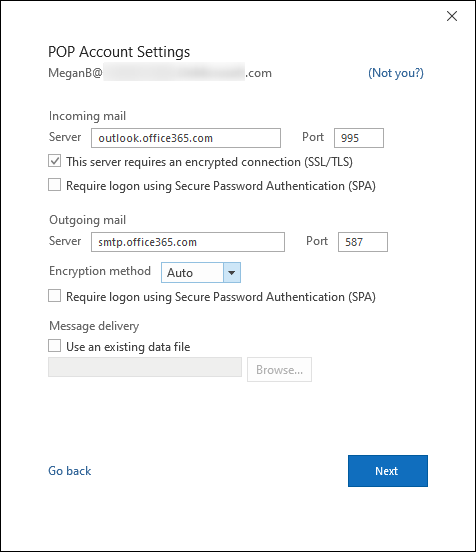
Fig. 4. Configuring the new POP account.
- Type the password for your account and click Connect. Outlook will test the connection. When the account setup is complete, click OK.
- Your email account is now visible in Outlook.
- If you followed Step 1 and temporarily disabled the scheduled Send/Receive tasks in Outlook, the mailbox does not contain any emails. This is only temporary - once you resume the send/receive tasks, the mailbox will receive messages in the usual way. To avoid this, proceed to Step 8.
- If you skipped Step 1, you will have access to all emails in this mailbox once Outlook downloads them. You will also receive new emails sent to this account.
- To stop Outlook from receiving emails for the account you added, you need to modify the settings of the incoming mail server for this account: open the File tab in Outlook and go to Account Settings (Fig. 5.).
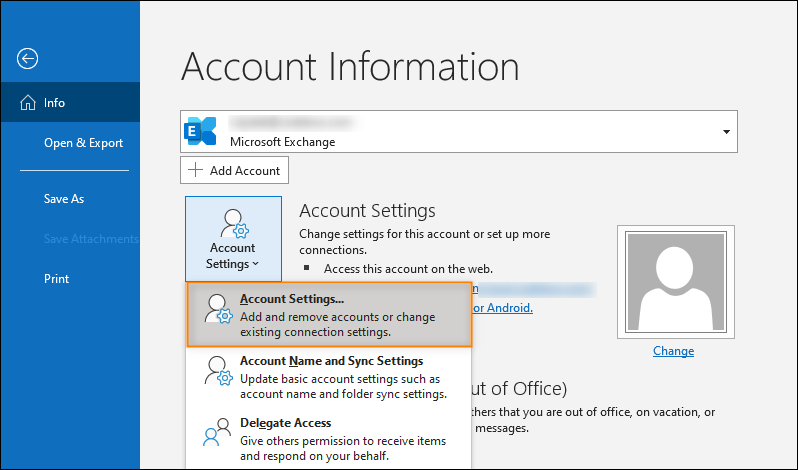
Fig. 5. Accessing the account settings in Outlook.
- On the Email tab, edit your email account by double-clicking it or via the Change button (Fig. 6.).
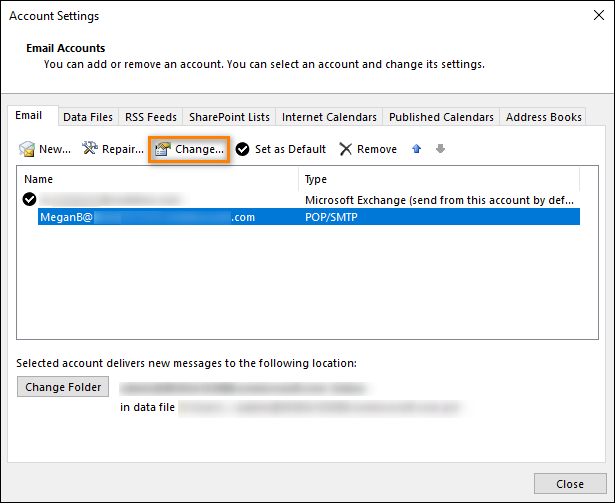
Fig. 6. Accessing the email server settings.
- The server settings window opens. Change the name of the Incoming mail server to any fake name (e.g. fake-server) and clear the Automatically test account settings when Next is clicked checkbox (Fig. 7.). Click Next and then Finish.
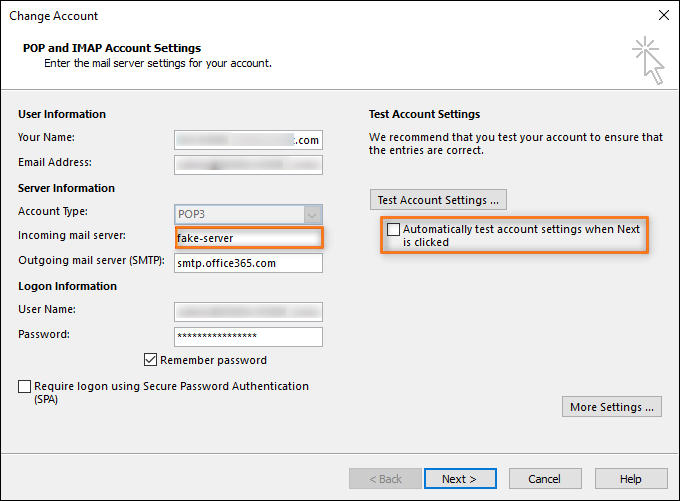
Fig. 7. Configuring the connection to a fake incoming mail server.
- This email account has now become a Send-Only account. You can use it to send emails, but Outlook will not receive emails sent to this account.
- Optional steps:
- If you disabled the send/receive tasks in Outlook (Step 1), turn it back on to resume your mail flow.
- If you skipped Step 1 and you would like to remove the existing content of your send-only mailbox account (e.g. emails automatically downloaded by Outlook when you added this account), you can clear this data on the Data Files tab in the Account Settings (see Fig. 6.).
Getting rid of the Send/Receive error
Since you provided a fake name of the incoming mail server, Outlook displays the Send/Receive error (Fig. 8.) for your Send-Only account each time a send/receive task is performed.
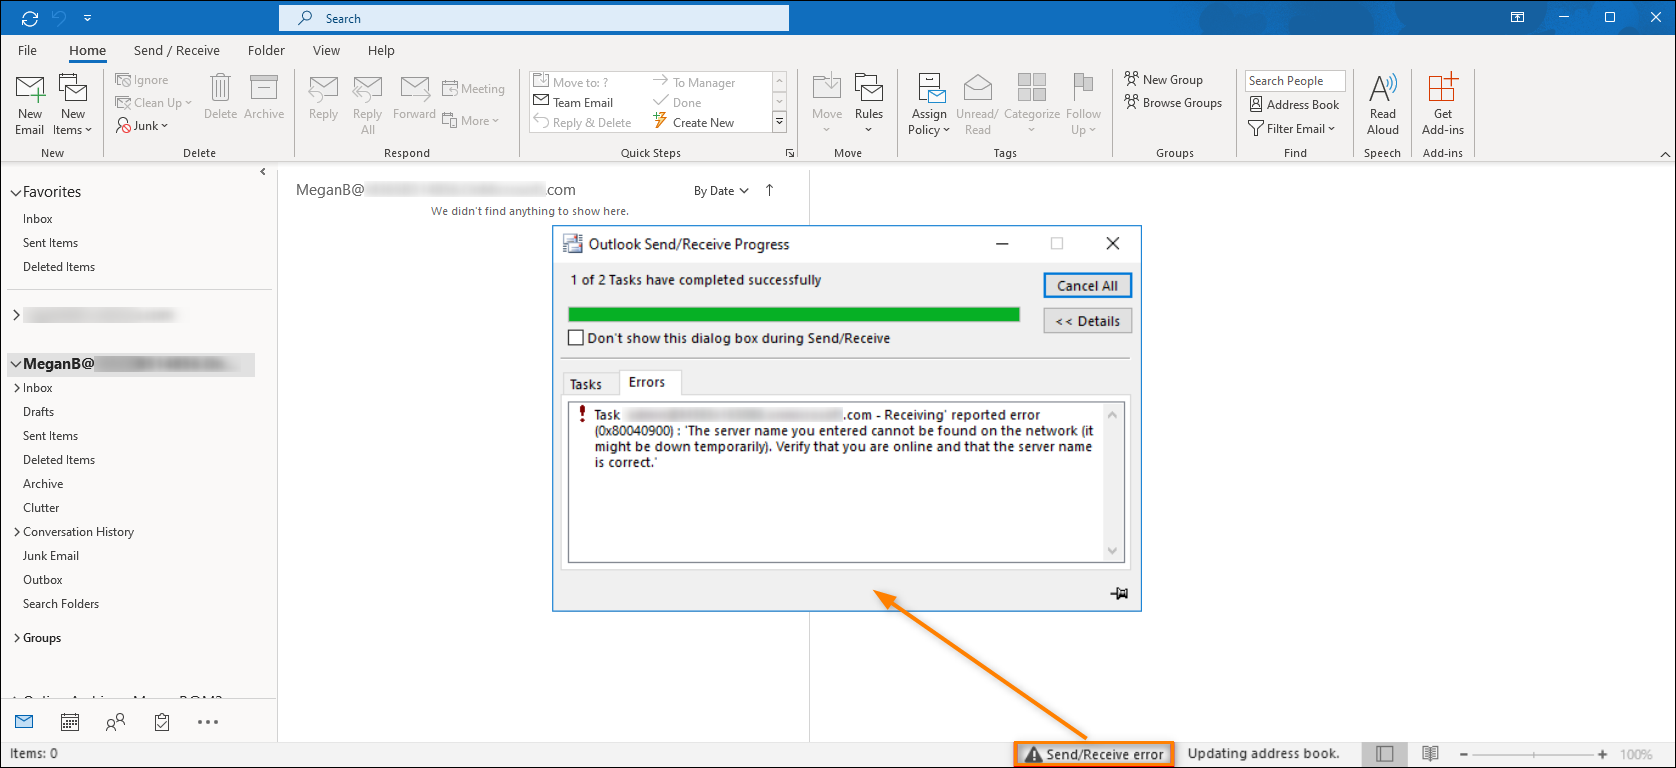
Fig. 8. The Outlook error related to the Receiving task.
However, you can prevent the error from keep popping up by completing the following steps:
- On the Outlook ribbon, click the Send / Receive tab and next go to Send/Receive Groups > Define Send/Receive Groups (Fig. 9.).
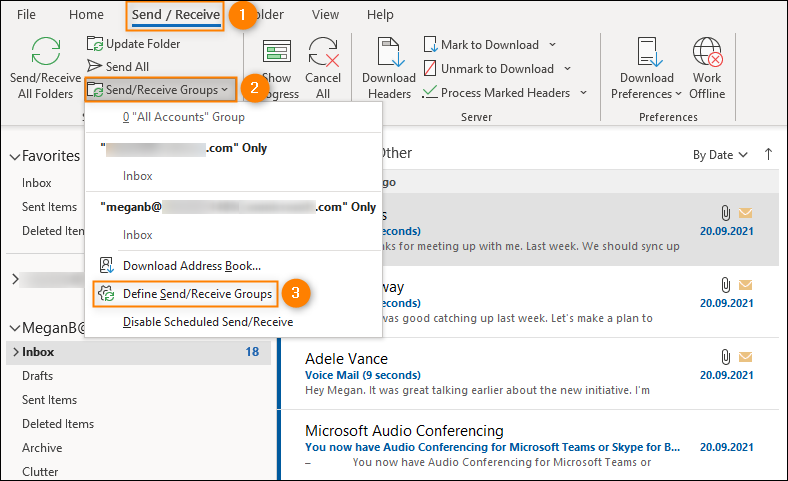
Fig. 9. Accessing Send/Receive groups.
Info
An alternative way to access the settings in Outlook 2010 / 2013 / 2016 / 2019 / Office 365 is: File > Options > Advanced > Send/Receive (button).
- Next, click New, specify the name for your new send/receive group in the pop-up that opens (e.g. Send only account), and click OK (Fig. 10.).
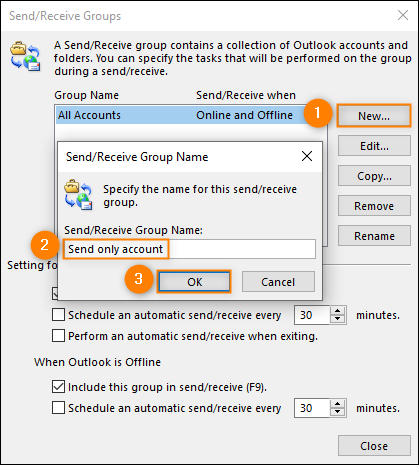
Fig. 10. Defining and naming a new send/receive group.
- The Send/Receive Settings dialog will open. In the Accounts area on the left (Fig. 11., item 1), choose the account that will be used to only send emails.
- Next, switch on the Include the selected account in this group checkbox (Fig. 11., item 2) and clear the Receive mail items checkbox below (Fig. 11., item 3).
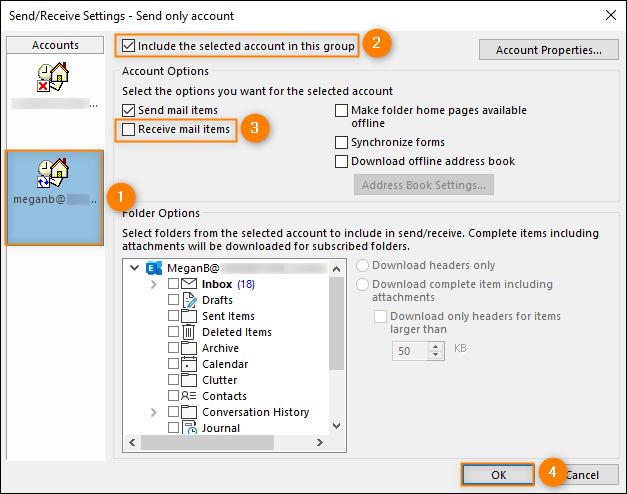
Fig. 11. Disabling email reception for your chosen account.
- Once you are back to the Send/Receive Groups dialog, open the All Accounts group by double-clicking it, or selecting it and using the Edit button (Fig. 12.). Outlook creates this group by default.
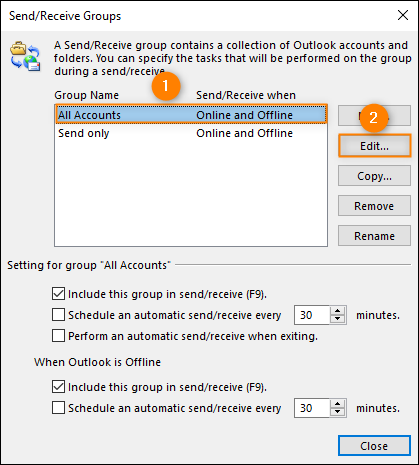
Fig. 12. Opening the default send/receive group named All Accounts.
- Verify if your send-only account is included in the All Accounts group by clicking the account in the Accounts area (Fig. 13., item 1). For this solution to work, the account should not be included. So if the Include the selected account in this group checkbox is selected, deselect it (Fig. 13., item 2) and click OK (Fig. 13., item 3).
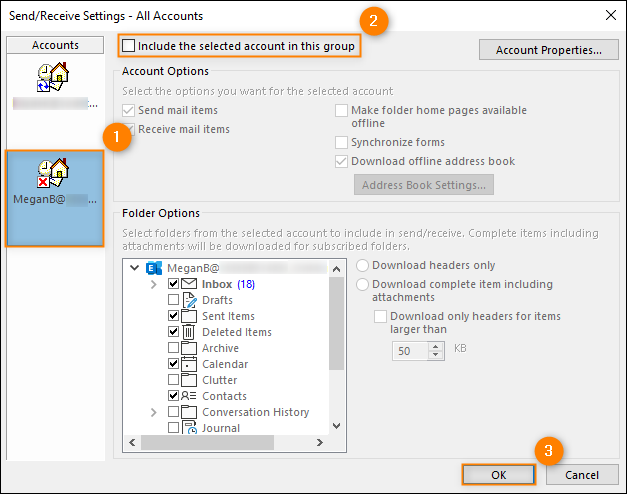
Fig. 13. Excluding the send-only account from the All Accounts group.
- Close the Send/Receive Groups dialog.
- From now on, you will no longer receive the Send/Receive error because Outlook will not perform the receive action for your send-only account.
| Related products: | CodeTwo Outlook Sync, CodeTwo Public Folders 4.0, 4.5, 5.x, General (Microsoft 365, Exchange & more) |
| Categories: | How-To |
| Last modified: | October 26, 2021 |
| Created: | February 6, 2009 |
| ID: | 81 |


