How to stop emails with null sender (e.g. automatic replies) from being routed through CodeTwo
Problem:
You want to stop emails with a null sender (like Microsoft 365 automatic replies or automated emails) from being routed through CodeTwo.
Solution:
Info
With the May 2024 update to CodeTwo Email Signatures 365, we added a new exception to the CodeTwo Exchange transport rule. With the new exception on board, the rule now more effectively identifies and excludes emails with the null sender address from being processed by CodeTwo. Learn more about this update
If the new exception is missing from the CodeTwo Exchange transport rule in your Microsoft 365 tenant, follow the steps below to add this exception manually.
Use one of the methods below to exclude auto replies (and other emails with a null sender) from going through the CodeTwo transport rule:
- Add an additional exception to the CodeTwo Exchange transport rule
- Create an additional transport rule to correct the behavior
Add an additional exception to the CodeTwo Exchange transport rule
The fastest way is to add a new exception to the CodeTwo Exchange transport rule in the following way:
- Sign in to the Exchange admin center.
- Navigate to Mail flow > Rules. Select the CodeTwo Exchange transport rule and click Edit rule conditions (Fig. 1.).
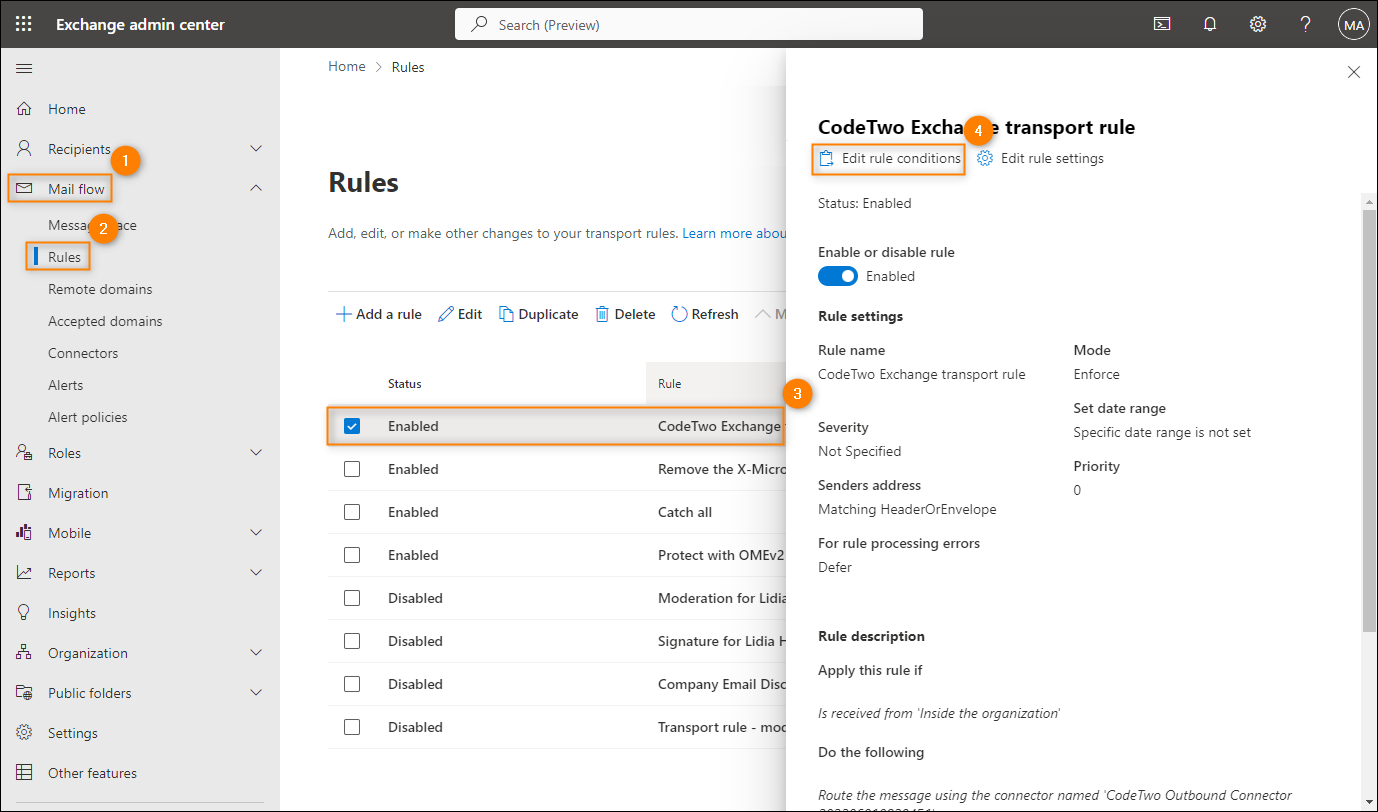
Fig. 1. Opening the CodeTwo Exchange transport rule for editing.
- In the Except if section, click the + button to add a new exception and use the drop-down lists to specify the following condition: The message headers > includes any of these words (Fig. 2.).
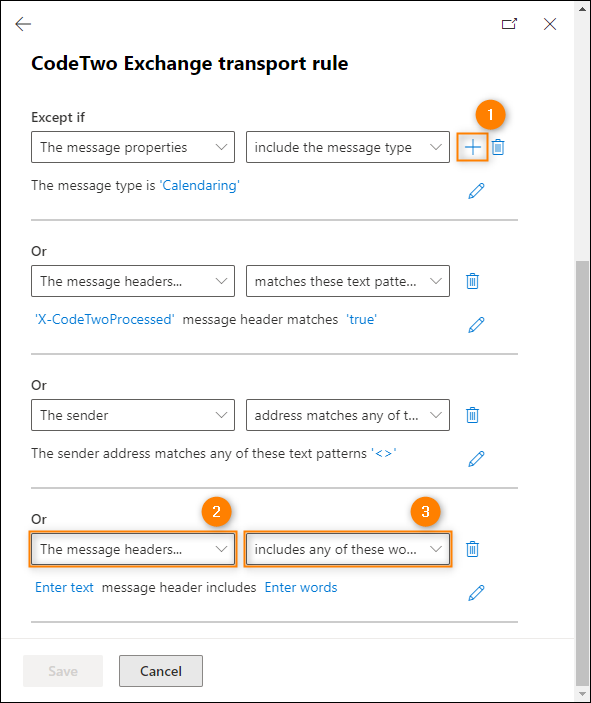
Fig. 2. Adding a new exception to the CodeTwo Exchange transport rule.
- Click the Enter text link below the drop-down lists (see Fig. 2.). In the pane that opens, type/paste the following header name: Return-Path, and click Save (Fig. 3.).
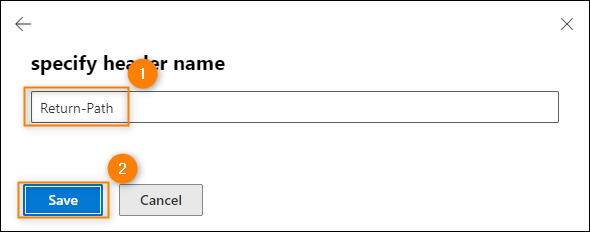
Fig. 3. Specifying the header name to use in the new exception.
- Click Enter words below the drop-down lists (see Fig. 2.). In the pane that opens, type/paste <> in the text field, click Add and then Save (Fig. 4.).
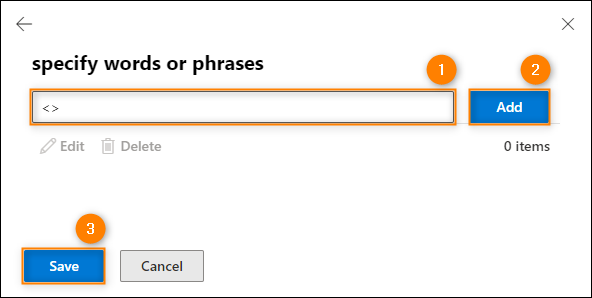
Fig. 4. Adding a header value to the exception.
- Finally, click Save to apply your changes and Done to close the rule editing pane. Wait up to 30 minutes for the changes to propagate.
Create an additional transport rule
The following alternative solution is also available when solution #1 does not apply to you (e.g. because you already use the exception to the transport rule explained in solution #1).
- Sign in to the Exchange admin center.
- Navigate to Mail flow > Rules, click Add a rule and select Create a new rule from the drop-down menu (Fig. 3.).
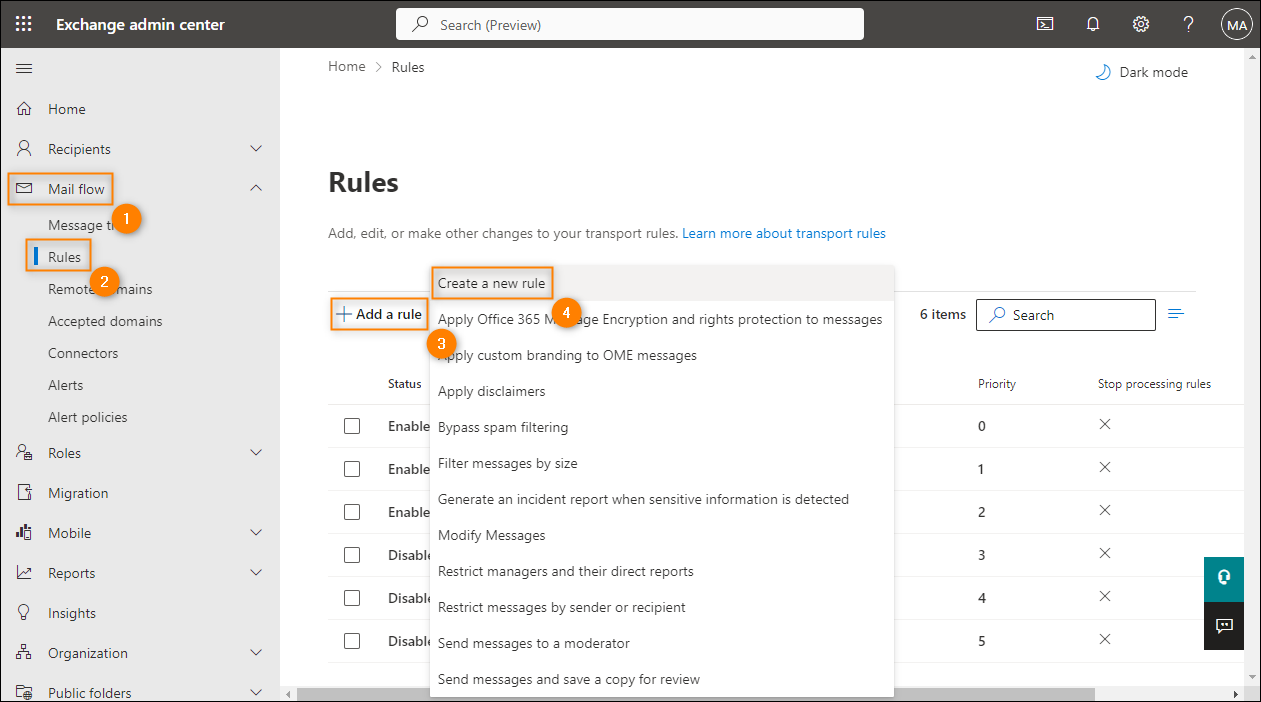
Fig. 3. Creating a new mail flow (transport) rule.
- A new transport rule wizard will open. First, name your rule (e.g. Exclude automatic replies).
- Next, under the Apply this rule if section, select The message properties > include the message type using the drop-down lists (Fig. 4.).
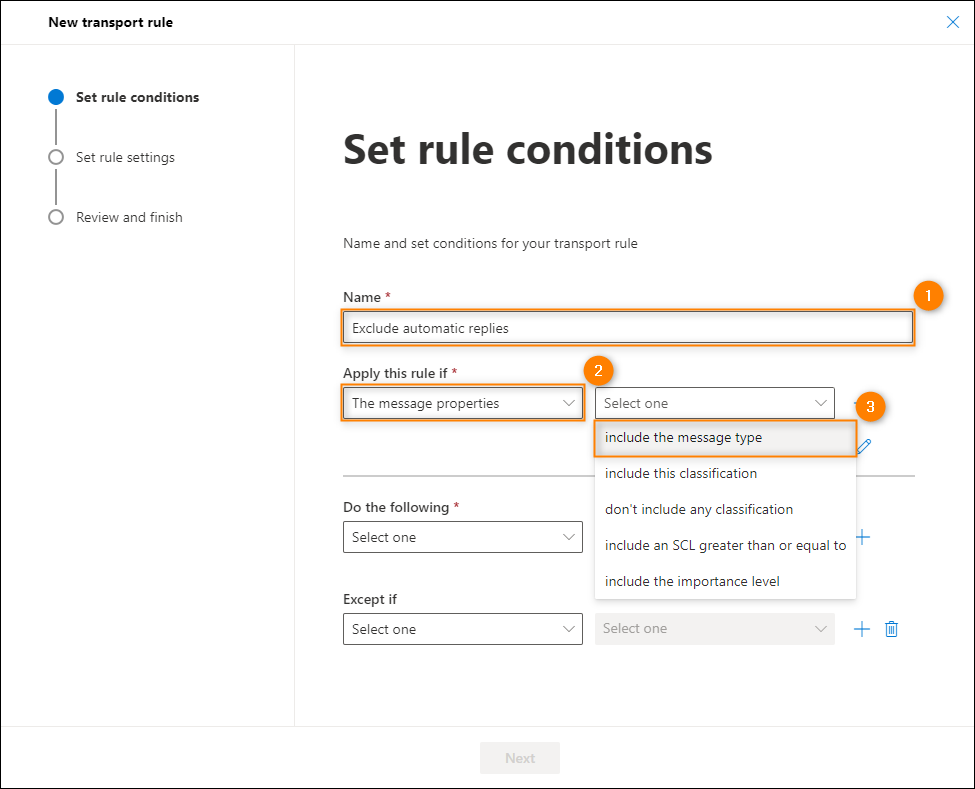
Fig. 4. Selecting the condition under which the rule will apply.
- In the pane that opens, select Automatic reply from the drop-down menu and click Save (Fig. 5.).
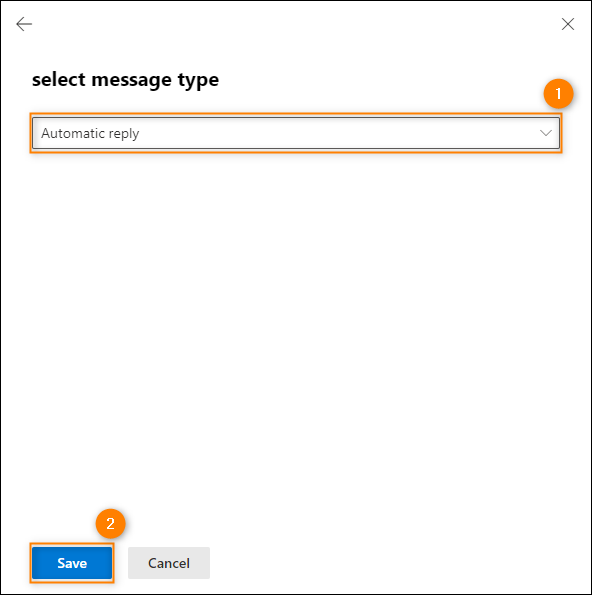
Fig. 5. Selecting the message type.
- Now, under the Do the following section, select Modify the message properties > set a message header using the drop-down lists (Fig. 6.).

Fig. 6. Defining the rule's action.
- Click the first Enter text link below the drop-down lists (see Fig. 6.). In the pane that opens, type/paste X-CodeTwoProcessed to set the message header and click Save (Fig. 7.).
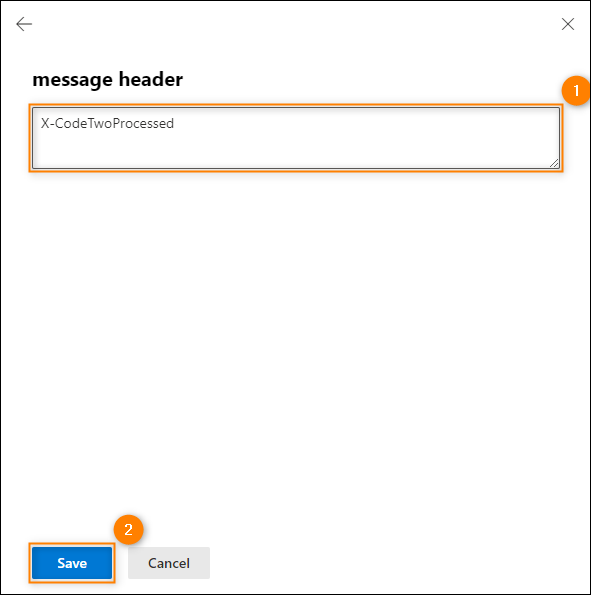
Fig. 7. Providing the header's name.
- Click the second Enter text link below the drop-down lists (see Fig. 6.). In the pane that opens, type true and click Save (Fig. 8.).
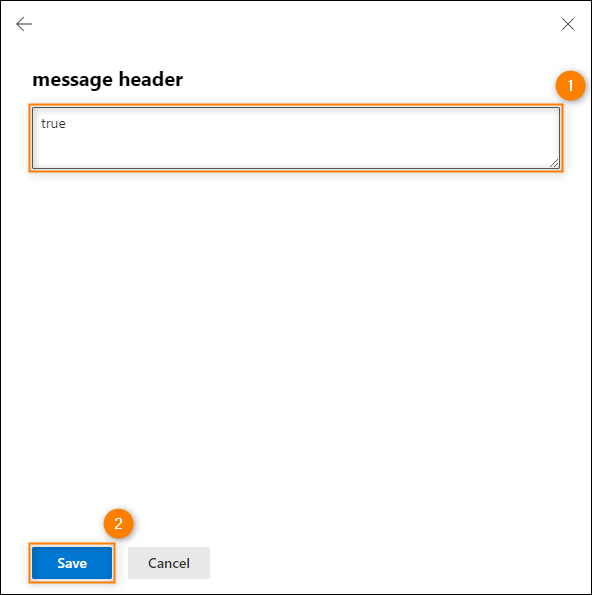
Fig. 8. Specifying the header's value.
- Click through the other steps of the wizard, leaving all the default settings and save your rule by clicking Finish and Done - it will appear on the rules' list.
- By default, the rule is disabled and has the lowest priority. For the rule to work properly, you should click it (to select it) and:
- turn it on by setting the toggle button to Enabled (see Fig. 9.)
- move it above the CodeTwo Exchange transport rule using the Move up button (Fig. 9.). That way, the new rule is processed first.
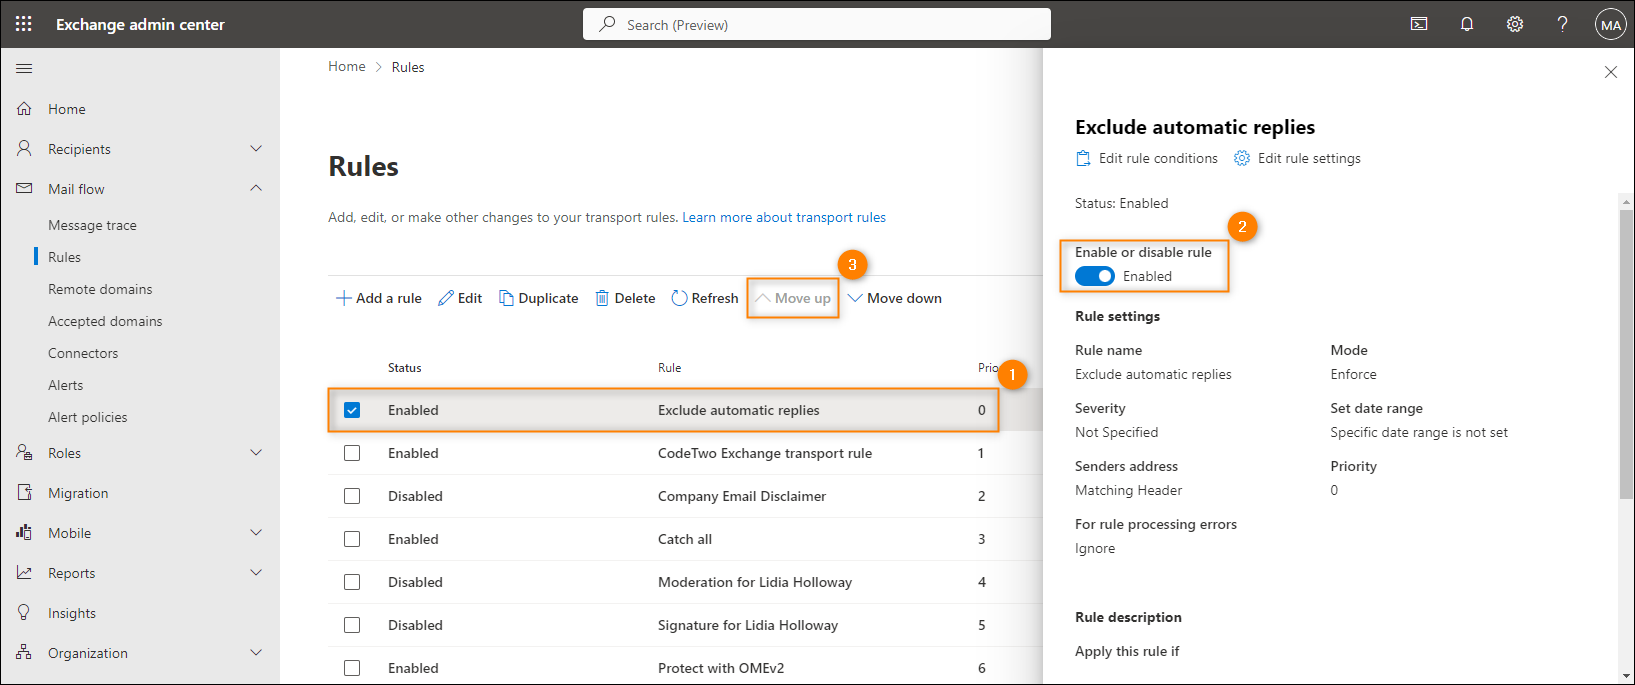
Fig. 9. Enabling the rule and setting its priority.
Important
It may take some time (up to 1 hour) before the changes you made are propagated and take effect.
See also:
| Related products: | CodeTwo Email Signatures for Office 365 |
| Categories: | How-To, Troubleshooting |
| Last modified: | May 21, 2024 |
| Created: | June 24, 2020 |
| ID: | 874 |


