How to force emails to go through a local Exchange server in a hybrid configuration
Problem:
You are using a hybrid environment feature called Centralized Mail Transport (CMT), which forces all external emails to be sent through the on-premises part of the environment.
However, all your emails that have signatures added by the CodeTwo cloud service are delivered to their intended recipients by your Microsoft 365 (Office 365) tenant instead by the on-premises Exchange server. Therefore, the CMT feature is not being respected.
Solution:
To fix this problem, you should first check if the CMT feature is actually enabled. If yes, you can create an additional connector and a mail flow (transport) rule that will force emails to be routed through your on-premises Exchange server.
Follow the links below to learn how to:
Check if Centralized Mail Transport is enabled
The easiest way to check if the CMT feature is enabled is to sign in to your local Exchange server and execute the following command in the Exchange Management Shell:
Get-HybridConfiguration | fl
Under Features, you should be able to find an entry named CentralizedTransport. If the entry is missing, the CMT is not enabled and you have to reconfigure your hybrid environment.
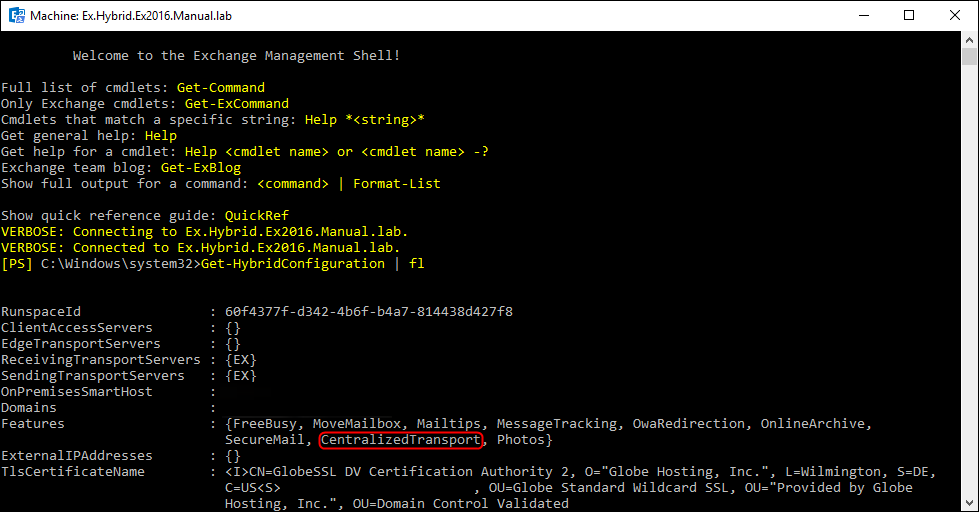
Fig. 1. Verifying that Centralized Mail Transport is enabled.
Force emails to go through an on-premises environment
If Centralized Mail Transport is enabled but is not respected in the case of emails processed by the CodeTwo cloud service, you can force these messages to go through the on-premises environment by creating an additional connector and a transport rule that makes use of it.
Create a clone of hybrid outbound connector
- Sign in to the Exchange admin center.
- Go to Mail flow > Connectors.
- Find a connector named Outbound to <GUID>. This connector is used to relay your messages to an on-premises environment.
- Click the connector, note down all configuration details which are shown in the right pane, and close the pane.
- Click the Add a connector button to open the wizard for creating a new connector.
- In the Connection from section, select Office 365.
- In the Connection to section, select Your organization's email server.
- In the next step, provide any name you want (e.g. ForceToOnPrem).
- In the third step, set the connector to be used Only when I have a transport rule set up that redirects messages to this connector (the second option).
- Complete the connector wizard using the details you have noted in step 5 above.
- Make sure the connector can be validated.
Once your new connector is ready, you can go ahead and create a transport rule that will make use of it.
Create a transport rule which forces emails to go through an on-premises environment
Important
Since the issue of emails not being routed through your local Exchange server is limited to messages that are coming back from the CodeTwo cloud service, it is necessary to limit the transport rule you are about to create to these messages only.
- In the Exchange admin center, go to Mail flow > Rules.
- Click the Add a rule button and select Create a new rule.
- Name your rule (e.g. Route emails from CodeTwo to On-Premises).
- Choose the following condition under the Apply this rule if section: The message headers > includes any of these words. Set the header name to X-CodeTwoProcessed and the value to true.
- In the Do the following section, add the following action: Modify the message properties > set a message header. Set the header name to X-AntiLoop-OnPremises and the value to true.
- Click the + button (in the Do the following section) to add another action: Redirect the message to > the following connector. In the pane that opens, select the connector you have created before from the drop-down list.
- In the Except if section, add the following exception: The message headers > includes any of these words. Set the header name to X-AntiLoop-OnPremises and the value to true.
- The final configuration should look similar to the one shown in Fig. 2.
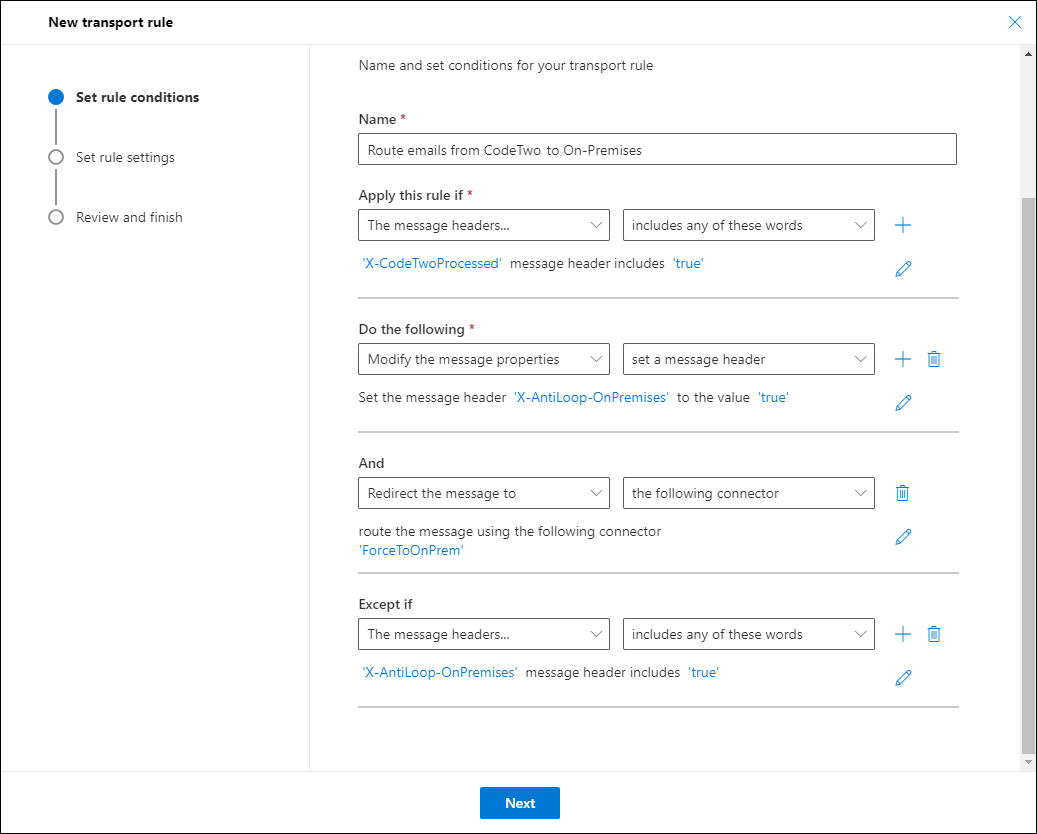
Fig. 2. The correct configuration of the transport rule that forces the CMT behavior.
- Next, click through the other steps of the wizard, leaving all the default settings and save your rule by clicking Finish and Done - it will appear on the rules' list.
- By default, the rule is disabled. To turn it on, click it (to select it) and, in the pane that opens, set the toggle button to Enabled (Fig. 3.).
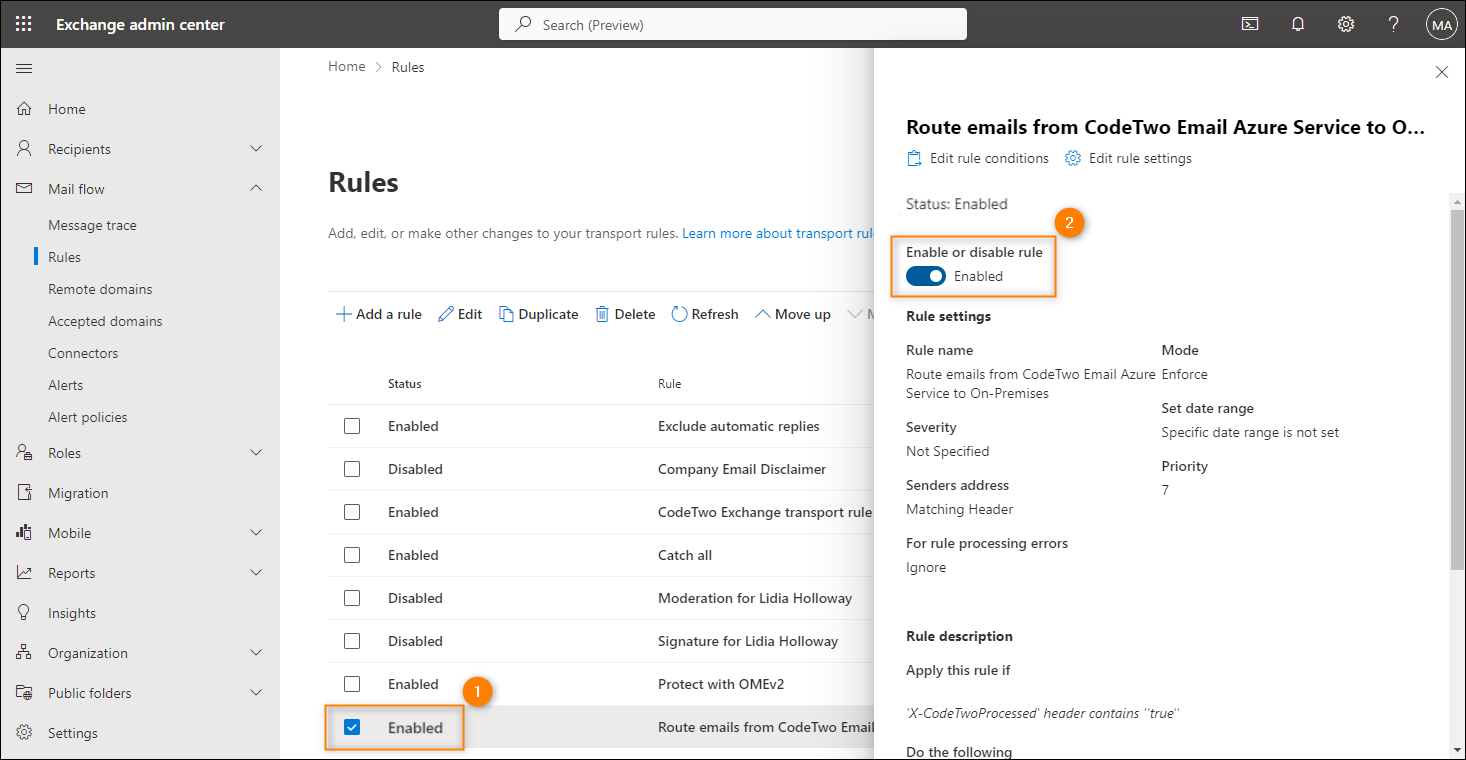
Fig. 3. Enabling the newly-created rule.
From now on, all messages that are routed through the CodeTwo cloud service will be sent via your local Exchange environment. That way, the Centralized Mail Transport is respected.
| Related products: | CodeTwo Email Signatures for Office 365 |
| Categories: | How-To, Troubleshooting |
| Last modified: | June 15, 2023 |
| Created: | April 28, 2020 |
| ID: | 862 |


