How to prevent calendar items, tasks and contacts sent from Outlook from being converted to emails
Problem:
When emails are routed through an external relay, such as the CodeTwo cloud service, the Exchange Online internal objects (which are internal parts of an email) undergo a conversion process. This is to ensure the best compatibility across all email systems (MIME), specifically for receiving servers that are not based on the Exchange platform (like Microsoft 365) and might not understand the Exchange proprietary email format (also known as TNEF).
As a result, these converted items, such as calendaring objects (meetings and appointments), tasks, contacts, Outlook polls and recall requests, may arrive in recipients' inboxes and not work correctly. For instance, a recall request might not be recognized at all and be received just like a regular email.
In the case of emails that are not routed through the CodeTwo service, the calendar items, tasks and contacts are embedded correctly because the automatic conversion described above does occur.
Solution:
You need to intentionally prevent the conversion from happening by providing domain-level exceptions. Considering the capabilities of different (non-Microsoft) mail systems, you should follow these guidelines:
- For all external recipients you must not prevent the automatic conversion.You should never set the TNEF format as applicable for the Default remote domain definition in your tenant, otherwise external recipients might start to receive winmail.dat attachments along with incorrectly formatted emails.
- For all internal recipients and for other external organizations using Microsoft 365 (Office 365) / Exchange platform the conversion needs to be prevented.For each internal domain and each of external domains belonging to an organization that definitely uses the Microsoft 365 / Exchange platform, you need to create a separate remote domain definition for which the conversion must be turned off as described in each of the procedures below.The only exception is when users in a particular internal domain use an email system or an email client that does not support the TNEF format (like Mozilla Thunderbird). Otherwise, their email clients won’t be able to read attachments in the TNEF format (they’ll always appear as winmail.dat or win.dat) and email formatting may be broken.
When using CodeTwo Email Signatures 365, attachments in the TNEF format are always converted when they pass through the CodeTwo outbound connector regardless of if they are sent to an internal or external recipient. In other words, they are not converted by the CodeTwo cloud service but are treated as if they were sent to an external domain.
Enabling the TNEF format for internal domains / organizations definitely using Microsoft 365 (or Exchange) does not come with any drawbacks, as, in fact, it restores the default internal configuration.
You can configure TNEF conversion options for remote domains:
Configure TNEF conversion options for remote domains in Windows PowerShell
- Connect to your Exchange Online using Windows PowerShell (refer to this article to learn how to do so).
- Run the following cmdlet:
Get-RemoteDomain | fl Identity, TnefEnabled
to display all remote domains configured in your Microsoft 365 organization. If the TNEFEnabled parameter returns no value (Fig. 1.), it means that messages in the TNEF format are converted if sent to that domain.

Fig. 1. Listing remote domains in Windows PowerShell.
- If the cmdlet returns only the Default remote domain, as shown in Fig. 1., it means that a remote domain is not configured in your organization. If so, create a new remote domain by using this command:
New-RemoteDomain "example.com" -DomainName "example.com"
where the -DomainName value (example.com) matches the domain name of the primary SMTP address used in your organization (Fig. 2.).Important
Keep in mind that the value is case-sensitive. For example, if your domain name of the primary SMTP address is example.com, and you use Example.com in the cmdlet above instead, your changes to the TNEF conversion options won't be applied correctly.

Fig. 2. Creating a new remote domain.
- Change the TNEFEnabled parameter to True for all remote domains listed in step 2 (other than Default) and/or for the new remote domain created in step 3. To do so, use the following cmdlet:
Set-RemoteDomain "<remote domain name>
where <remote domain name> is the name of your remote domain (e.g. example.com)." -TnefEnabled $true
Important
You can change the default remote domain options by using * instead of providing the name of a remote domain
- Verify that TNEF conversion options have been changed for your remote domain by using the same cmdlet as shown in step 2. The TNEFEnabled parameter should be set to True, as shown in Fig. 3.
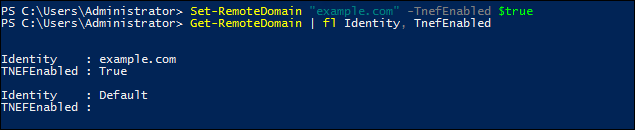
Fig. 3. Changing and verifying the change of TNEF conversion options.
From now on, calendar items, tasks and contacts forwarded as attachments will retain their format when sent to the domains you specified.
Info
It can take some time for this change to fully propagate across your Microsoft 365 tenant.
Configure TNEF conversion options for remote domains in the Exchange admin center
- TNEF configuration for a remote domain already added to your Microsoft 365 tenant
- TNEF configuration for a remote domain not yet added to your Microsoft 365 tenant
TNEF configuration for a remote domain already added to your Microsoft 365 tenant
- Sign in to the Exchange admin center of your Microsoft 365 tenant.
- Go to Mail flow > Remote domains and select your remote domain from the list.
- In the pane that opens, click Edit text and character set.
- Under the Use rich-text format heading, select the Always option (Fig.4.).
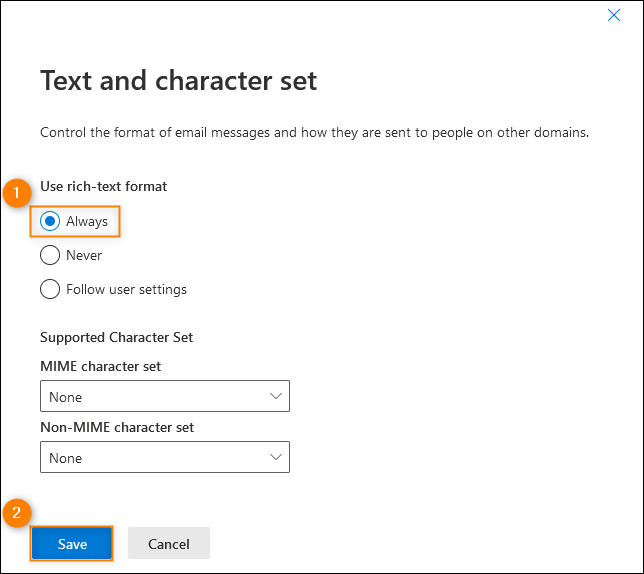
Fig. 4. Enabling the sending of messages in the TNEF format to a remote domain already added to your tenant.
- Click Save to apply the new settings.
From now on, calendar items, tasks and contacts forwarded as attachments will retain their format when sent to your domain that has already been added to your Microsoft 365 tenant.
TNEF configuration for a remote domain not yet added to your Microsoft 365 tenant
If you only see the Default remote domain on the list, you need to add your remote domain to your Microsoft 365 tenant and specify its TNEF conversion options. To do so, follow the instructions below.
- Complete the steps 1–2 from the procedure above, and click Add a remote domain button (Fig.5.) to launch the wizard for adding a new remote domain.
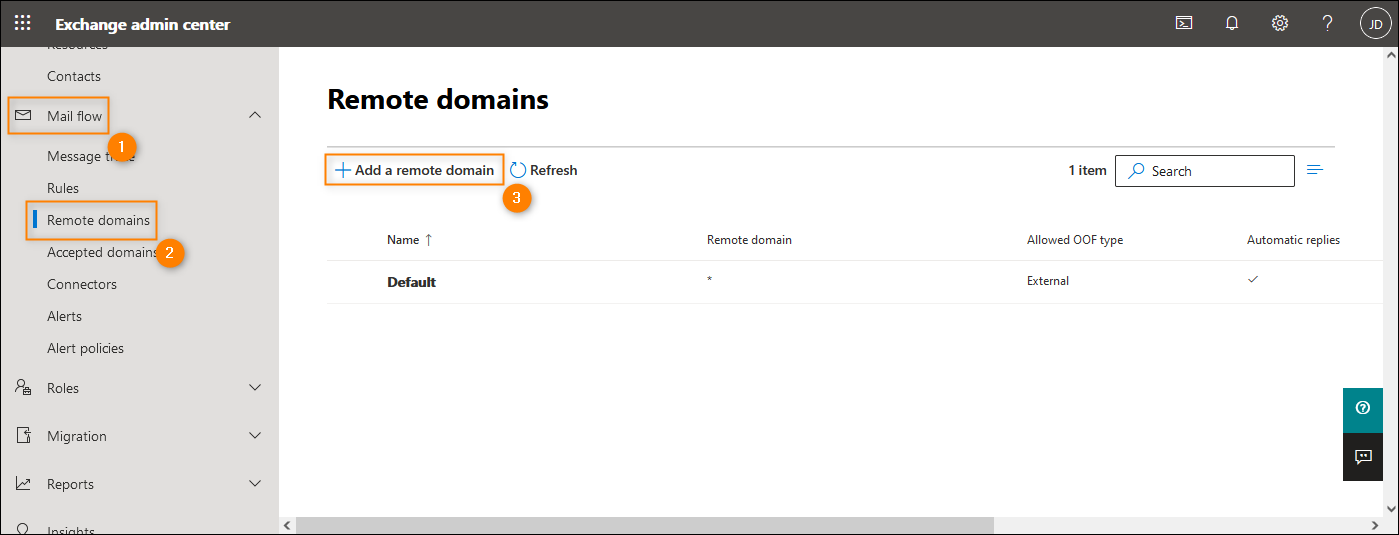
Fig. 5. Adding a new remote domain in the Exchange admin center.
- In the first step of the wizard, be sure to enter the same domain name as used in the primary SMTP address of the organization in the Remote Domain field (Fig. 6.).
Important
Keep in mind that the value you enter in the Remote domain field is case-sensitive. For example, if your domain name of the primary SMTP address is example.com, and you enter Example.com instead, your changes to the TNEF conversion options won't be applied correctly.
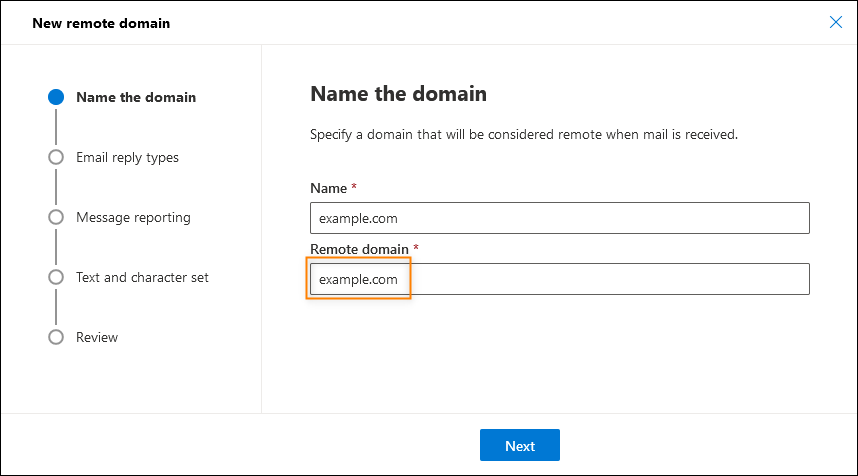
Fig. 6. Entering the name of a new remote domain in the Exchange admin center.
- Use the default settings in the second and third steps of the wizard (Email reply types, Message reporting) by simply clicking Next.
- In the fourth step, select the Always option under the Use rich-text format heading (Fig. 7.).
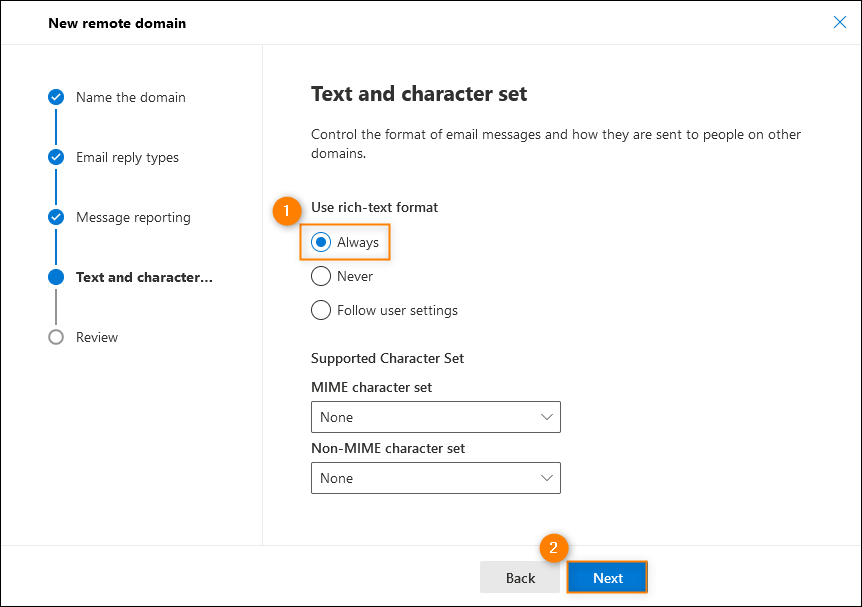
Fig. 7. Enabling the sending of messages in the TNEF format to a newly added remote domain.
- Click Next to go to the last step of the wizard. Once there, click Save and Done to save your settings.
From now on, calendar items, tasks and contacts forwarded as attachments will retain their format when sent to the domain you've just added to your Microsoft 365 tenant.
| Related products: | CodeTwo Email Signatures for Office 365 |
| Categories: | How-To, Troubleshooting |
| Last modified: | June 15, 2023 |
| Created: | July 24, 2020 |
| ID: | 884 |






