AD attributes in CodeTwo Exchange Rules and CodeTwo Exchange Rules Pro
In this article you can learn about the Active Directory attributes available in the Editor of CodeTwo Exchange Rules and CodeTwo Exchange Rules Pro.
The software from the CodeTwo Exchange Rules family is targeted at on-premises Exchange Server environments. The attributes available in the Editor are based on Active Directory (AD). The software caches the values of AD attributes locally (and refreshes this data once per hour) to use them in email signatures. CodeTwo does not have access to your AD attributes - they can only be accessed by authorized people in your organization.
The usage of placeholders is not limited to signatures. You can also add them when you define recipients of forwarded messages in CodeTwo Exchange Rules Pro. Learn more
A table containing the list of all placeholders available in the program is shown below. It includes the types and names of the placeholders and describes their availability in various message template formats.
Info
Apart from using the predefined set of AD attribute placeholders, you can also use your own Active Directory attributes as placeholders, after defining them in the Custom placeholders section in the program's settings.
| Attribute type | AD attribute (placeholder) name | Template format |
|---|---|---|
| Message sender | {City} | HTML / RTF / Plain Text |
| {Company} | HTML / RTF / Plain Text | |
| {Country} | HTML / RTF / Plain Text | |
| {Department} | HTML / RTF / Plain Text | |
| {Description} | HTML / RTF / Plain Text | |
| {Display name} | HTML / RTF / Plain Text | |
| {Email} | HTML / RTF / Plain Text | |
| {Email as link} | HTML | |
| {Fax} | HTML / RTF / Plain Text | |
| {First name} | HTML / RTF / Plain Text | |
| {Home phone} | HTML / RTF / Plain Text | |
| {Initials} | HTML / RTF / Plain Text | |
| {IP phone} | HTML / RTF / Plain Text | |
| {Last name} | HTML / RTF / Plain Text | |
| {Mobile} | HTML / RTF / Plain Text | |
| {Notes} | HTML / RTF / Plain Text | |
| {Office} | HTML / RTF / Plain Text | |
| {P.O. Box} | HTML / RTF / Plain Text | |
| {Pager} | HTML / RTF / Plain Text | |
| {Phone} | HTML / RTF / Plain Text | |
| {Photo} | HTML | |
| {Postal code} | HTML / RTF / Plain Text | |
| {State} | HTML / RTF / Plain Text | |
| {Street} | HTML / RTF / Plain Text | |
| {Title} | HTML / RTF / Plain Text | |
| {Web page} | HTML / RTF / Plain Text | |
| {Web page as link} | HTML | |
| {ExchAttr1} - {ExchAttr15} | HTML / RTF / Plain Text | |
| Custom placeholders | HTML / RTF / Plain Text | |
| Dynamic content | {Rotating image} | HTML / RTF |
| {Rotating text} | HTML / RTF / Plain Text | |
| Message properties | {Recipient Address} | HTML / RTF / Plain Text |
| {Message Subject} | HTML / RTF / Plain Text | |
| {Sending Server} | HTML / RTF / Plain Text | |
| {Message ID} | HTML / RTF / Plain Text | |
| {Message Date} | HTML / RTF / Plain Text | |
| Counters | {Counter} | HTML / RTF / Plain Text |
| {Unique counter} | HTML / RTF / Plain Text | |
| Other | {Current Date/Time} | HTML / RTF / Plain Text |
| {QR Code image} | HTML | |
| {Unsubscribe link} | HTML / RTF / Plain Text |
The {Photo} placeholder
This placeholder is used by the program to pull your users' photos from Active Directory and insert them into emails. This placeholder also lets you customize the dimensions of AD photos. Once you add it to your template in the Editor, you can decide to (Fig. 1.):
- insert photos in original dimensions,
- adjust the dimensions to a desirable size in pixels.
While adjusting the photo, either use one dimension (this way the program will scale the photo, keeping its original aspect ratio) or enter both dimensions (the program will scale the photo to the selected values).
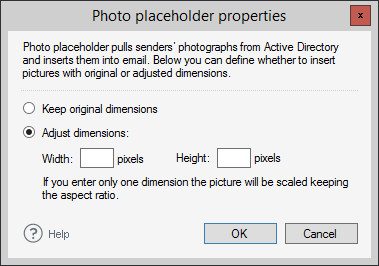 |
| Fig. 1. The {Photo} placeholder's configuration window. |
Tip
You can use our freeware application, CodeTwo Active Directory Photos, to easily upload your photos to Active Directory.
Learn how to add user photos to signatures in CodeTwo Exchange Rules
Learn how to add user photos to signatures in CodeTwo Exchange Rules Pro
The {Web page as link} placeholder
This placeholder allows you to pull a webpage address from your Active Directory and insert it as a valid hyperlink. The web address should be preceded by a proper protocol definition (like HTTP or HTTPS). In the case when this information is missing, the program will automatically append the HTTP protocol to the very beginning of the link.
The {Rotating text} and {Rotating image} placeholders
These placeholders are used to include text or graphics from a desired folder. The content is changed in a random or sequential mode (depending on how you configured it), every time when a message is going through Exchange Server. To configure the placeholder, simply right-click it and select Properties. There you can define the FolderPath from where the text/images should be pulled and the mode of operation (WorkingMode). To limit which file extensions should be included in the process, use FileMask. Moreover, in the case of {Rotating text}, you can also set the Formatting field to make the text e.g. in upper or lower case.
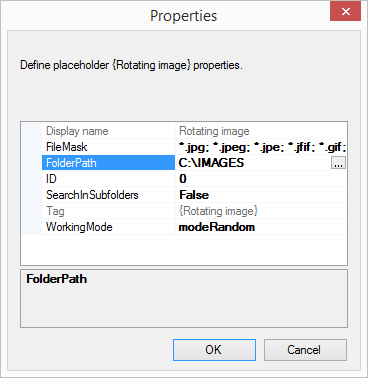
Fig. 2. The {Rotating image} placeholder's configuration window.
See this Knowledge Base article for more information about creating emails with rotating images and rotating links
Date and time related placeholders
You can customize the format of date and time in many different ways. For more information, see this KB article.
Counters
The {Counter} placeholder lets you add a counter to any part of the email: the body, the subject field, or the signature. The counter shows a numerical value that increases by 1 on each occurrence. If you use this placeholder more than once in a single email, the counter will display a different, growing value every time it appears in the email, for example 504 in the subject field and 505 in the signature.
The {Unique counter} placeholder generates a random string of letters and digits, for example: 6HG12422. If used more than once, the counter displays a different value on every occurrence.
The {QR Code image} placeholder
Once you choose to insert the {QR Code image} placeholder, its configuration window appears (Fig. 3.). There, you can generate (directly within the program) a QR code image based on a bare text value or on variables from Active Directory.
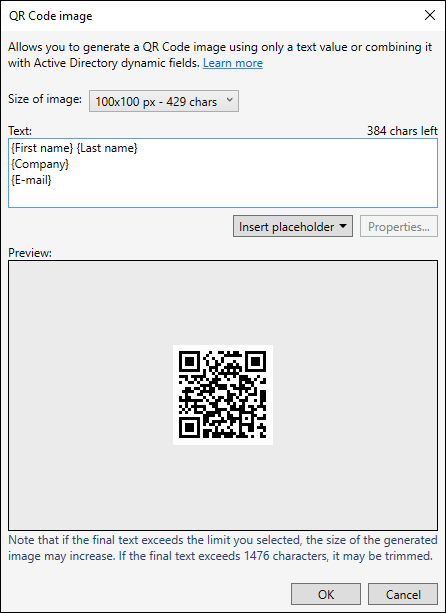
Fig. 3. The {QR Code image} placeholder's configuration window.
The QR Code image configuration window is divided into four sections:
- Size of image - here you define the actual size of an image in pixels; this section additionally shows how many characters (chars) the image may contain. If you exceed the shown character limit, the program will automatically increase the size of the inserted QR Code image. The maximum limit is 1476 characters. If you go beyond this limit, your text may be trimmed.
- The Text field - here you can type the text value that will be used to generate the image. You can also use placeholders that will be replaced with Active Directory data. You can enter placeholders manually or select them by using the Insert placeholder button. Furthermore, by right-clicking any placeholder within the Text field and choosing Placeholder properties, you can also change each of placeholder's properties. Keep in mind that once you save your changes and open the QR Code image configuration window again, the properties of a placeholder will be available only via the Properties button.
- Insert placeholder - instead of typing the placeholder manually, you can use this button to automatically insert a desirable placeholder by choosing it from the provided list.
- The Preview field - shows what your QR code image will look like.
See this Knowledge Base article to learn how to insert vCards as QR codes in email signatures.
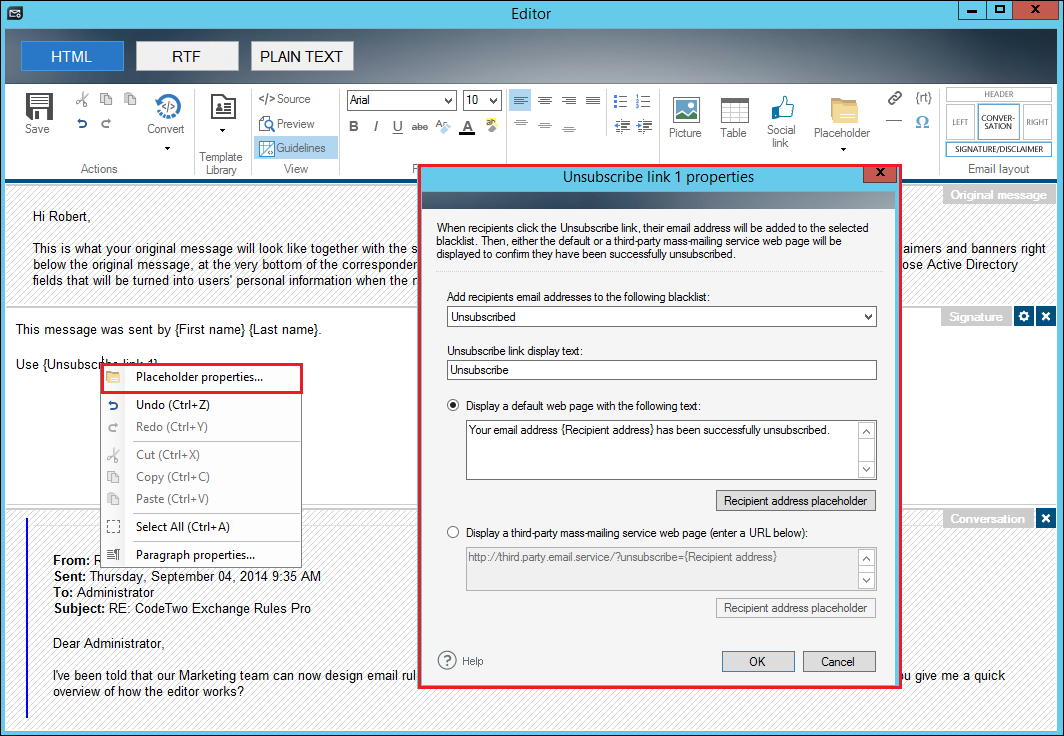
The {Unsubscribe link} placeholder
This placeholder is only available in CodeTwo Exchange Rules Pro. It is used to create a personalized link (triggering the unsubscribe mechanism) that will be included in the outgoing emails. Once such a link is clicked, it will unsubscribe the email recipient from any messages coming from a particular sender/group/whole company (depends on the conditions defined) and block them against reaching the recipient's mailbox.
Learn how to configure the program to enable mechanism unsubscribing from a mailing list
When you add the {Unsubscribe link} placeholder (using the Placeholder button on the Editor’s toolbar), the configuration window opens (Fig. 4.) in which you can define the following settings:
- Add recipients' email addresses to the following blacklist - this is the container to which the email address of the recipient who unsubscribes from the mailing list is added. Note that you can manage the blacklists and the recipients included in the lists (add new or edit/remove the existing recipients) via the Recipients blacklists tab in the program's settings.
- Unsubscribe link display text - this is the text representing the link that appears in an email used for unsubscribing a recipient from a mailing list.
- Display a default web page with the following text - this is the information that will be displayed on the default landing page provided by CodeTwo once a recipient clicks the unsubscribe link in a received email. Note that this information can be customized by adjusting the text and inserting the recipient's email address placeholder.
- Display a third-party mass-mailing service web page (enter a URL below) - this feature is the alternative to the above-mentioned default landing page provided by CodeTwo. If you do not want to use the default web page provided, you can enter the URL of your own web page that will be displayed once the recipient of your message clicks an unsubscribe link in the received email. Note that after choosing this page, you will not be able to adjust its text. Furthermore, the only option to customize it via the program is adding the recipient's email address placeholder that will be filled by the program and visible in the URL only.
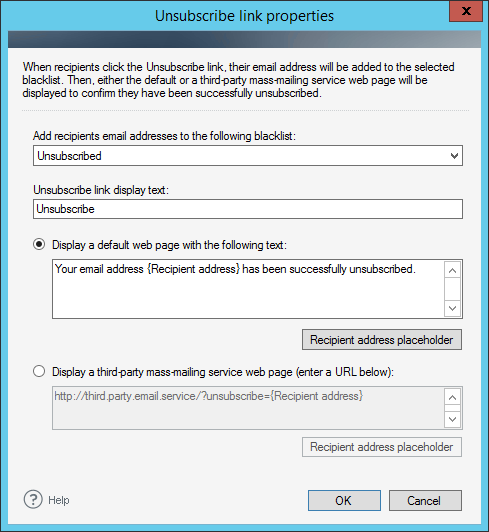 |
| Fig. 4. The {Unsubscribe link} placeholder's configuration window. |
Note that you can change the placeholder's configuration at any point after it was saved. Open your signature/disclaimer template in the Editor, right-click your {Unsubscribe link} placeholder and from the context menu choose Placeholder properties... (Fig. 5.).
 |
| Fig. 5. Opening the placeholder's properties window. |