Troubleshooting Sent Items Update in CodeTwo Email Signatures On-prem
This article applies to the Sent Items Update service used in CodeTwo Email Signatures On-prem and the deprecated CodeTwo Exchange Rules family of products.
If you are using CodeTwo Email Signatures 365, see this article for troubleshooting.
Problem:
The Sent Items Update service (SIU) in your CodeTwo software for on-prem Exchange cannot properly connect with Exchange Web Services (EWS). As a result, signatures are not added to emails in the Sent Items folder.
In the log files, you may find the following errors:
The request failed. The remote server returned an error: (401) Unauthorized.
The account does not have permission to impersonate the requested user.
The request failed. The remote name could not be resolved.
Solution:
The Sent Items Update service failure is caused by a wrong configuration that prevents the service from connecting with your Exchange Web Services, impersonating users, and finally adding the signatures to sent emails. To resolve the problem, you need to verify if the EWS connection can be established and if the account used with the service is able to impersonate others.
- Find the right local endpoint
- Create a service account
- Reinitiate and test the Sent Items Update service configuration
Important
Note that access to EWS must be enabled to establish the connection. Therefore, make sure that EWS access is not blocked – for instance, by EWS access controls or such settings as Disable organization-wide access to Exchange Web Services (EWS) available as part of the Baseline Security Mode (BSM) in the Microsoft 365 admin center. Learn more about controlling access to EWS
Find the right local endpoint
First, you need to identify the server that the Sent Items Update service should connect to. The steps below show how to find the correct connection URL for single- and multi-server Exchange environments and how to test if the endpoint is working correctly.
Warning
If you are constantly being asked for credentials during the tests, it means there is a problem with the account you are testing or with the allowed authorization methods.
However, if you provide these credentials but the browser still returns an HTTP error page, it means that there is a problem with your Exchange server itself.
Single-server Exchange environments
If you are running just one server in your Exchange organization, it means it is able to handle the EWS connection. In this case, you can use the localhost name (the entire URL would be: https://localhost/EWS/Exchange.asmx) to configure the Sent Items Update service.
To make sure the EWS protocol is working correctly, you should open your browser directly on that Exchange server and navigate to the following address:
https://localhost/EWS/Exchange.asmx
Important
At this point, your browser may ask you for credentials – if you have created an account for the Sent Items Update service manually, you should log in with its credentials. Otherwise, you can use any account with a mailbox.
Multi-server Exchange environments (Exchange 2016 and later)
If your Exchange organization consists of more than one Exchange server, you should first check if all servers are Mailbox servers. If so, you can use the localhost name as well (the entire URL would be: https://localhost/EWS/Exchange.asmx) to configure the Sent Items Update service.
However, if any Exchange server in your environment doesn’t run the Mailbox role, you need to find one which runs that role and is best in terms of overall performance. Next, you should determine its Fully Qualified Domain Name (FQDN) or an IP address because you will need it to properly configure the Sent Items Update service.
To check the FQDN of your chosen server with the Mailbox role, log in to it and run the Command Prompt (cmd.exe). In the Command Prompt window, execute the following command:
echo %COMPUTERNAME%.%USERDNSDOMAIN%
The Mailbox server’s FQDN should be displayed in the next line (Fig. 1.). Write it down or copy it to a convenient place because you will need it later on. The IP address can be identified similarly via the ipconfig command.
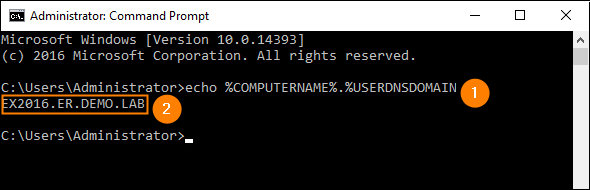
Fig. 1. Obtaining your Mailbox server’s FQDN.
Now, you need to test the connection with Exchange Web Services from another server:
- Log in to an Exchange server that is not a Mailbox server.
- Open a new browser window.
- Navigate to the following URL:
https://<FQDN>/EWS/Exchange.asmxWhere the <FQDN> part should be the Fully Qualified Domain Name of the Mailbox server you have obtained earlier (as shown in Fig. 1.).
Important
At this point, your browser may ask you for credentials – if you have created an account for the Sent Items Update service manually, you should log in with its credentials. Otherwise, you can use any account with a mailbox.
Create a service account
While the software can create the account automatically, you can also create it manually. If you decided to create the account manually, please keep in mind that according to the User Guide, the account requires:
- to have a valid User Principal Name (UPN) assigned,
- to be a member of the Domain Users group,
- impersonation rights (see our Knowledge Base article on how to set impersonation rights manually),
- to be in a working condition (it cannot be disabled, needs to have a valid password, etc.).
Learn more on Sent Items Update service requirements
Reinitiate and test the Sent Items Update service configuration
Once you have found the correct URL for the EWS endpoint and prepared the service account, you should reinitiate the configuration of Sent Items Update. To do so, please follow these steps:
- Navigate to each server where CodeTwo software is installed.
- Run services.msc and stop the CodeTwo Sent Items Update or CodeTwo Exchange Rules Sent Items Update service (the service’s name depends on the CodeTwo program you’re using).
- Go to folder
%programdata%\CodeTwo Email Signatures On-prem\Config
or%programdata%\CodeTwo Exchange Rules\Config
and either:- remove the file named SentItemsUpdate.Service.xml and continue from step 4 below, OR
- open the SentItemsUpdate.Service.xml file with any text editor (e.g. Notepad), find the EWSUrl setting and change
<EWSUrl i:nil="true" />
to contain the proper EWS address as IP, e.g.<EWSUrl>https://192.168.0.10/EWS/Exchange.asmx</EWSUrl>
or FQDN, e.g.<EWSUrl>https://exserv1.mydomain.com/EWS/Exchange.asmx</EWSUrl>
Once you've edited the XML settings file manually, restart the CodeTwo Sent Items Update / CodeTwo Exchange Rules Sent Items Update service and continue from step 10 below.
- Start the CodeTwo Sent Items Update / CodeTwo Exchange Rules Sent Items Update service.
- Open the Administration Panel of the software and click the Settings button in the top menu.
- Make sure you are on the Sent Items Update tab and click the Change button next to Account.
- On the On-premises server connection tab, select Configure connection manually and use the EWS URL you have obtained earlier (Fig. 2.).
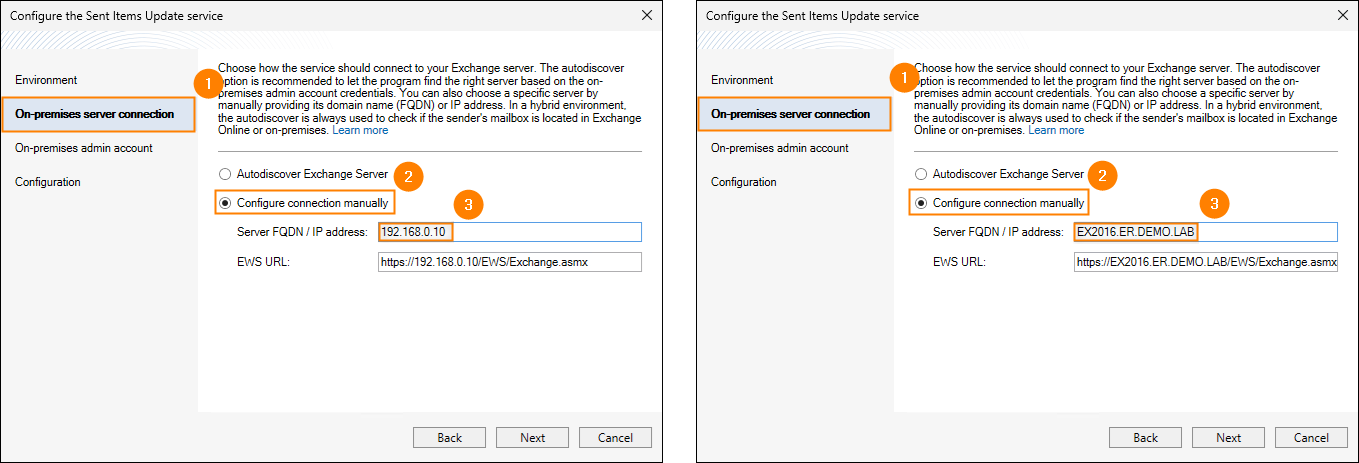
Fig. 2. Configuring the Sent Items Update service manually by using your Mailbox server’s IP address or FQDN.
- On the On-premises admin account tab, either allow the software to create the account for you or choose the one you have created manually.
- Make sure the wizard is finished with all the ticks green.
- Send a test message.
- Open your OWA and check if you are able to see your signatures in the Sent Items folder.
Important
If you are able to see your signatures in OWA but not in Outlook on your desktop, it may be because you have enabled the Cached Exchange Mode in your Outlook. Because of that, your Outlook may not be able to retrieve stamped messages while they were actually updated on the server. See this article to learn more.
See also
| Related products: | CodeTwo Email Signatures On-prem, CodeTwo Exchange Rules 2007 4.x, CodeTwo Exchange Rules 2010 3.x, CodeTwo Exchange Rules 2013 2.x, CodeTwo Exchange Rules 2016 1.x, CodeTwo Exchange Rules 2019 1.x, CodeTwo Exchange Rules Pro 2.x |
| Categories: | Troubleshooting |
| Last modified: | May 26, 2026 |
| Created: | June 18, 2014 |
| ID: | 383 |


